Build and Package an NPM Component with esbuild, React and TypeScript
Looking for a simple, straightforward, development environment for a React component(s) that can be bundled and packaged for NPM distribution? Here’s our team’s approach using esbuild, TypeScript and React.
Quick background
Recently our dev team at Northwestern University Libraries set out to create an open-source, image, audio and video viewer component to display items from our Digital Collections UI application.
- Re-use the component in a variety of applications
- Establish a simple development environment (featuring live reloading, fast bundling, etc), without using extra helpers like Create React App, Next.js, etc.
- Package for easy NPM distribution
- A public API for how to use this component via types and IntelliSense support in any IDE (via TypeScript)
Although there are many helpful articles on varying combinations of the above technologies, we thought we’d share our particular use case.
If you’d like to jump straight to the code, here’s an example repo of the final code: https://github.com/adamjarling/medium-es-build-article-demo.
esbuild
esbuild is gaining a lot of traction lately due to its simplified API, speed, native support for TypeScript and a host of other great features. It seemed a more streamlined approach so we’ll use this as our JavaScript bundler/packager.
It might prove helpful to reference esbuild’s API when reading through this article or following the steps to set up your project in case you’d like to adjust your config.
Set up the project
First, create a new directory for your project and enter the project. Let’s next initialize npm and git in your project to get a package.json file. Go ahead and accept all the command prompt defaults for now (you can always update later).
// Create your new project directorymkdir my-awesome-projectcd my-awesome-project// Initialize npmnpm init// Initialize gitgit init
Set up the development environment
Let’s get a development environment up and running. First, we’ll install some initial development dependencies:
// Install development dependenciesnpm install -D esbuild typescript chokidar rimraf live-server
chokidar used to watch for changes in our code to help with live reloading.
rimraf used to clean up our output directory to ensure fresh, clean files.
live-server is a lightweight local webserver we’ll use to serve the dev environment so you can see your work in a browser.
Next, we’ll install React and its types (so TypeScript knows the syntax), which is a dependency our app needs to run in the browser.
npm install react react-dom @types/react @types/react-dom
Add dev environment project structure
Now let’s add some initial development environment files in our project. We’ll start with two boilerplate config files, .gitignore and tsconfig.json. Create them at the project root:
touch .gitignoretouch tsconfig.json
To get started, you can copy the contents of this file into .gitignore and this file into your TypeScript configuration file, tsconfig.json
/public
Let’s create a directory called /public which will contain files our local dev server will use.
// Create dev environment filesmkdir publiccd publictouch index.html
Copy the contents of this file into your /public/index.html.
<div id="root" />is the HTML element to which our React component will attach. And <script src="/script.js"></script>is where our bundled dev code needs to end up to render in the browser.
/src
Now let’s mimic what a consuming app and our component to be imported will look like in our development environment. Let’s create 2 files, one of which, dev.tsx mimics a consuming app and the other, index.tsx which will represent our top-level component consuming apps will import.
First, back out to the root of our project, and create a sibling /src directory next to /public.
mkdir srccd srctouch dev.tsxtouch index.tsx
Your project should now look like this:

In /src/dev.tsx, copy the contents of this file:
And in /src/index.tsx, copy the contents of this file:
Bundle up the code and render in a browser
Now we’ll create a file /src/serve.js that will contain the config for our dev environment. This file will watch for changes in our code, bundle up our code for the browser, and provide a live reload experience.
// /src/serve.jstouch serve.js
Copy the contents of this file into src/serve.js
There’s a lot going on here, but if you read through the code the primary takeaways are:
- esbuild’s
buildmethod is bundling our code with some basic configuration applied, and creating the/public/script.jsfile as it’s output. chokidaris watching for changes to any TypeScript files, and then we’re telling esbuild to re-build.live-serveris starting up a local web server with some basic configuration.
Now let’s create a script so we can run the code and try it out.
npm run dev
We’ll need to update our package.json file to add a npm run dev command we can run to verify everything is working. Replace the scripts key in our package.json file to match the following:
// package.json..."scripts": { "dev": "node serve.js"},npm run dev
in your terminal and you’ll see a new browser window or tab open up. Make some changes to your code and notice live-reload should be working as well.
At this point, you can add as many components as you like to your app, make it as simple or complex as you like, but keep index.tsx as your top-level component which imports all other child components.
Set up the production build environment
We now have a minimal development environment up and running. You’ll likely want to add unit tests, linters and other project best practices at this point, so feel free to explore and build out your app. We can cover this more in detail of tools our teams use in another article if anyone’s interested.
build.js
Let’s add another file which uses esbuild’s build method to bundle up our component for importing into other React projects, and prepare for distribution to NPM.
Create a /build.js file in the project root:
// build.jstouch build.js// The project structure should look like...build.jsserve.jssrc/ ...
Copy the contents of this file into /build.js .
In this configuration file, we’re defining our entry file /src/index.tsx and two output file formats: ESModules and CommonJS into a project dist folder as the final destination for our packaged component’s code.
Typically most browser-based apps will consume the esm format and Node environment apps the cjs format, but since we don’t know for certain what type of bundlers consuming apps will be using, we’ll provide both formats.
Now let’s hop back to the package.json file and finish wiring things up.
Here are the diffs we’re going to add to our package.json file. The latest file will look like this:
mainCommon JS format location for final bundled files.moduleES modules format location for final bundle files.scripts.buildThis command cleans out the/distdirectory, then executes our ESBuild via thebuild.jsfile. This command also creates Typescript type definitions which are exported with our final bundled files so IDEs will get IntelliSense and autocomplete for our exported component.scripts.cleanCleans out thedistfolder of any leftover debris.scripts.prepublishOnlyThis ensures that every time you do annpm publishthebuild.jscommand gets executed. Otherwise, you’ll have to manually build your new production files each time before publishing, and it’s easy to forget:)filesTells NPM to only package up files in this array of project directories
Build the package
We’re now ready to build the package:
npm run build
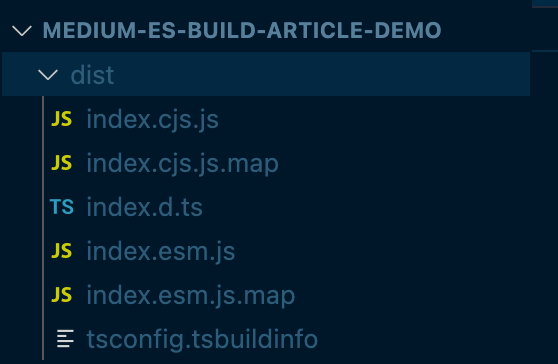
We’ll now see a new /dist directory has been created and its contents should look like this:
Test locally
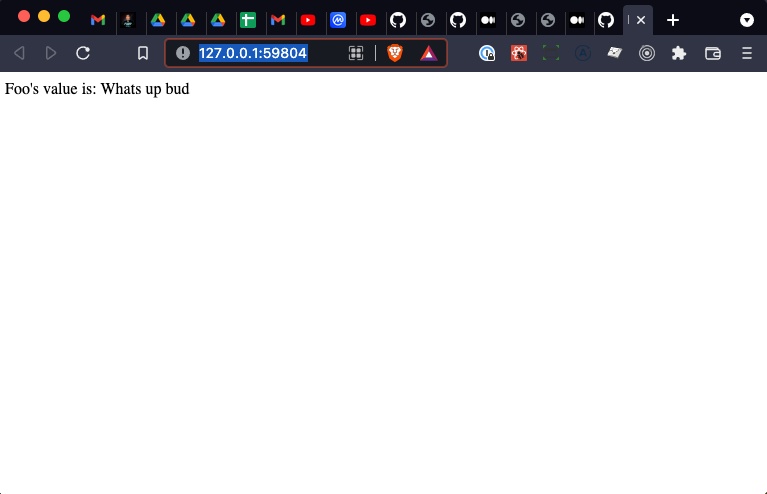
To test that our component actually exports and imports successfully, open up any React project in your local environment, and import this component directly from a local file path. Here’s an example:
// Install the local packagenpm install '../location/of/your/local/project';
Import the component into a local React app:
// Some other React appimport MyAwesomeComponent from 'my-awesome-project';...
<MyAwesomeComponent foo="something goes here" />
Publish to NPM
Congratulations, you know have a project ready to deliver to NPM! There’s plenty of articles on how to publish packages to NPM, so explore the NPM docs for more details, but in it’s most basic form it’s as simple as:
npm publish
Articles / References
Thanks to the following for some great patterns and references we used to build our config:
- https://github.com/souporserious/bundling-typescript-with-esbuild-for-npm
- https://github.com/zaydek/esbuild-hot-reload
More content at plainenglish.io. Sign up for our free weekly newsletter. Get exclusive access to writing opportunities and advice in our community Discord.
Get an email whenever Adam J. Arling publishes.
More from JavaScript in Plain English
New JavaScript and Web Development content every day. Follow to join 2.5M+ monthly readers.
Want to Understand Immediately Invoked Function Expressions (IIFEs)? You Can Start NowJavascript Has Three Types of Functions: Named, Annonymous, and IIFE. Do you know the difference? — Immediately Invoked Function Expressions, or IIFE, are exactly what the name suggests. They are functions that are immediately called as soon as you define them. Take the following sample code:
The Simple Guide to SEO for Your ApplicationSome basic SEO setups that we can do ourselves as a developer without relying on SEO experts. — We as a developer mostly focused on solving problems and building stuff. but some other things need our focus and time. SEO(Search Engine Optimization) is one of them, and we can’t say that it’s not a developer job it’s some SEO expert job. There are many things when we talk…