Introduction to Git and GitHub
Git and GitHub
Don ProfOctober 01, 2020
Version Control Systems (VCS)
use the cat command to see the code
cat rearrange1.py

//use the diff command to see the difference

diff rearrange.1.py rearrange2.py

//use diff -u to see the unified form of the difference

diff -u validations1.py validations2.py
wdiff highligts the words that have changed in the file
>> meld
>>KDiff3
>>vimdiff
all these are graphical tools for difference
Applying Changes
diff -u old_file new_file>change.diff
This generates the difference into a file called change.diff
You can use patch to apply the changes
patch cpu_usage.py < cpu_usage.diff
Meaning it used the new files in the cpu_usage.diff and added it to the cpu_usage.py
VCS
Version Control System
Commit is making edits to multiple files and treat that collection of edits as a single change.
Files are organsied in repositories
Its stores histories of the code.
Git
Git can be used for;
- Standalone program
- As a Server
- As a client
https://git-scm.com/
Source Control Management
Examples of vcs
Subverion
Mercurial
>>git --version //use cmd to check whether you have git installed on the computer.
On windows git comes with a file called MinGW64 already installed
you download git on windows from gitforwindows.org website
Git was developed by Linus Torvalds
Within a VCS, project files are organized in centralized locations called _____ where they can be called upon later. //repositories
Using Git
git config --global user.email "me@example.com"
git config --global user.name "My Name"
//this is to tell git who you are. it is like setting a user name for your git access.
$ git init //Create a repository
or use
$ git clone //clone an old repository
---------------------------------------

$ mkdir checks //make a directory called checks
$ cd checks // change directory to checks
$ git init // initial a git repository
For linux the command is ls -la to list all hidden files
$ dir /a .git/
It is a database that stores your repository.
The area outside your .git is called the working tree. It is the current version of your project (sandbox).
Staging area (also called index): A file maintained by Git that contains all of the information about what files and changes are going to go into your next commit
$ cp ../disk_usage.py  //this would copy the py file to the directory  // for cmd use copy
$ ls -l //this is to list the files in the directory
git add disk_usage.py //this would add the py file to the staging area

$ git commit

-----------------
for cmd
$ copy C:\Users\MediaAdmin\AndroidStudioProjects\MyDemo\app\src\main\java\com\example\mydemo

$ dir /a

$git add MyActivity.java

$ git commit
kjl;k
In windows to exit out of the commit interface.
//press esc
$:wq //to save write and quit
- Git directory - contains history of all files and changes.
- Working tree - contains the current state of the object.
- Staging area - changes that have been marked to be included in the next commit
Modified state - Changes have been made but havent been commited yet
Staging state - the changes to those files are marked for tracking
Commit - The changes are made.
$git commit - m 'Added periods' //this one makes you write the notes for the commit right away.
How to write a commit message
The first line is the summary of the commit message <52 Characters
empty line
Full details < 72 characters
$ commit log`//used check commit history messages
Linux kernel documentation
http://stopwritingramblingcommitmessages.com/
https://robots.thoughtbot.com/5-useful-tips-for-a-better-commit-message
https://help.github.com/articles/setting-your-email-in-git/
https://help.github.com/articles/keeping-your-email-address-private/
Graded assessment
Install Git
Before you install Git on your Linux VM, you need to first make sure that you have a fresh index of the packages available to you. To do that, run:
sudo apt update
content_copy
Now, you can install Git on your Linux host using apt by running the following command:
sudo apt install git
content_copy
For any prompts, continue by clicking Y.
Check the installed version of git by using the command below:
git --version
content_copy
Click Check my progress to verify the objective.
Initialize a new repository
Create a directory to store your project in. To do this, use the following command:
mkdir my-git-repo
content_copy
Now navigate to the directory you created.
cd my-git-repo
content_copy
Next, initialize a new repository by using the following command:
git init
content_copy
The git init command creates a new Git repository. In our case, it transformed the current directory into a Git repository. It can also be used to convert an existing, unversioned project to a Git repository or to initialize a new, empty repository.
Executing git init creates a .git subdirectory in the current working directory, which contains all of the necessary Git metadata for the new repository. This metadata includes subdirectories for objects, refs, and template files. A HEAD file is also created which points to the currently checked out commit.
If you've already run git init on a project directory containing a .git subdirectory, you can safely run git init again on the same project directory. The operation is what we call idempotent; running it again doesn't override an existing .git configuration.
Configure Git
Git uses a username to associate commits with an identity. It does this by using the git config command. To set Git username use the following command:
git config --global user.name "Name"
content_copy
Replace Name with your name. Any future commits you push to GitHub from the command line will now be represented by this name. You can use git config to even change the name associated with your Git commits. This will only affect future commits and won't change the name used for past commits.
Let's set your email address to associate it with your Git commits.
git config --global user.email "user@example.com"
content_copy
Replace user@example.com with your email-id. Any future commits you now push to GitHub will be associated with this email address. You can even use git config to change the user email associated with your Git commits.
Git Operations
Let's now create a text file named README. We will be using the nano editor for this.
nano README
content_copy
Type any text within the file, or you can use the following text:
This is my first repository.
content_copy
Save the file by pressing Ctrl-o, Enter key, and Ctrl-x.
Git is now aware of the files in the project. We can check the status using the following command:
git status
content_copy
This command displays the status of the working tree. It also shows changes that have been staged, changes that haven't been staged, and files that aren't tracked by Git.
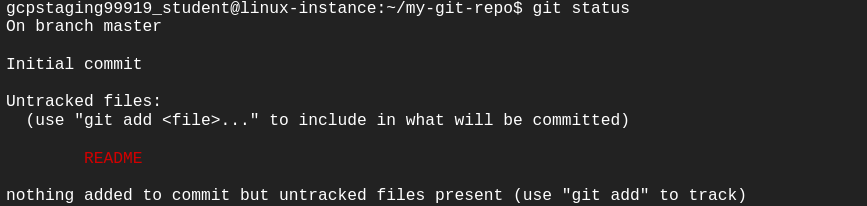
You can now see the file you created, README, under the section Untracked files. Git isn't tracking the files yet. To track the files, we have to commit these files by adding them to the staging area.
Now let's add the file to the staging area using the following command:
git add README
content_copy
This command adds changes from the working tree to the staging area i.e., it gathers and prepares files for Git before committing them. In other words, it updates the index with the current content found in the working tree to prepare the content that's staged for the next commit.
You can now view the status of the working tree using the command: git status. This now shows the file README in green i.e., the file is now in the staging area and yet to be committed.
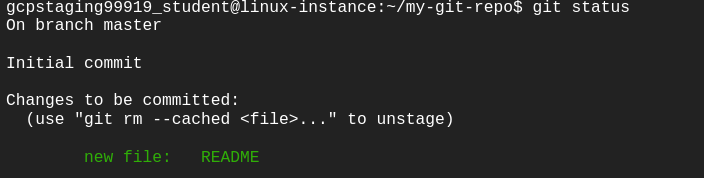
However, git add doesn't affect the repository in any serious way because changes are not actually recorded until you commit them.
Let's now commit the changes. A Git commit is equivalent to the term "Save".
Commit the changes using the following command:
git commit
content_copy
This now opens an editor, asking you to type a commit message. Every commit has an associated commit message. A commit message is a log message from the user describing the changes.
Enter the commit message of your choice or you can use the following text:
This is my first commit!
content_copy
Once you have entered the commit message, save it by pressing Ctrl-o and Enter key. To exit click Ctrl-x.
The git commit command captures a snapshot of the project's currently staged changes i.e., it stores the current contents of the index in a new commit along with the commit message.
Click Check my progress to verify the objective.
First commit
Check my progress
You have successfully committed your file!
Let's now re-edit the file again to understand the process better. Open the file README using nano editor.
nano README
content_copy
Now add another line of description for your repository below the earlier entered line. Add the description of your choice or you can use the following text:
A repository is a location where all the files of a particular project are stored.
content_copy
Save and exit the editor by pressing Ctrl-o, Enter key, and Ctrl-x.
Now, let's repeat the previous process. As mentioned earlier, you can always check the status of your repository by using:
git status
content_copy
To understand the difference, compare with the earlier scenario where you added the new file to the repository.
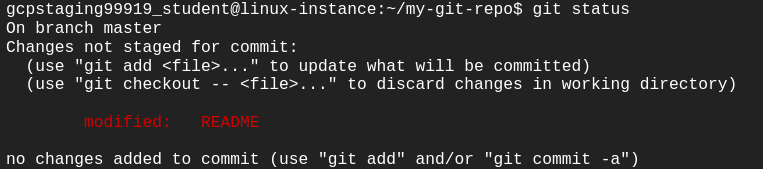
Git tracks the changes and displays that the file has been modified. You can view the changes made to file using the following command:
git diff README
content_copy
You can see the differences between the older file and the new file. New additions are denoted by green-colored text and a + sign at the start of the line. Any replacements/removal are denoted by text in red-colored text and a - sign at the start of the line.
Now, we will add these changes to the staging area.
git add README
content_copy
View the status of the repository using the following command:
git status
content_copy
Git now shows the same file in green-colored text. This means the changes are staged and ready to be committed.
Let's commit the file now by entering the commit message with the command itself, unlike the previous commit.
git commit -m "This is my second commit."
content_copy
The command git commit with -m flag takes the commit message, too. This is different to the command without flag, where you had to type the commit message within the editor. If multiple -m flags are given to the command, it concatenates the values as separate paragraphs.
To view all the commits use the following command:
git log
content_copy
Git log command shows the commit history of the repository. It shows all the commits on the repository represented by a unique commit ID at the top of each commit. It also shows the author, date, and time and the commit message associated with the commits.
You also have various options to limit the output of this command. The output can be filtered based on the last number of commits, author, commit message, etc.
Click Check my progress to verify the objective.
Second commit
Check my progress
Congratulations!
Congrats! You've successfully installed the Git, initialized a repository, and performed basic Git operations. Now that you know how to do this, it will be easier for you and your team to work on a huge project with multiple functionalities and modules.
End your lab
When you have completed your lab, click End Lab. Qwiklabs removes the resources you’ve used and cleans the account for you.
You will be given an opportunity to rate the lab experience. Select the applicable number of stars, type a comment, and then click Submit.
The number of stars indicates the following:
- 1 star = Very dissatisfied
- 2 stars = Dissatisfied
- 3 stars = Neutral
- 4 stars = Satisfied
- 5 stars = Very satisfied
You can close the dialog box if you don't want to provide feedback.
For feedback, suggestions, or corrections, please use the Support tab.
21/11/2020
git commit -a //a shortcut to stage any changes to tracked files and commit them in one step
//It doesnt work on new files.
$cd scripts
$atom all_checks.py
$git commit -a -m "Call check_reboot from main`, exit with 1 on error"
//This would commit directly together with -m
head is the point to the current branch
git -p // the -p is from patch
git show //displays info about the commit and the associated patch.
and the key.
git log --stat //it would show some stats in the commit
git diff //it to show the difference in the lines. show only unstaged changes by default
git add -p //this would add the patch
git diff --staged // changes that are staged, but not committed.
git rm //this is to remove/delete a file
git mv [old name] [new name] //to rename or move a file
.gitignore //This is a gitignore file
23/11/2020
git checkout //to change a file back to its former state... before it is staged.
with the -p // you can go through the previous ones.
it is also effectively used to switch branches.
git reset //to change a file that has already been staged.
git commit --amend //it overwrites the previous commit --use it in private repository
touch //command in linux to create a file
git revert HEAD //for a rollback
git log -p -2 //-p is for the patch -2 limits the output to the last 2 entries
The id names is called a Hash which is calculated using an algorithm called the SHA1
The id's are composed of 40 characters
git show [id] //you can just use the starting of the id too
24/11/2020
Explore repository
There is a Git repository named food-scripts consisting of a couple of food-related Python scripts.
Navigate to the repository using the following command:
cd ~/food-scripts
content_copy
Now, list the files using the ls command. There are three files named favorite_foods.log, food_count.py, and food_question.py.

Let's explore each file. Use the cat command to view each file.
- favorite_foods.log: This file consists of a list of food items. You can view it using the following command:
cat favorite_foods.log
content_copy
Output:
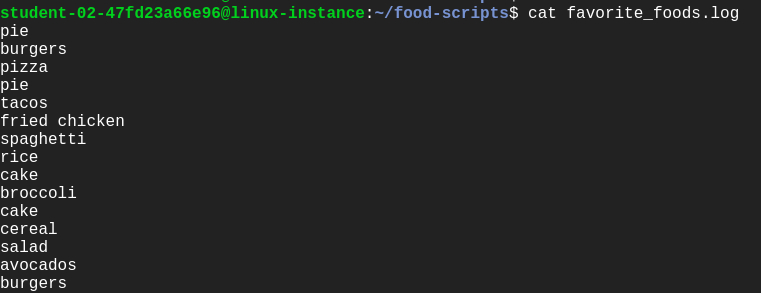
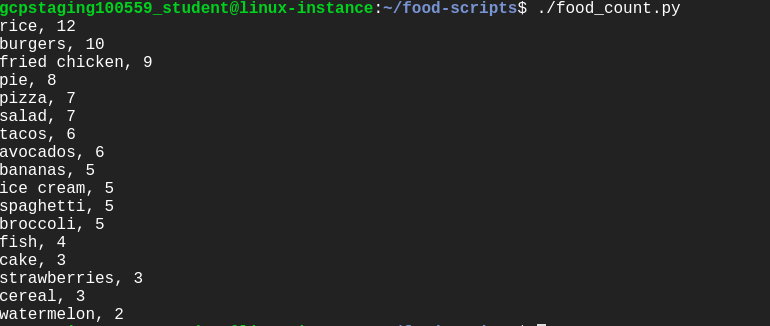
- food_count.py: This script returns a list of each food and the number of times the food appeared in the
favorite_foods.logfile.
Let's execute the script food_count.py:
./food_count.py
content_copy
Output:
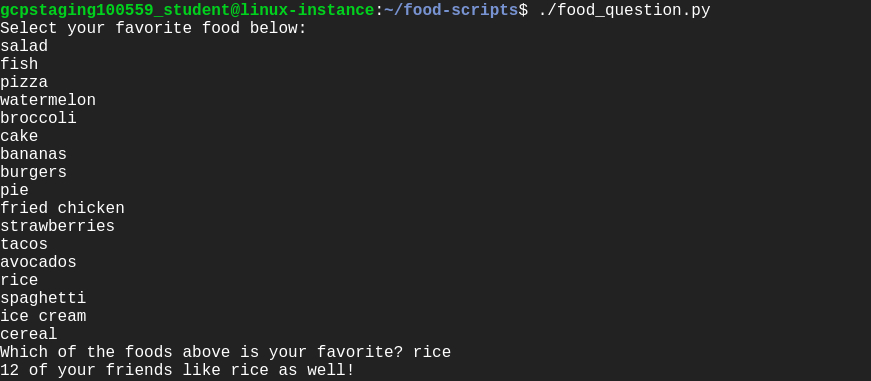
- food_question.py: This prints a list of foods and prompts the user to enter one of those foods as their favorite. It then returns an answer of how many others in the list like that same food.
Run the following command to see the output of food_question.py script:
./food_question.py
content_copy
Output:

Uh oh , this gives us an error. One of your colleagues reports that this script was working fine until the most recent commit. We'll be fixing this error later during the lab.
Understanding the repository
Let's use the following Git operations to understand the workflow of the repository:
- git status
- git log
- git branch
Git status: This displays paths that have differences between the index file and the current HEAD commit; paths that have differences between the working tree and the index file; and paths in the working tree that are not tracked by Git. You can view the status of the working tree using the command: [git status]
git status
content_copy
You can now view the status of the working tree.
Git log: This lists the commits done in the repository in reverse chronological order; that is, the most recent commits show up first. This command lists each commit with its SHA-1 checksum, the author's name and email, date, and the commit message.
You can see logs by using the following command:
git log
content_copy
Output:
Enter q to exit.
Git branch: Branches are a part of the everyday development process on the master branch. Git branches effectively function as a pointer to a snapshot of your changes. When you want to add a new feature or fix a bug, no matter how big or small, you spawn a new branch to encapsulate your changes. This makes it difficult for unstable code to get merged into the main codebase.
Configure Git
Before we move forward with the lab, let's configure Git. Git uses a username to associate commits with an identity. It does this by using the git config command. Set the Git username with the following command:
git config user.name "Name"
content_copy
Replace Name with your name. Any future commits you push to GitHub from the command line will now be represented by this name. You can even use git config to change the name associated with your Git commits. This will only affect future commits and won't change the name used for past commits.
Let's set your email address to associate them with your Git commits.
git config user.email "user@example.com"
content_copy
Replace user@example.com with your email-id. Any future commits you now push to GitHub will be associated with this email address. You can also use git config to change the user email associated with your Git commits.
Add a new feature
In this section, we'll be modifying the repository to add a new feature, without affecting the current iteration. This new feature is designed to improve the food count (from the file food_count.py) output. So, create a branch named improve-output using the following command:
git branch improve-output
content_copy
Move to the improve-output branch from the master branch.
git checkout improve-output
content_copy
Here, you can modify the script file without disturbing the existing code. Once modified and tested, you can update the master branch with a working code.
Now, open food_count.py in the nano editor using the following command:
nano food_count.py
content_copy
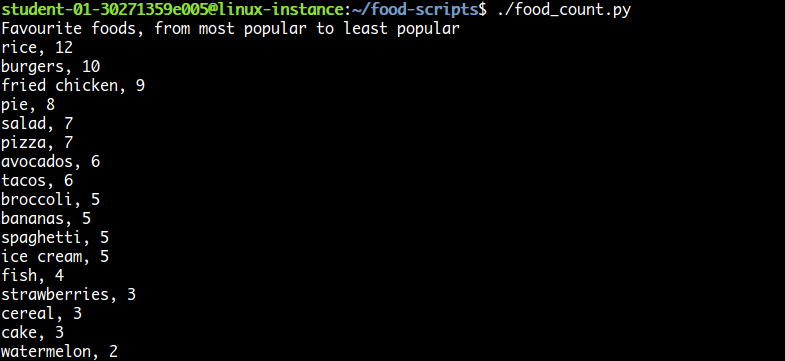
Add the line below before printing for loop in the food_count.py script:
print("Favourite foods, from most popular to least popular")
content_copy
Save the file by pressing Ctrl-o, the Enter key, and Ctrl-x. Then run the script food_count.py again to see the output:
./food_count.py
content_copy
Output:
After running the food_count.py script successfully, commit the changes from the improve-output branch by adding this script to the staging area using the following command:
git add food_count.py
content_copy
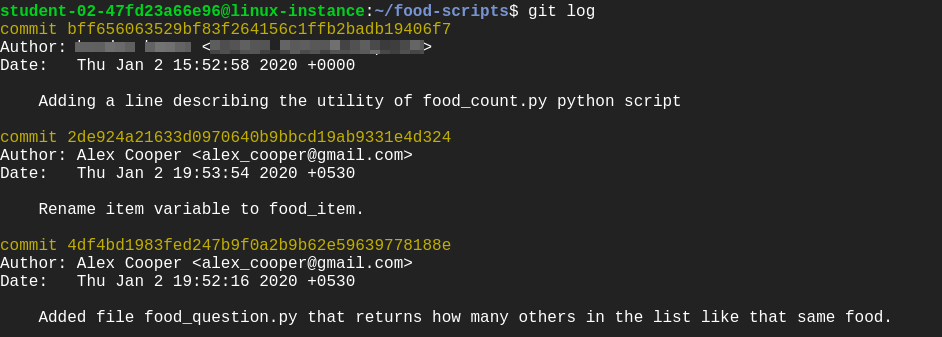
Now, commit the changes you've done in the improve-output branch.
git commit -m "Adding a line in the output describing the utility of food_count.py script"
content_copy
Output:

Click Check my progress to verify the objective.
Add a feature
Check my progress
Fix the script
In this section, we'll fix the script food_question.py, which displayed an error when executing it. You can run the file again to view the error.
./food_question.py
content_copy
Output:
This script gives us the error: "NameError: name 'item' is not defined" but your colleague says that the file was running fine before the most recent commit they did.
In this case, we'll revert back the previous commit.
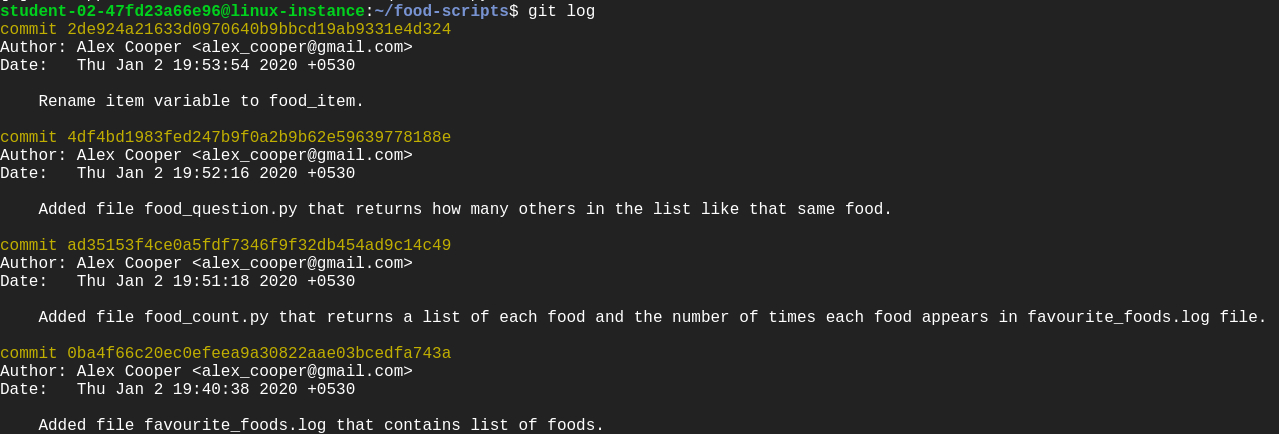
For this, check the git log history so that you can revert back to the commit where it was working fine.
git log
content_copy
Output:
Here, you'll see the commits in reverse chronological order and find the commit having "Rename item variable to food_item" as a commit message. Make sure to note the commit ID for this particular commit.
Enter q to exit.
To revert, use the following command:
git revert [commit-ID]
content_copy
Replace [commit-ID] with the commit ID you noted earlier.
This creates a new commit again. You can continue with the default commit message on the screen or add your own commit message.
Then continue by clicking Ctrl-o, the Enter key, and Ctrl-x.
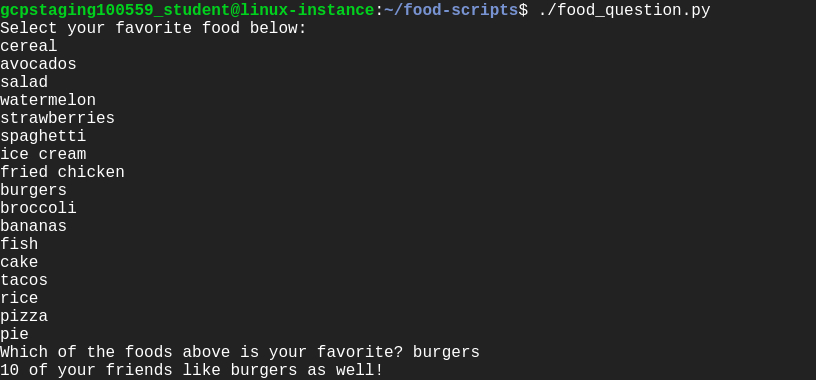
Now, run food_question.py again and verify that it's working as intended.
./food_question.py
content_copy
Output:
Merge operation
Before merging the branch improve-output, switch to the master branch from the current branch improve-output branch using the command below:
git checkout master
content_copy
Merge the branch improve-output into the master branch.
git merge improve-output
content_copy
Output:
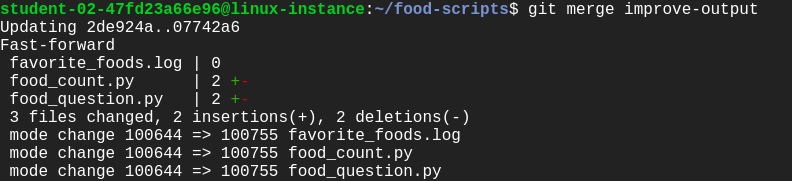
Now, all your changes made in the improve-output branch are on the master branch.
./food_question.py
content_copy
Output:
To get the status from the master branch, use the command below:
git status
content_copy
Output:

To track the git commit logs, use the following command:
git log
content_copy
Output:

Click Check my progress to verify the objective.
Revert changes
Check my progress
Congratulations!
In this lab, you successfully created a branch from the master branch to add a new feature. You also rolled back a commit to where the script worked fine, and then merged it to the master branch. This will help as you work with colleagues who are simultaneously on the same repository.
10/12/2020
Forking and detect function behavior
For this exercise, you need to fork an existing repository: google/it-cert-automation-practice.
- Open Github. If you don't already have a Github account, create one by entering a username, email, and password. If you already have a Github account proceed to the next step.
- Log in to your account from the Github login page.
A fork is a copy of a repository. Forking a repository allows you to freely experiment with changes without affecting the original project.
Forking a repository is a simple two-step process. We've created a repository for you to practice with!
- On GitHub, navigate to the google/it-cert-automation-practice repository.
- In the top-right corner of the page, click Fork.
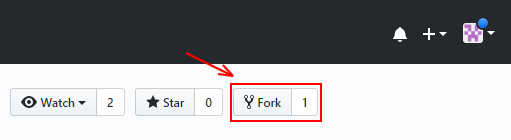
That's it! Now, you have a fork of the original google/it-cert-automation-practice repository.
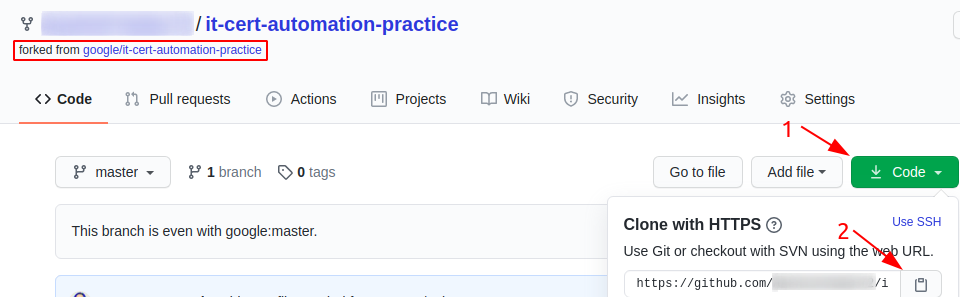
First, clone the repository using the following command:
git clone https://github.com/[git-username]/it-cert-automation-practice.git
content_copy
Note: If you enabled two-factor authentication in your Github account you won't be able to push via HTTPS using your account’s password. Instead you need to generate a personal access token. This can be done in the application settings of your Github account. Using this token as your password should allow you to push to your remote repository via HTTPS. Use your username as usual. Note down this personal access token as we would need it further in the lab. For more help to generate a personal access token, click here.
Output:

Go to the it-cert-automation-practice directory using the following command:
cd ~/it-cert-automation-practice
content_copy
First, verify that you have already setup a remote for the upstream repository, and an origin.Type the following command and press Enter. You'll see the current configured remote repository for your fork.
git remote -v
content_copy
Output:

In terms of source control, you're "downstream" when you copy (clone, checkout, etc) from a repository. Information is flowed "downstream" to you.
When you make changes, you usually want to send them back "upstream" so they make it into that repository so that everyone pulling from the same source is working with all the same changes. This is mostly a social issue of how everyone can coordinate their work rather than a technical requirement of source control. You want to get your changes into the main project so you're not tracking divergent lines of development.
Setting the upstream for a fork you have created using the following command:
git remote add upstream https://github.com/[git-username]/it-cert-automation-practice.git
content_copy
To verify the new upstream repository you've specified for your fork, type git remote -v again. You should see the URL for your fork as origin, and the URL for the original repository as upstream.
git remote -v
content_copy
Output:

Configure Git
Git uses a username to associate commits with an identity. It does this by using the git config command. Set the Git username with the following command:
git config --global user.name "Name"
content_copy
Replace Name with your name. Any future commits you push to GitHub from the command line will now be represented by this name. You can even use git config to change the name associated with your Git commits. This will only affect future commits and won't change the name used for past commits.
Let's set your email address to associate them with your Git commits.
git config --global user.email "user@example.com"
content_copy
Replace user@example.com with your email-id. Any future commits you now push to GitHub will be associated with this email address. You can also use git config to change the user email associated with your Git commits.
Fix the script
In this section we are going to fix an issue that has been filed. Navigate to the issue, and have a look at it.
Branches allow you to add new features or test out ideas without putting your main project at risk. In order to add new changes into the repo directory it-cert-automation-practice/Course3/Lab4/, create a new branch named improve-username-behavior in your forked repository using the following command:
git branch improve-username-behavior
content_copy
Go to the improve-username-behavior branch from the master branch.
git checkout improve-username-behavior
content_copy
Now, navigate to the working directory Lab4/.
cd ~/it-cert-automation-practice/Course3/Lab4
content_copy
List the files in directory Lab4.
ls
content_copy
Output:

Now, open the validations.py script.
cat validations.py
content_copy
Output:

This script should validate usernames if they start with an letter only.
Here, you can check the validate_user function's behavior by calling the function. To edit the validations.py Python script, open it in a nano editor using the following command:
nano validations.py
content_copy
Now, add the following lines of code at the end of the script:
print(validate_user("blue.kale", 3)) # True
print(validate_user(".blue.kale", 3)) # Currently True, should be False
print(validate_user("red_quinoa", 4)) # True
print(validate_user("_red_quinoa", 4)) # Currently True, should be False
content_copy
Once you've finished writing this script, save the file by pressing Ctrl-o, the Enter key, and Ctrl-x.
Now, run the validations.py on the python3 interpreter.
python3 validations.py
content_copy
Output:

Here, as we see the output, it function returns true even if the username doesnot start with an letter. Here we need to change the check of the first character as only letters are allowed in the first character of the username.
Continue by opening validations.py in the nano editor using the following command:
nano validations.py
content_copy
There are lots of ways to fix the code; ultimately, you'll want to add additional conditional checks to validate the first character doesn't start with either of the forbidden characters. You can choose whichever way you'd like to implement this.
Once you've finished writing this script, save the file by pressing Ctrl-o, the Enter key, and Ctrl-x.
Now, run the validations.py.
python3 validations.py
content_copy
Output:

Now, you've fixed the function behavior!
Commit the changes
Once the issue is fixed and verified, create a new commit by adding the file to the staging area. You can check the status using the following command:
git status
content_copy
The git status command shows the different states of the files in your working directory and staging area, like files that are modified but unstaged and files that are staged but not yet committed.
You can now see that the validations.py has been modified.

Now, let's add the file to the staging area using the following command:
git add validations.py
content_copy
Use the git add command to add content from the working directory into the staging area for the next commit.
git status
content_copy
Output:

Let's now commit the changes. A git commit is like saving your work.
Commit the changes using the following command:
git commit
content_copy
This now opens up an editor that asks you to type a commit message. Every commit has an associated commit message, which is a log message from the user describing the changes.
Enter a commit message of your choice and append a line: "Closes: #1" at the beginning to indicate that you're closing the issue. Adding this keyword has an additional effect when using Github to manage your repos, which will automatically close the issue for you (for more information, please see the documentation here).
Closes: #1
Updated validations.py python script.
Fixed the behavior of validate_user function in validations.py.
content_copy
Once you've entered the commit message, save it by pressing Ctrl-o and the Enter key. To exit, click Ctrl-x.
Output:

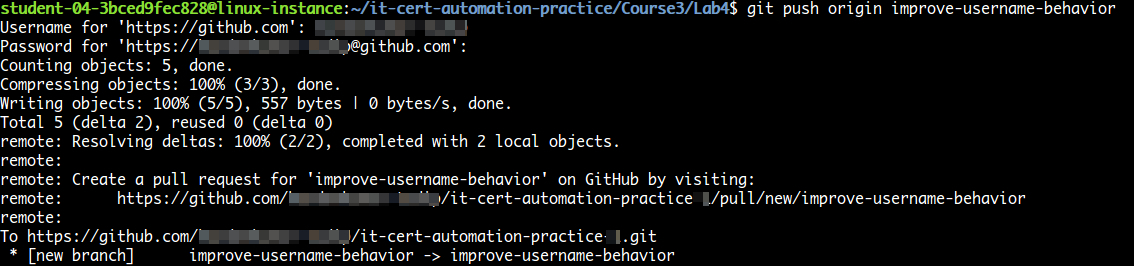
Push changes
You forked a repository and made changes to the fork. Now you can ask that the upstream repository accept your changes by creating a pull request. Now, let's push the changes.
git push origin improve-username-behavior
content_copy
Note: If you have enabled two-factor authentication in your Github account, use the personal access token generated earlier during the lab as the password. If you have not noted down the personal access token earlier, go to your Github homepage > Settings > Developer settings > Personal access tokens. Now click on the token you generated earlier and click 'Regenerate token'. Use your username as usual.
Output:
Then, from GitHub, create a pull request from your forked repository [git-username]/it-cert-automation-practice that includes a description of your change. Your branch improve-username-behavior is now able to merge into the master branch. It should look like the image below:
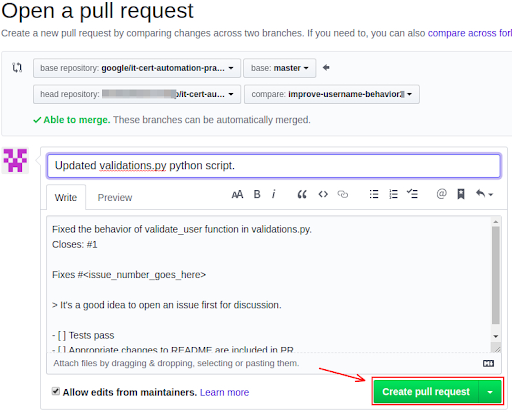
After initializing a pull request, you'll see a review page that shows a high-level overview of the changes between your branch (the compare branch) and the repository's base branch. You can add a summary of the proposed changes, review the changes made by commits, add labels, milestones, and assignees, and @mention individual contributors or teams.
Once you've created a pull request, you can push commits from your topic branch to add them to your existing pull request. These commits will appear in chronological order within your pull request and the changes will be visible in the "Files changed" tab.
Other contributors can review your proposed changes, add review comments, contribute to the pull request discussion, and even add commits to the pull request.
You can see information about the branch's current deployment status and past deployment activity on the "Conversation" tab.
Note: PR won't be merged on the master branch so that other users can also make a similar change to fix the issue.