Epson Printer in Error State Windows 10 | How To Fix it!
For a problem like the Epson printer in error state, a multitude of factors can be responsible. Some of these factors can relate to faulty ink cartridges, lack of sufficient power supply, installation errors in the printer’s software, etc. The error state issue can also occur while you use your device with a Windows 10 computer or on models such as Epson WF 3640 Printer and Epson XP 410 Printer.
Your problem is too common and our fixes are too easy to apply. We know how to deal with this Epson printer problem in just the perfect ways. From the meaning and causes of this issue to its helpful fixes, you will find everything related to the error state of your Epson printer in this guide. Read further to get your device back to an error-free state.
The following will help in formulating an overview of this post:
Table Of Contents
What Does Epson Printer is in Error State Mean?
The users of Epson printers should know that it is common for these devices to be in an error state due to some reasons. When this error turns up, you may not be able to proceed with your printing tasks. So, if you want to resume these tasks, you need to the error state of your Epson printer. Before you do that, it will be helpful to understand what is causing your Epson printer to be in an error state. In the upcoming section, we will look at the causes of this Epson printer problem.
Why is My Epson Printer is in an Error State?
For those of you who are thinking about why your Epson printer is in an error state, here we have identified the usual causes for the same. Have a look at these prior to knowing the appropriate way to fix it.
- There may be a problem with your printer’s software or its installation.
- Your Epson printer may have a hardware issue.
- Your device may not be turned on or properly connected to your system.
- There may be jammed bits of paper inside your printer.
- Using an incorrect ink cartridge for your device is the fifth cause of this problem.
- An inadequate power supply to your printer can leave it in an error state.
- Not only outdated but a corrupt printer driver can also result in an error state and cause other damages as well.
How to Fix Epson Printer in Error State?
This is the most awaited section of this blog. Here you will find out what to do when the Epson printer is in the error state. Usually, when your device experiences such a problem, we recommend using tools like Windows Troubleshooter to fix it. Additionally, you should check that the printer connections are fine, no jammed paper is present, and that the printer drivers are updated. Along with these fixes, proper sets of instructions have also been provided. Read them carefully to effectively deal with this Epson printer problem.
Fix 1: Run Windows Troubleshooter
The Windows Troubleshooter can help you troubleshoot a number of errors, including the error state of your Epson printer. To start this useful tool, you can open the Windows menu and click on Search. Here, you can write Printers and go through the results. You will be able to see certain devices that have been connected to your computer. After identifying your Epson printer model, you can right-tap on it and choose the option stating Troubleshoot. After that, you can rely on the tool to recognize the issue and settle it.
Learn the details for how to use the tool to fix this problem in 12 steps
1. In the Windows search bar, type “Printers” and press “Enter”.
2. Click on “Devices and Printers”.
3. A window showing a list of all the devices connected to your system will open up. Look for your Epson printer on this list.
4. Right-click on your Epson printer.
5. A dropdown menu will appear. Click on the option of “Troubleshoot”.
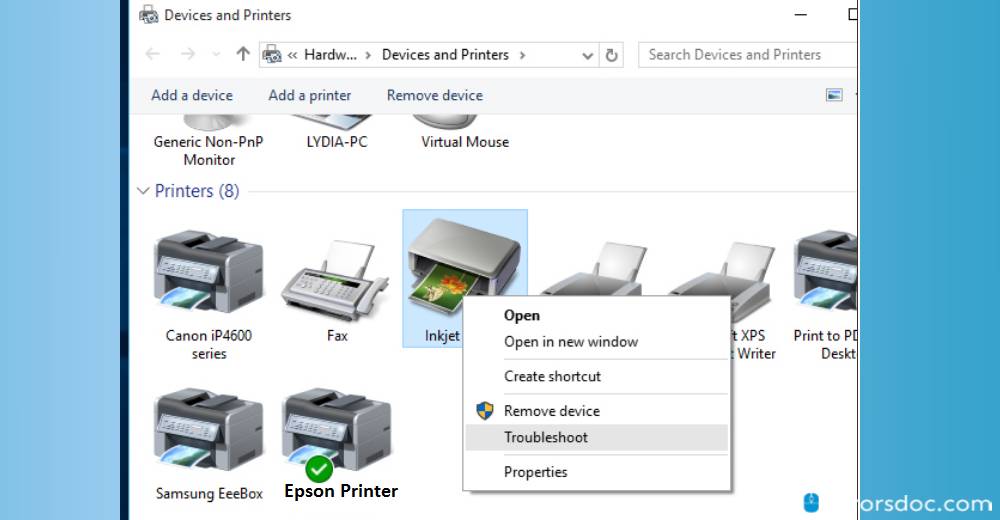
6. Wait for the tool to detect and kill the problem. In case your problem is not solved, move to the next step.
7. Open the “Start” menu on your Windows system.
8. Now, click on “Settings”.
9. Open the “Devices” section.
10. Next, click on “Printers & Scanners”.
11. On the list of printers and scanners, locate your Epson device. In case you can’t see your device, click on the button for “Add a printer or scanner”.
12. Windows will automatically detect your Epson printer and provide you with the instructions to install it. Follow these instructions to complete this process.
Tip for Readers: You will not be able to see your Epson device on the list of printers and scanners when it has not been connected to your Windows system. So, always ensure that it is on and has been connected to your system.
Fix 2: Ensure Ink Cartridges are Original
In the section of the causes, we told you that the Epson error state can very well be a result of not using the correct ink cartridges. That is why we will suggest you to ensure that the ink cartridges are not only original but also the ones recommended in the Epson printer manual. Not using the original ones will put your device in an error state and may cause further damage over time.
Fix 3: Check & Remove Printhead Blockage
Your Epson printer can be in an error state due to printhead blockage. This is the printer part that is important for carrying out printing operations. Therefore, keeping it in a condition free of blockages or dirt will be advised. To begin with the procedure, you can power off the device and take off the cover, When the printhead is on the left, your device can be started for getting a test page. The printed page will hint at whether or not the printhead is having any blockage. In case the blockage is observed, you can rush to the Settings for using the Clean Printhead option.
We have provided 10 steps to check and remove the printhead blockage easily.
1. Turn off your Epson printer. It must be devoid of any power source.
2. Open the printer cover to access the printhead.
3. Slide the printhead towards the left.
4. Turn on your printer to print a test page and observe the colors that seem to be affected.
5. Then select “Tools” from the Control Panel of your Epson device.
6. Select the option of “Print quality”.
7. You may be prompted by the errors in the print quality report. Resolve these and press “Ok”.
8. Then open the “Menu”, select “Settings”, and press “Ok”.
9. From the “Tools” menu, select “Clean printhead” and press “Ok”.
10. The cleaning process will take some time. Afterwards, you can use your device normally.
Fix 4: Check Connections and Mend them
Lack of maintenance, loose connections in the hardware, or any cables not being properly connected may be the reason for your Epson printer being in an error state. Here are 5 great tips to help you ensure that the connections are proper and the maintenance is right.
1. Ensure the hardware has no loose connections.
2. The cable connecting the printer computer must not be loose.
3. The power cable must be properly connected to your Epson device and the power source.
4. When no wire is loose, it will be helpful to remove each wire and clean the dust.
5. For a wireless Epson printer, the router and other wireless connections should be proper.