(LFCS) 1. Essential Commands 25%

1.1 Log into local & remote graphical and text mode consoles
1.2 Search for files
1.3 Evaluate and compare the basic file system features and options
1.4 Compare and manipulate file content
1.5 Use input-output redirection (e.g. >, >>, |, 2>)
1.6 Analyze text using basic regular expressions
1.7 Archive, backup, compress, unpack, and uncompress files
1.8 Create, delete, copy, and move files and directories
1.9 Create and manage hard and soft links
1.10 List, set, and change standard file permissions
1.11 Read, and use system documentation
1.12 Manage access to the root account
2. Operation of Running Systems - 20%
3. User and Group Management - 10%
4. Networking - 12%
5. Service Configuration - 20%
6. Storage Management - 13%
1.1 Log into local & remote graphical and text mode consoles
- Text Terminal: text input/output environment.
- Originally, they meant a piece of equipment through which you could interact with a computer: in the early days of Unix, that meant a teleprinter-style device resembling a typewriter, sometimes called a teletypewriter, or “tty” in shorthand
- Tty were used to establish a connection to a mainframe computer and share operating system provided by it
- A typical text terminal produces input and displays output and errors
- Console: terminal in modern computers that don't use mainframe but have an own operating system. It is generally a terminal in the physical sense that is, by some definition, the primary terminal directly connected to a machine.
- The console appears to the operating system "like" a remote terminal
- In Linux and FreeBSD, the console, in realty, appears as several terminals (ttys) called Virtual Consoles
- Virtual Consoles: to provide several text terminals on a single computer
- Shell: command line interface or CLI
- It is the primary interface that users see when they log in, whose primary purpose is to start other programs
- It is presented inside console
- There are many different Linux shells
- Command-line shells include flow control constructs to combine commands. In addition to typing commands at an interactive prompt, users can write shell scripts
To summarize: A virtual console is a shell prompted in a non-graphical environment, accessed from the physical machine, not remotely.
- Pseudo-terminal: Terminal provided by programs called terminal emulators e.g.
ssh,tmux - X Windows System: is a windowing system for bitmap displays
- X provides the basic framework for a graphical user interface (GUI) environment: drawing and moving windows on the display device and interacting with a mouse and keyboard
- X does not mandate the user interface – this is handled by individual programs, like KDE or GNOME
- It is considered "graphical terminal"
- When is executed it will substitute one of the text terminal provided by virtual console. In CentOS the terminal will be 1, in other system could be 7.
- Some applications running inside X Windows System provide pseudo-terminal e.g. Konsole, Gnome Terminal
- If graphical environment is not started, you can run command
startxto execute it
- To log into local environment you must provide, when prompted, userID and password for both graphical and text mode
- To login into a remote text environment you can use command
ssh - To login into a remote graphical environment you can use command
ssh -X
Once logged command w can be used to show who is logged and what they are doing:
[root@localhost ~]# w
23:41:16 up 2 min,  2 users,  load average: 0.02, 0.02, 0.01
USER     TTY      FROM             LOGIN@   IDLE   JCPU   PCPU WHAT
root     tty1                      23:40   60.00s  0.01s  0.01s -bash
root     pts/0    192.168.0.34     23:41    1.00s  0.02s  0.00s w
First column shows which user is logged into system and the second one to which terminal.
- For Virtual Console in terminal is showed tty1, tty2 etc.
- For ssh remote sessions (pseudo-terminal) in terminal is showed pts/0, pts/1 etc.
- :0 is for X11server namely used for graphical login
- https://askubuntu.com/questions/506510/what-is-the-difference-between-terminal-console-shell-and-command-line
- https://access.redhat.com/documentation/en-us/red_hat_enterprise_linux/6/html/installation_guide/sn-guimode-virtual-consoles-ppc
- https://www.computernetworkingnotes.com/rhce-study-guide/linux-virtual-console-explained-with-terminal-and-shell.html
- https://fossbytes.com/difference-between-shell-console-terminal/
- https://en.wikipedia.org/wiki/Computer_terminal#Text_terminals
- https://en.wikipedia.org/wiki/System_console
- https://unix.stackexchange.com/questions/60641/linux-difference-between-dev-console-dev-tty-and-dev-tty0
1.2 Search for files
findis recursive without parameters- Base syntax: find PATH PARAMETERS
find /etc -name "\*host*"Search in /etc all file/directories with host in their name. * is a wildcardfind . -perm 777 -exec rm -f '{}' \;Search from current position all files/directories with permissions 777 and after remove them-execuses the result of find to do something{}will be substitute with result of find
The exec's command must be contained between-execand\;.;is treated as end of command character in bash shell. For this I must escape it with\. If escaped it will be interpreted by find and not by bash shell.- Some parameter accepts value n with + or - in front. The meaning is:
find /etc -size -100kSearch in /etc all files/directories with size less of 100 kilobytesfind . -maxdepth 3 -type f -size +2MSearch starting from current position, descending maximum three directories levels, files with size major of 2 megabytefind . \( -name name1 -o -name name2 \)-oor, it is used to combine two conditions. \ is escape to avoid that ( or ) will be interpreted by bash shell- f
ind . -samefile file - f
ind . \! -user owner - It will show all files that aren't owned by user owner.
!means negation, but must be escaped by \ to not be interpreted by bash shell find . -iname namefind . -perm 222find . -perm -222find . -perm /222find . -perm -g=wfind . -atime +1find . -maxdepth 3 -type f -size +2Mfind /home/user -perm 777 -exec rm '{}' +find /etc -iname "*.conf" -mtime -180 –printfind /dir/ -type f –size +100m –depthfind . –type f | grep * | ls –li | sort –k1 –r | head –n 101 > biggestfiles.txtfind . – type f | ls –l | grep ‘rwx’ > files_that_match.txt
1.3 Evaluate and compare the basic file system features and options
Printout disk free space in a human readable format:
df -h
See which file system type each partition is:
df -T
See more details with file command about individual devices:
file -sL /dev/sda1 (or other device)
- Ext: "Extended Filesystem". Old, deprecated.
- Ext2: no journaling, max file size 2TB. Lower writes to disk = good for USB sticks etc.
- Ext3: journaling (journal, ordered, writeback), max file size 2TB
- Journaling: file changes and metadata are written to a journal before being committed. If a system crashes during an operation, the journal can be used to bring back the system files quicker with lower likeliness of corrupted files.
- Ext4: From 2008. Supports up to 16TB file size. Can turn off journaling optionally.
- Fat: From Microsoft. No journaling. Max file size 4 GB.
1.4 Compare and manipulate file content
diff file1 file2Compare file1 and file 2diff -y file1 file2Compare file1 and file 2 with output in two columnsvi fileIt is used to manipulate a fileInside vi:In command mode:In insert mode:- o - open a new line and enter in insert mode
- O - open a new line above current position and enter in insert mode
- :wq - write and quit
- :q! - quit without save
- :w! - force write
- u - undo
- ctrl + r - redo
- gg - go to file begin
- G - go to last line
- Search
- dd - delete current line
- x - delete current character
- d$ - delete from current point to end of line
- Replace:
- :%s/one/ONE/g - replace all occurrences of one with ONE:%s/one/ONE - replace first occurrences of one with INE
- Cut and paste:
uniq fileRemove equal consecutive rowsuniq -w 2 fleRemove equal consecutive rows comparing only first two charactersuniq -c fileRemove equal consecutive rows and show number of occurrencessort fileorder file content- cut -d delimiter -f column
cut -d ' ' -f 1 filePrint first word of each line. Delimiter will be spacecut -d ' ' -f 1,3 filePrint first and third word of each line. Delimiter will be spacecat filePrint file contenttail filePrint last 10 file linestail -n 5file Print last 5 file linestail -f filePrint last 10 file lines and append. Useful to monitor log fileshead filePrint first 10 file linestr SET1 SET2translate set of characters one to set of characters 2cat file | tr test subIt will replace all occurrences of test with subcat file | tr -s ' 'It will replace all consecutive occurrences of space with one spacefile namefileprint the type of namefile
Compare binary files
xxd <infile> <outfile>
Dump binary file in hex/octal:
od <file> # octal
od -x <file> # hex
cmp <file1> <file2>
1.5 Use input-output redirection (e.g. >, >>, |, 2>)
All Unix-based operating systems provide at least three different input and output channels - called stdin, stdout and stderr respectively - that allow communication between a program and the environment in which it is run.
In Bash each of these channels is numbered from 0 to 2, and takes the name of file descriptor, because it refers to a particular file: as it happens with any other file stored in the system, you can manipulate it, copy it, read it or write it on its.
When a Bash environment is started, all three default descriptor files point to the terminal where the session was initialized: the input (stdin - 0) corresponds to what is typed in the terminal, and both outputs - stdout ( 1) for traditional messages and stderr (2) for error messages - they are sent to the terminal. In fact, an open terminal in a Unix-based operating system is usually itself a file, commonly stored in /dev/tty0; when a new session is opened in parallel with an existing one, the new terminal will be /dev/tty1 and so on. Therefore, initially the three file descriptor all point to the file representing the terminal in which they are executed.
There are operator to redirect input, ouput and error.
- < - redirect stdin
- > and >> - redirect stdout
echo test > file1Write test in a file1. The content of file1 will be replacedecho test >> file1Append test in file1- 2> - redirect stderr
find /proc -name "cpu*" 2> /dev/nullFind in /proc file/directory that begin with cpu and redirect all errors, like 'Permission Denied' to special file /dev/null (virtual file that discard all data)- | - the stdout is transformed in stdin
- 2>&1 - redirect stderr to same place of stdout
- All redirections can be combined
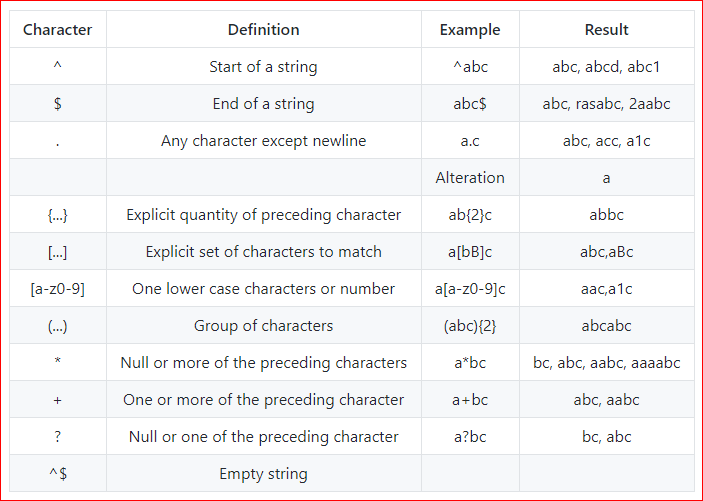
1.6 Analyze text using basic regular expressions
- File Globbing in LinuxFile globbing is a feature provided by the UNIX/Linux shell to represent multiple filenames by using special characters called wildcards with a single file name. A wildcard is essentially a symbol which may be used to substitute for one or more characters. Therefore, we can use wildcards for generating the appropriate combination of file names as per our requirement.
- * - Every character
ls -l a*List all file/directories that begin with a - ? - Every single character
ls -l a?List all file/directories formed by two character that begin with a - [ab] - list of characters
ls -l a[ab]List file/directories called aa or ab - [a-c]
ls -l a[a-c]List file/directories called aa, ab and ac - Wildcards can be combined
ls -l a[a-c]*List all file/directories that begins aa, ab and ac - grep pattern path/*Search pattern inside the strings of the files in path/*. Show file name and row matching patternIt is no recursive and key sensitive. To have recursion -r must be addedPattern can be a regular expression. The regular expression must be surrounded by ' ' otherwise content could match bash globing.
- Not all regular expressions are supported by
grep. As alternative can be usedegrep - sed - Without -i the results of file alteration won't be permanent
sed 's/source/target/' fileIn any row of file, it will change first occurrence of source to target. Print all rowssed 's/source/target/g' fileIn any row of file, it will change all occurrences of source to target. Print all rowssed 's/source/target/gI'In any row of file, it will change all occurrences of source to target. Ignore case = case insensitive. Print all rowssed '10s/source/target/' fileFor row 10, it will change first occurrence of source to target. Print all rowssed -n 's/source/target/p'In any row of file, it will change first occurrence of source to target. Print only changed rowssed -n '/source/p' fileIt will print only rows that contain sourceIt is equal to grep source filesed -n 2,4p fileIt prints rows from 2 to 4sed '/source/d' fileDelete rows with sourcesed -n 12d fileDelete row 12sed '11inewline' fileIt will insert newline as line 11sed -i 's/source/target/g' fileIn any row of file, it will change all occurrences of source to target. Save result to filesed -i.orign 's/source/target/g' fileIn any row of file, it will change all occurrences of source to target. Save result to file but keep an copy of original file with name file.orign
1.7 Archive, backup, compress, unpack, and uncompress files
tarSave many files into a single fileFile permissions are maintained by default only for file users. For other user I must explicit say to maintain permission during decompression using-pparametertar jcfv file.tar.bz2 *Save all files of current directory in new bzip2 compressed file called file.tar.bz2tar jxfv file.tar.bz2Extract content of file.tar.bz2tar tf file.tarShow content of file.tar. Note: the file.tar isn't compressedtar --delete -f test.tar fileDelete file from test.tar. Note: the test.tar isn't compressedtar --update -f test.tar fileUpdate file in test.tar. Note: the test.tar isn't compressedtar X<(command that generate list) -c -f file.tar *tar X<(ls | file -f - | grep -i MPEG | cut -d: -f 1) -c -f file.tar *Exclude file MPEG from content of file.tar- Backup a deviceDevice must be unmounted
dd if=/dev/sda of=/system_images/sda.img - Restore device
dd if=/system_images/sda.img of=/dev/sda rsyncit is used to keep synchronized the content of two directoriesyum -y install rsyncInstall rsync commandrsync -av source destSynchronize source with dest.-aarchive, provide a series of default optionrsync -avz /tmp user@123.123.123.123:/destSynchronize tmp with dest that it's contained in a remote machine with IP 123.123.123.123.-zmeans that content will be compressed during transferrsync -avzhe ssh source root@remote_host:/remote_directory/Synchronize source with remote_directory using ssh
To extract an uncompressed archive:
tar -xvf /path/to/foo.tar
To create an uncompressed archive:
tar -cvf /path/to/foo.tar /path/to/foo/
tar -xzvf /path/to/foo.tgz
tar -czvf /path/to/foo.tgz /path/to/foo/
To list the content of an .gz archive:
tar -ztvf /path/to/foo.tgz
tar -xjvf /path/to/foo.tgz
tar -cjvf /path/to/foo.tgz /path/to/foo/
To extract a .tar in specified Directory:
tar -xvf /path/to/foo.tar -C /path/to/destination/
1.8 Create, delete, copy, and move files and directories
You must be able to check results of activities.
lslist directory contentls -llong output. It will print more columnsFile Type+Permissions - Number of links - Owner - Group - Dimension - Creation date - Creation hour - NameFirst letter of first column indicate file type:ls -lalong output plus hidden filesls -lRlong output recursive (show subdirectories content)ls -ltlong output sorted by modification timels -ld /etcshow the directory properties and not its contentdu fileshow disk usagedu directoryshow space used by directory and each subdirectory. It is recursivedu -s directorysummarize space used by directory and subdirectorydu *show space of each file in current directorypwdprint current directorytouch fileIt creates an empty filecp source destinationcopy source file to destinationcp file1 file2 ./destCopy file2 and file2 to directory destcp * ./destCopy all file of current directory to directory destcp -r dir1 dir2Copy dir1 in dir2.-rrecursivemkdir dircreate directory dirrmdir dirremove dir. Note: dir must be emptytreeshow directories treemv file file2rename file in file2rm filedelete file
1.9 Create and manage hard and soft links
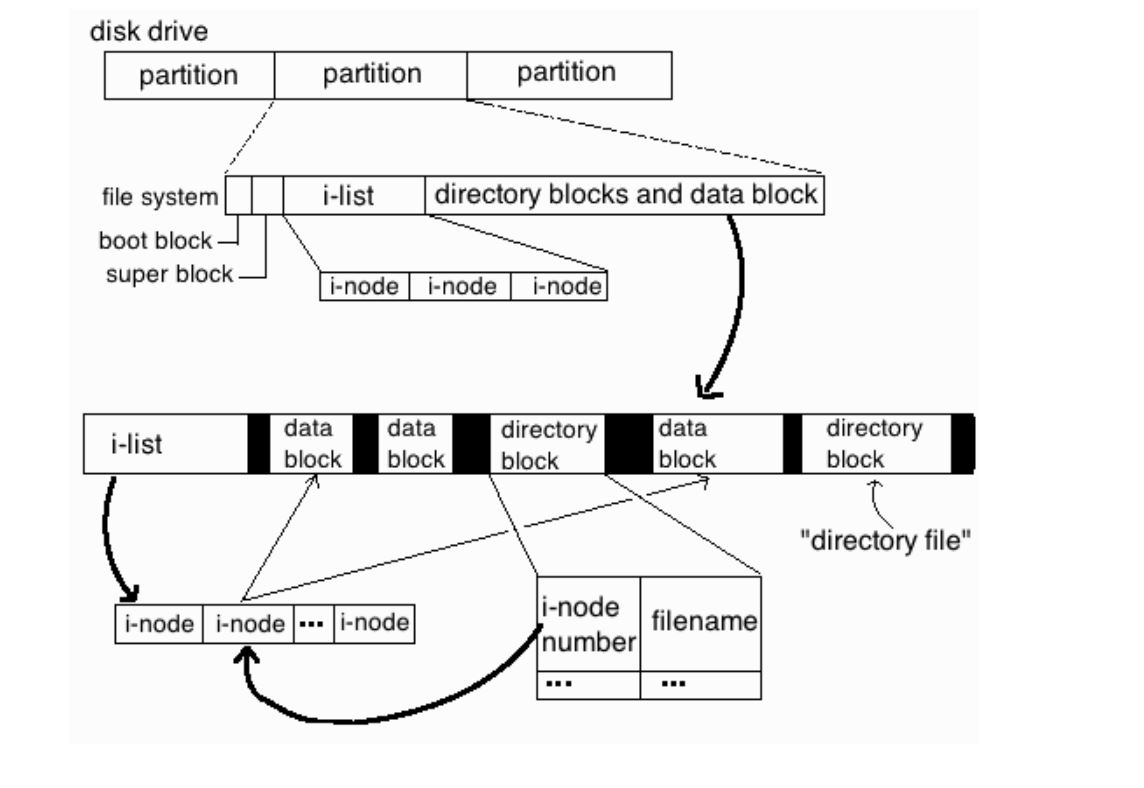
The i-node (index node) is a data structure in a Unix-style file system that describes a file-system object such as a file or a directory. Each i-node stores the attributes and disk block location(s) of the object's data.
File-system object attributes may include metadata (times of last change, access, modification), as well as owner and permission data.
Directories are lists of names assigned to i-nodes. A directory contains an entry for itself, its parent, and each of its children.
Each i-nodes is identified by a unique i-node numbers
To summarize: directory contains filenames, that is associated to i-node, that contains reference to data block.
- It's a pointer to a filename
- This means that there will by this chain: link -> filename -> i-node
- Note: permissions on a link are "open", because real permission are associate to i-node
ls -liin first column show the i-node numberln target newnameIt will create and hard link to the same i-node of target with name (filename) newnameln -s target newlinkIt will create a symbolic link to target called newlink
Note: A file is considered deleted when they don't exist anymore hard link to same i-node. This means that rm remove link, hard or symbolic.
- https://en.wikipedia.org/wiki/Inode
- http://www.farhadsaberi.com/linux_freebsd/2010/12/files-directory-security-setuid-sticky-bit-permissions.html
- http://www.compsci.hunter.cuny.edu/~sweiss/course_materials/unix_lecture_notes/chapter_03.pdf
1.10 List, set, and change standard file permissions
To see user, group and permission use ls -l. Permissions are in the first column, name in third and group in fourth.
Each file/directory will have an owner and will be associated to a group.
The permissions for each file/directory are given for each of this category:
Others are all other users that are not the owner and are not member of group.
For each category can be set below permissions
The right that each permission provide are different and depends if target is a file or a directory:
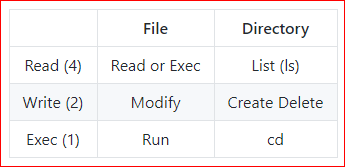
Note: When exec is set for group of other, file will be executed with identity of the user that are executing command (user ID) and group of user (group ID)
- Use numbers for each permission, that must be added if more that a permission
chmod 760 fileChange file permission
chmod +x fileAdd exec to owner, group and otherchmod g+w fileAdd write to groupchmod o-rw fileRemove read and write to others
There are other special permissions that can be granted to file/dirctories
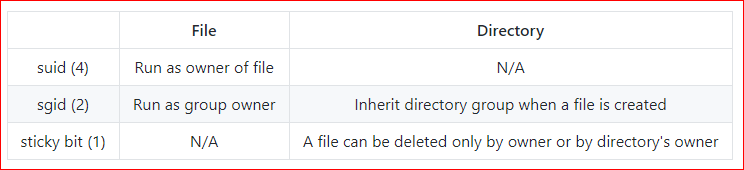
- Suid: When a file with setuid is executed, the resulting process will assume the effective user ID given to the owner class. This enables users to be treated temporarily as root (or another user). E.g
passwdhas suid setted - Sgid: When a file with setgid is executed, the resulting process will assume the group ID given to the group class
- Sticky bit is applied to /tmp
- Suid cannot be applied to Bash scripts
- https://en.wikipedia.org/wiki/File_system_permissions#Changing_permission_behavior_with_setuid,_setgid,_and_sticky_bits
1.11 Read, and use system documentation
commad --helpman command/usr/share/docinfo command- bash completion
1.12 Manage access to the root account
rootis the system administrator- When logged as root, shell prompts
#character. Otherwise$ suUsed to become root. It will continue to use the current session with user and group id substitutedsu -Used to become root. It is same as logging into a fresh session on a terminalsu - userLogin as user.sudocommand to allow an ordinary user to execute commands as a different user (usually the superuser)- In default configuration, group
wheelis authorized to act as root. If a user is member ofwheelcan execute all command as root with this syntax: - To add user to wheel execute:
visudoModify the sudo configurationWhit this row inserted in sudo configuration, demo user can execute this command:sudo -u user commandThis means that it will execute command with the identity of user.If-uis not specified, this means that command will be executed as root.demo user can open a root session running:sudo su -The powerfulness of this command is that a root session can be opened only providing user password (in this case the password of user demo).This means that root direct login (with user and password) could be disabled and root session will be opened using onlysudo. Some Linux distribution use this method as default configuration (e.g Ubuntu).The advance is that root password is not shared if I need to add a new system administrator.- Basic configuration:
- demo ALL=(ALL:ALL) ALL The first field indicates the username that the rule will apply to.
- demo ALL=(ALL:ALL) ALL The first "ALL" indicates that this rule applies to all hosts.
- demo ALL=(ALL:ALL) ALL This "ALL" indicates that user demo can run commands as all users.
- demo ALL=(ALL:ALL) ALL This "ALL" indicates that user demo can run commands as all groups.
- demo ALL=(ALL:ALL) ALL The last "ALL" indicates these rules apply to all commands.
- In sudo configuration
%indicate group - %users localhost=/sbin/shutdown -h nowThe users in group users can execute command /sbin/shutdown -h now on localhost as root
- To simplify configuration in sudo configuration can be used aliasSOFTWARE can be used in sodo configuration rows