How to use Rufus to install Windows 10 with UEFI support
Rufus is one of the best USB bootable software. This article will guide you how to use Rufus to install Windows 10 that supports both UEFI and Legacy.
This tool has a long history of development (from 2011), Rufus 3.4 is currently the latest version updated in 2018. Personally I like this tool because it’s lightweight, simple and easy to use.
Rufus is a simple and easy to use tool, just download and run the tool to create bootable USB. You can easily use Rufus to create Windows 10 bootable USB and many other operating systems including Windows XP, Windows 7, 8, 8.1, Ubuntu and many other Linux distributions.
Rufus offers many great features but it also has limitations.
- Only supports USB (not tested with SDcards).
This tool does not support hard drive (HDD) and external hard drive. If you want to create a bootable hard drive or an external hard drive, Rufus is not the choice. - Rufus is not a multiboot tool.
This tool does not support creating multiboot usb with multiple ISO files, and can not have multiple operating systems on USB unless the ISO file supports it. Rufus requires reformatting the USB drive for each use. - Not supported on Windows XP.
Rufus 3.0 is no longer supported on Windows XP. You need to use older versions or other tools in this case.
In addition, AIO Boot also supports creating Windows 10 bootable USB and a lot of other operating systems that you can use:
- Is a multiboot tool.
- UEFI and Legacy support.
- Also supports hard drive, external hard drive and SDcard.
- OS installation through network boot.
- Supports USB 3.0 driver for Windows 7 and SATA/RAID/SCSI drivers for Windows XP.
- Supports Windows ISO files larger than 4GB on FAT32 drive.
- Support runs on Windows XP.
Create Windows 10 bootable USB
Rufus is lightweight and easy to use. Here are the detailed steps on how to use Rufus to install Windows 10 for beginners. First, download the latest version of Rufus here and then run the software to get started.
Choose the right options according to your needs:
UEFI only:
- Partition scheme: GPT
- Target system: UEFI (non CSM)
- File system: FAT32
Legacy BIOS only:
- Partition scheme: MBR
- Target system: BIOS (or UEFI-CSM)
- File system: NTFS
Dual UEFI + Legacy BIOS:
- Press “Alt + E“
- Partition scheme: MBR
- Target system: BIOS or UEFI
- File system: FAT32
If the ISO file contains files larger than 4GB, choose NTFS.
By default, Rufus will not support booting in both UEFI and Legacy (BIOS). Press ALT + E to enable this option. Rufus also supports creating two NTFS partitions to store files larger than 4GB and FAT32 to boot UEFI.
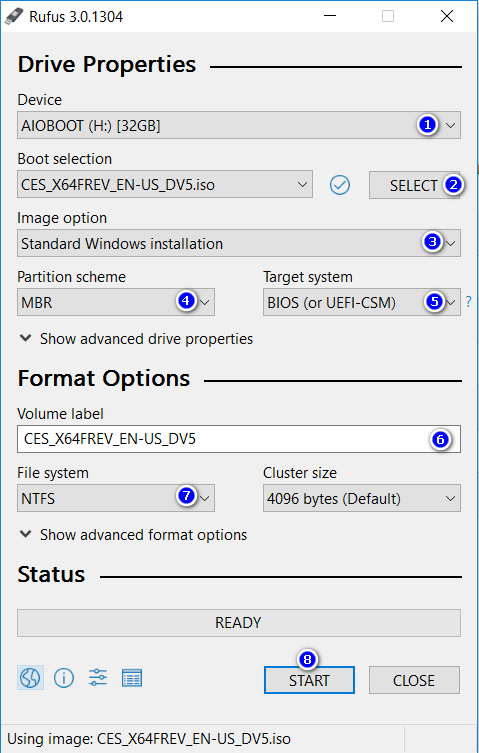
- Select the USB drive you want to create under Device.
- All data on this drive will be lost, including other partitions on the hard disk of this partition.
- Click the SELECT button and select the ISO file on your computer.
- Image Option: You can install Windows onto USB drive with Rufus’s Windows To Go option. Or select Standard Windows Installation to create the installer to install to any other drive.
- Partition scheme: MBR or GPT.
- Target system: This option depends on the Partition scheme option, or BIOS or UEFI, or BIOS (or UEFI-CSM), or UEFI (non CMS).
- Volume label: The program will extract this information from the ISO file, which you can change if you want.
- File system: This option is very important, it decides bootability in UEFI or Legacy. To support Legacy, you need to select MBR instead of GPT.
- Click the START button to start creating.
If you get this error message, it means that the ISO file contains a file larger than 4GB. In this case, choose NTFS instead of FAT32, Rufus will create a second FAT32 partition to support UEFI boot.
This ISO image contains a file larger than 4GB, which is more than the maximum size allowed for a FAT or FAT32 file system.
In general, choose GPT if you only need UEFI support. Selecting MBR and FAT32 will support both UEFI and Legacy. Select NTFS if the program errors as above.
Good luck!