Deploying Spring Boot Applications
Spring Boot applications can be deployed into production systems with various methods. In this article, we will go through step by step deployment of Spring Boot applications via the following 5 methods:
If you want to Gain In-depth Knowledge on Spring Boot, please go through this link Spring Boot Online Training
- Deploying in Java Archive (JAR) as a standalone application,
- Deploying as Web Application Archive (WAR) into a servlet container,
- Deploying in Docker Container,
- Deploying behind NGINX web server — direct setup,
- Deploying behind NGINX web server — containerized setup.
Deploying in Java Archive (JAR) as a standalone application
Spring Boot applications can easily be packaged into JAR files and deployed as standalone applications. This is done by the spring-boot-maven-plugin. The plugin is automatically added to pom.xml once the Spring project is created via Spring Initializr as a Maven project.
<build> <plugins> <plugin> <groupId>org.springframework.boot</groupId> <artifactId>spring-boot-maven-plugin</artifactId> </plugin> </plugins></build>
In order to package the application in a single (fat) jar file, run the maven command mvn package under project directory. This will package the application inside an executable jar file with all its dependencies (including the embedded servlet container — if its a web application). To run the jar file, use the following standard JVM command java -jar <jar-file-name>.jar.
Deploying as Web Application Archive (WAR) into a servlet container
Spring Boot applications can be packaged into WAR files to be deployed into existing servlet containers (such as Tomcat, Jetty etc.). This can be done as follows:
Specify WAR packaging in pom.xml file via <packaging>war</packaging>. This will package the application into a WAR file (instead of JAR). On the second step, set the scope of Tomcat (servlet container) dependency to provided (so that it is not deployed into WAR file):
<dependency> <groupId>org.springframework.boot</groupId> <artifactId>spring-boot-starter-tomcat</artifactId <scope>provided</scope></dependency>
Initialise the Servlet context required by Tomcat by extending SpringBootServletInitializer and overriding configure method as follows:
@SpringBootApplicationpublic class DemoApp extends SpringBootServletInitializer { @Override protected SpringApplicationBuilder configure(SpringApplicationBuilder builder) { return builder.sources(DemoApp.class); } public static void main(String[] args) { SpringApplication.run(DemoApp.class, args); }}In order to package the application in a war file, run the standard maven command mvn clean package under project directory. This will generate the WAR package which can be deployed into a servlet container. To run the application inside an existing Tomcat container, copy the generated WAR file to tomcat/webapps/ directory.
Deploying in Docker Container
Before deploying the application into a Docker container, we will first package the application in a (fat) JAR file. This process is previously explained, therefore I will assume we have a jar file.
On the first step, we need to build a container image. For this, we start with creating a Dockerfile in the project root directory as follows:
# latest oracle openjdk is the basisFROM openjdk:oracle# copy jar file into container image under app directoryCOPY target/demoApp.jar app/demoApp.jar# expose server port accept connectionsEXPOSE 8080# start applicationCMD ["java", "-jar", "app/demoApp.jar"]
Note that, in the above snippet, we assumed that the application JAR file ‘demoApp.jar’ is located under the target directory of our project. We also assumed that the embedded servlet port is 8080 (which is the default case for Tomcat).
Take your career to new heights of success with an Spring Boot Online Course
We can now build the Docker image with the following command (from where the Dockerfile is located):
docker image build -t demo-app:latest .
where -t is the name and tag of the image to be built. Once the image is built, we can create and run the container via:
docker container run -p 8080:8080 -d --name app-container demo-app
where -p publishes (maps) host port to container port (in this case both are 8080). The option -d (detach) runs the container in background, and --name specifies the name of the container.
Deploying behind NGINX web server — direct setup
Configuring servlet containers (such as Tomcat or Jetty) for real production (i.e. running on port 80, without root user and with SSL) may not be straight forward (but doable). Therefore, it is recommended to use a web server (such as Nginx) in front of your Spring Boot applications. This can be done in two ways; direct setup or containerized setup. In this section, we will demonstrate the direct setup.
In direct setup, we run the Nginx web server and the Spring Boot applications directly on localhost (on different ports of course). And we let Ngnix proxy REST requests to Spring Boot applications. For this:
- Install Nginx web server on Linux via
sudo apt-get install nginx, - Open the file
/etc/ngnix/sites-available/defaultwith a text editor, - Say, we have two Spring Boot applications to be proxied. Then replace the ‘location’ block in the file with following blocks for two Spring Boot applications. Note that, all Nginx-Java configs can be found here.
location /app1 { proxy_pass http://localhost:8080;}location /app2 { proxy_pass http://localhost:9000;}based on which the requests coming to http://localhost/app1/ will be directed to /http://localhost:8080/, and requests coming to http://localhost/app2/ will be directed to /http://localhost:9000/.
Load balancing
If you are running multiple instances of a Spring Boot application, you can enable Nginx to apply load-balancing. For example, if we have 3 instances of app1 running on ports 8080, 8081 and 8082. We can load-balance among these servers as follows:
Open the file /etc/ngnix/sites-available/default and add the following block at the top of the file (before server block):
# configure load-balancingupstream backend { server localhost:8080; server localhost:8081; server localhost:8082;}Modify the proxy_pass parameter of app1 as follows:
location /app1 { proxy_pass http://backend;}based on which the requests coming to http://localhost/app1/ will be directed to one of/http://localhost:8080/, /http://localhost:8081/ or /http://localhost:8082/.
Deploying behind NGINX web server — containerized setup
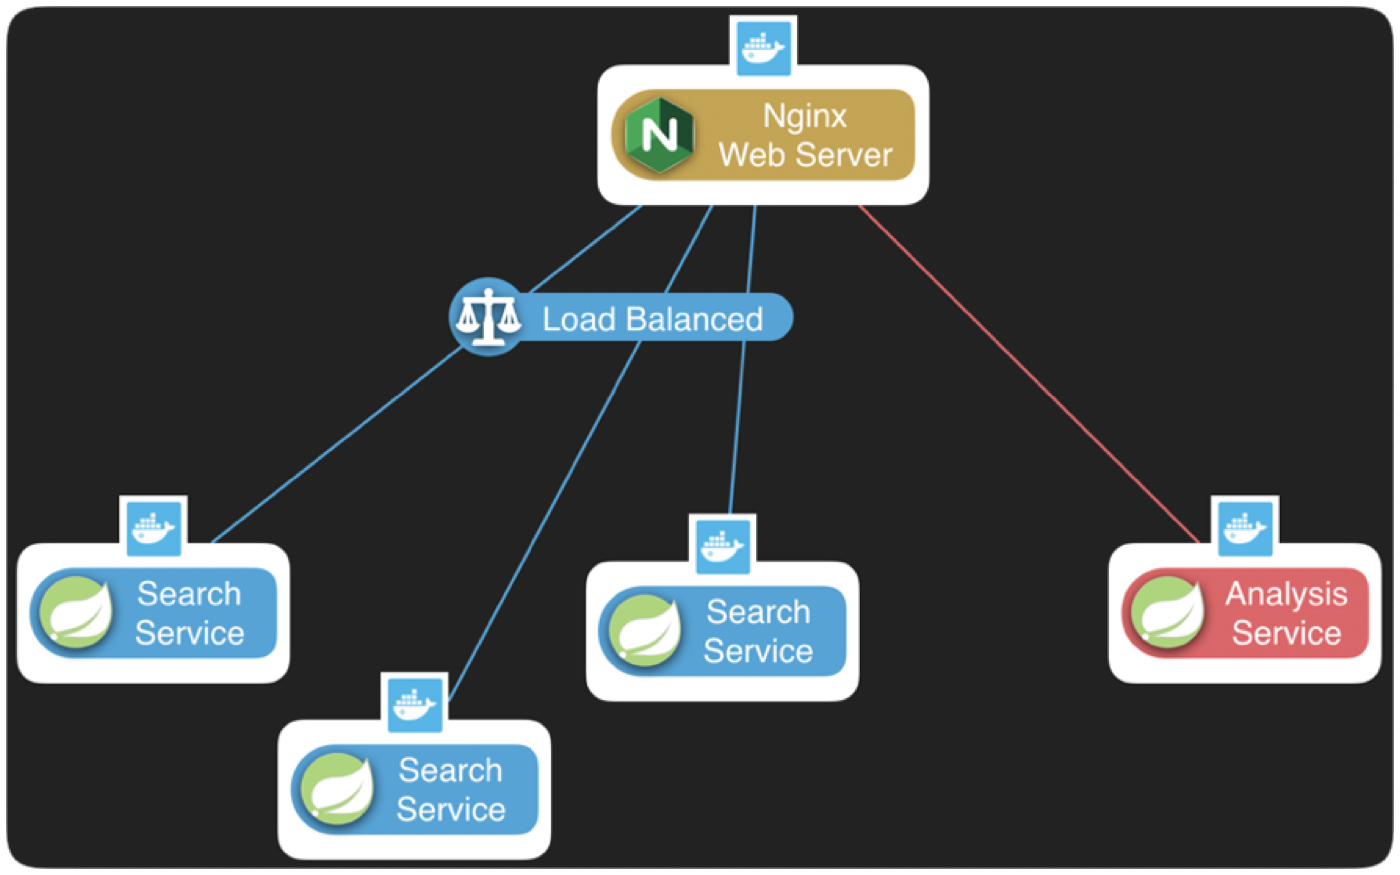
In containerized setup, we deploy the Nginx web server and all the Spring Boot applications on separate Docker containers. And we let Nginx (running in its own container) proxy REST requests to Spring Boot application containers.
We start by packaging all Spring Boot applications in (fat) jar files (which is previously explained). At this point, pay attention to setting individual server ports and root context paths to each Spring Boot application by adding following lines to application.properties (or application.yml) files:
server.port=8082server.servlet.context-path=/search-service
Then we deploy the generated jar packages in separate Docker containers (which is also previously explained).
As an example, we deploy four Spring Boot applications; single instance of ‘analysis-service’ application and three instances of ‘search-service’ application. The three instances of search-service application will be load-balanced by Nginx. Our basic architecture looks like follows:
We create a Nginx configuration file nginx.conf based on the default configurations. We add load-balancing and proxy information for each service as follows:
http { upstream backend { server search-service-1:8080; server search-service-2:8081; server search-service-3:8082; } server { listen 80 default_server; listen [::]:80 default_server; root /var/www/html; server_name _; location /search-service { proxy_pass http://backend/search-service; } location /analysis-service { proxy_pass http://analysis-service:8083/analysis-service; } }}events { worker_connections 1024; }based on which the requests coming to http://localhost/search-service/ will be directed to one of/http://search-service-1:8080/search-service/, /http://search-service-2:8081/search-service/ and /http://search-service-3:8082/search-service/, and requests coming to http://localhost/analysis-service/ will be directed to /http://analysis-service:8083/analysis-service/.
After the configuration file (nginx.conf) is created, we will deploy the Nginx web server in a Docker container. For this, we create a Dockerfile as follows:
# latest nginxFROM nginx# copy custom configuration fileCOPY nginx.conf /etc/nginx/nginx.conf# expose server portEXPOSE 80# start serverCMD ["nginx", "-g", "daemon off;"]
And we build a Docker image for Nginx web server as follows:
docker image build -t custom-nginx:latest .
Once all Docker images are built, all system can be deployed by running docker-compose up command on the following docker-compose.yml file:
version: '3.7'services: nginx_server: image: custom-nginx ports: - '80:80' networks: - demo-network depends_on: - "search-service-1" - "search-service-2" - "search-service-3" - "analysis-service"search-service-1: image: search-service-1 ports: - '8080:8080' networks: - demo-networksearch-service-2: image: search-service-2 ports: - '8081:8081' networks: - demo-networksearch-service-3: image: search-service-3 ports: - '8082:8082' networks: - demo-networkanalysis-service: image: analysis-service ports: - '8083:8083' networks: - demo-networknetworks: demo-network: name: demo-network