mac test
Step 1 : Check Battery
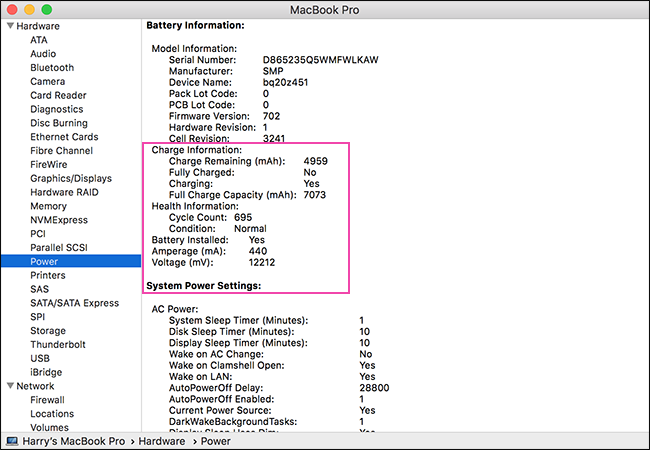
First we check up charge cycles.
A charge cycle is one full charge and discharge of the battery.
Every modern Mac battery is rated for 1000 cycles; some older models (pre-2010) are rated for 500 or 300 cycles.
While the battery won’t suddenly fail when it reaches its limit, it will start to hold less and less charge as it approaches that limit.
Eventually, you’ll need to keep your Mac connected to its power cable to use it.
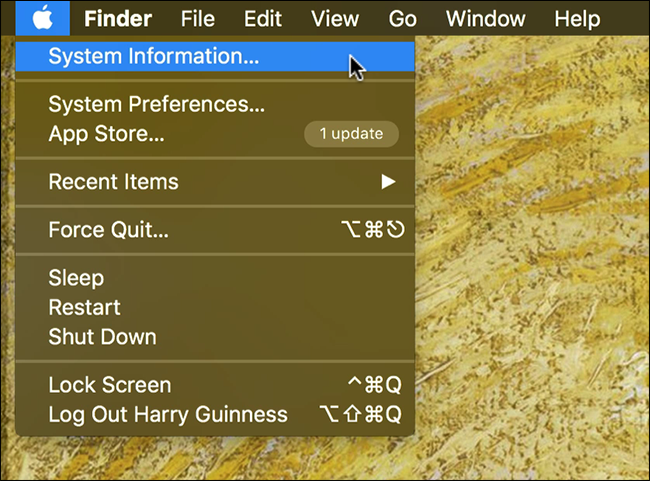
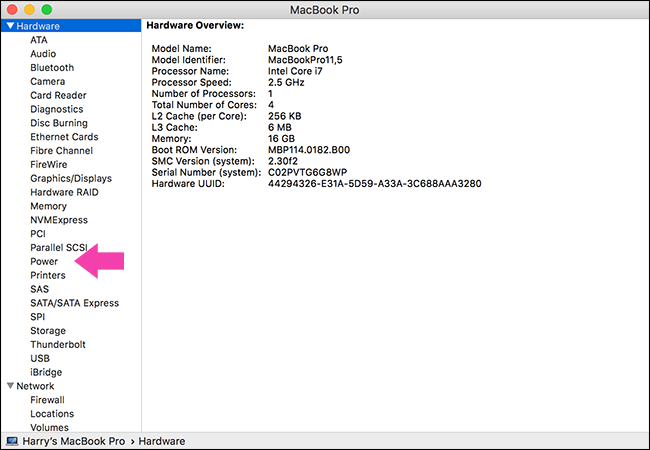
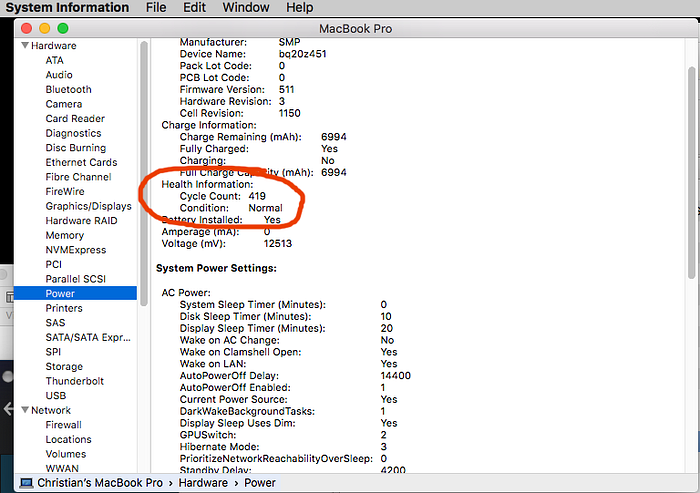
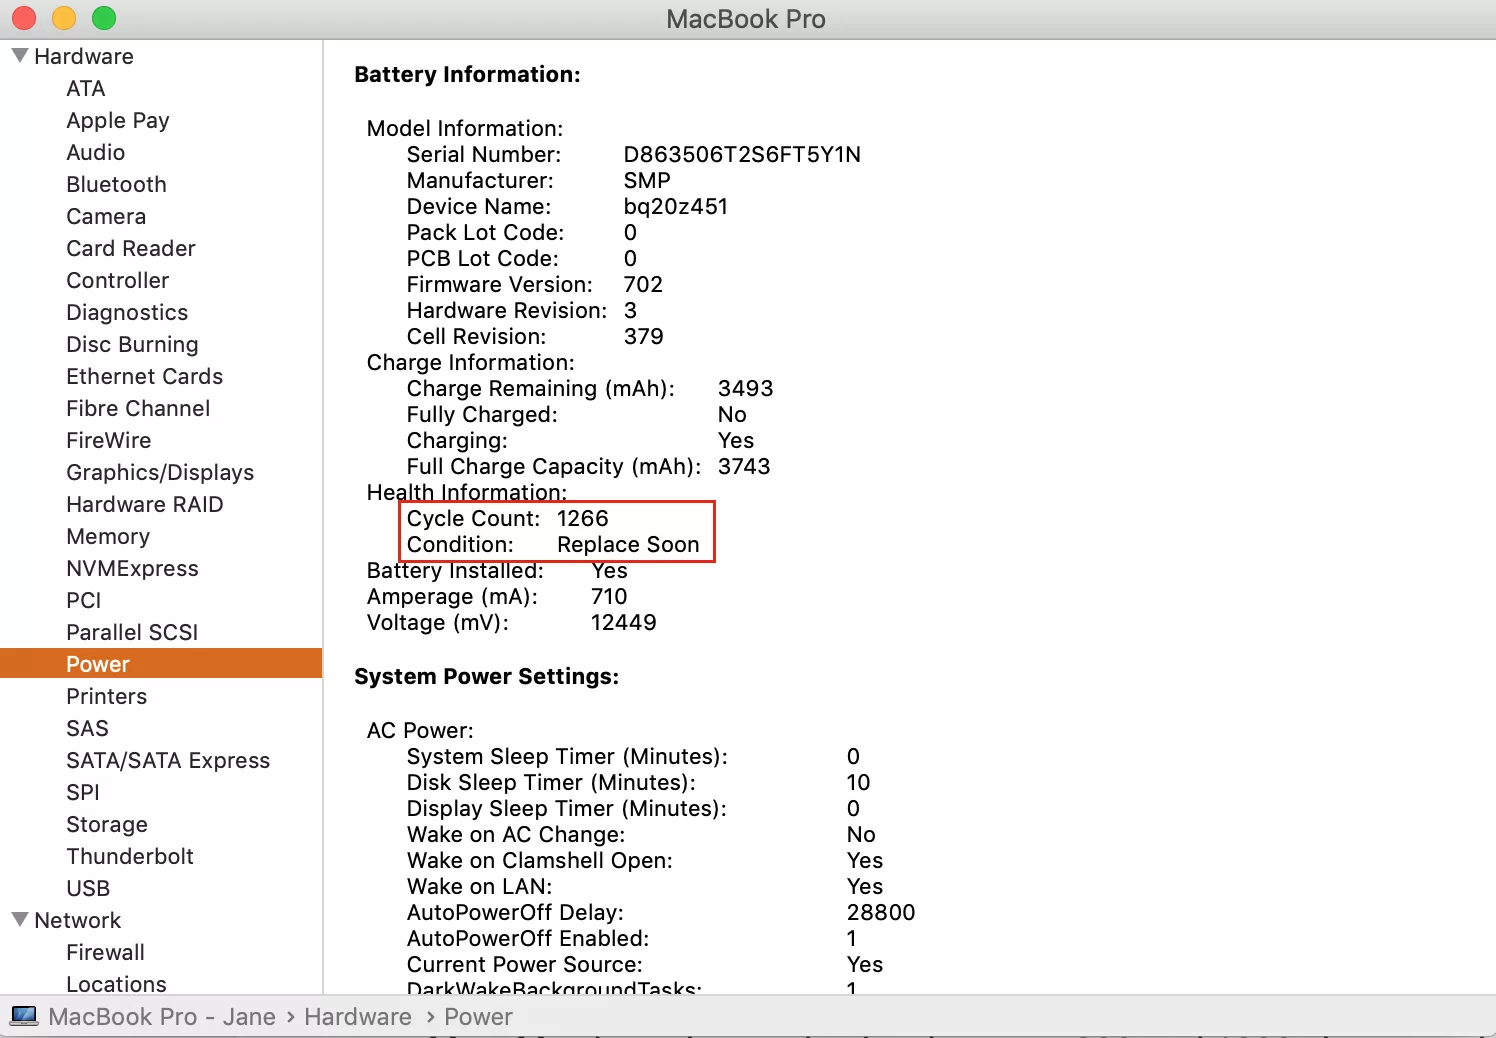
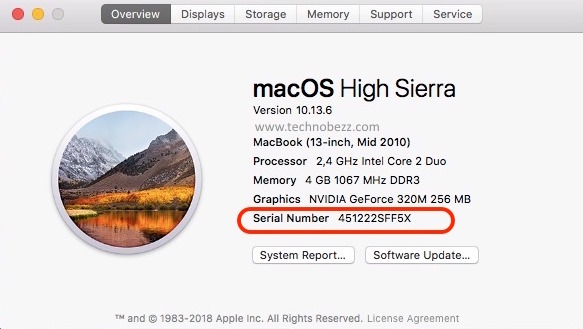
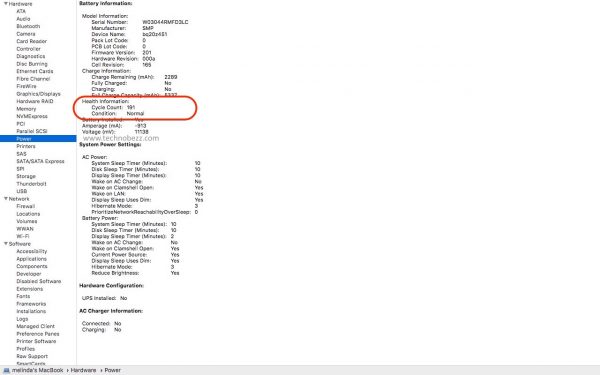
About This Mac > System Report, and select the Power tab, under Hardware. In the right panel, you will find the Cycle Count, as showed below.
Then we check on power sensors and alternator just to know if the charger works pretty fine and delivers juice the right way.
From this point on, have a terminal handy and just copy-paste whatever command follows and check for results.
pmset -g batt
pmset -g batt | head -n 1 | cut -c19- | rev | cut -c 2- | rev
Step 2 : Check Ports
Yup, your USB, FireWire, headphone jack, etc.
Just connect devices to all your ports to see if they still work.
After checking those ports physically, enter the command line.
system_profiler SPUSBDataType
Step 3 : Check the Keyboard
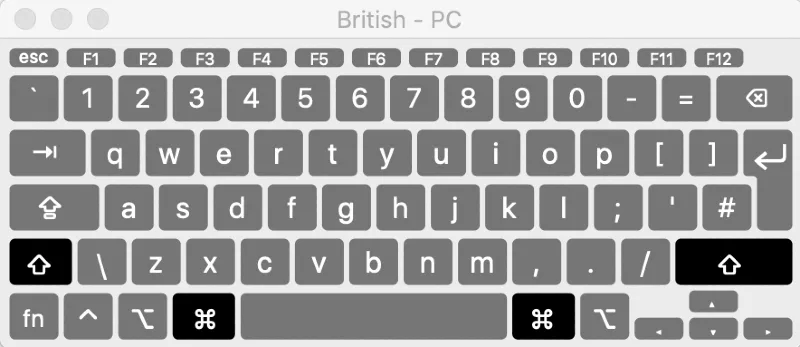
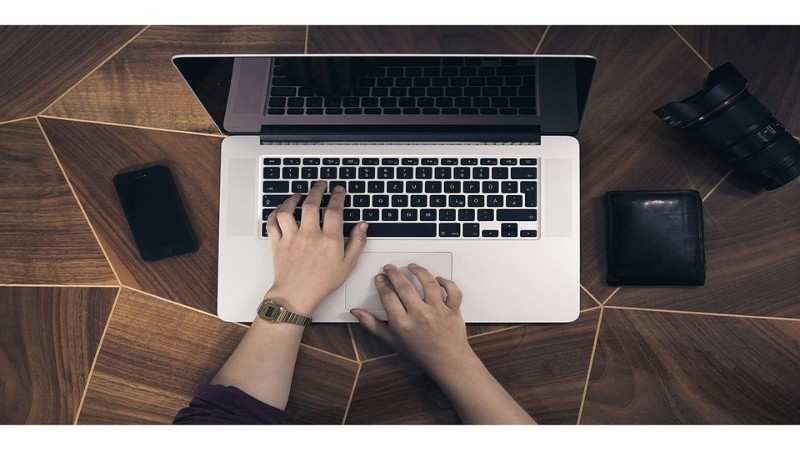
This one us more for the laptop users, but can apply to any keyboard. Testing the keyboard can be as simple as opening up a TextEdit file and testing every letter, but if you want to know if other keys register properly when pressed, you can use a handy macOS built-in tool, called the Keyboard Viewer. To enable it, go to System Preferences > Keyboard and check the box next to “Show keyboard and emoji viewers in menu bar.”
Now, from the menu bar, pull up the Keyboard Viewer.
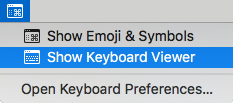
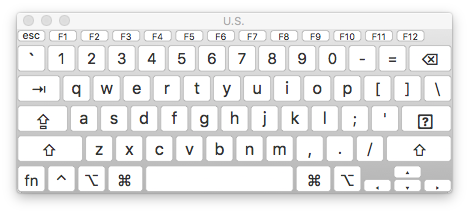
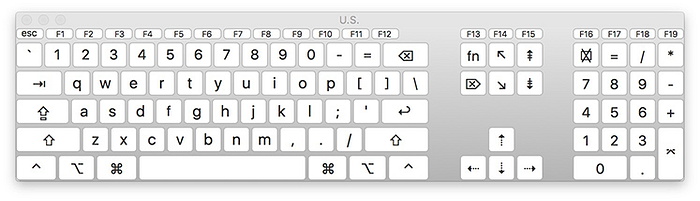
Simply press each key and see if it registers with a gray color in the Keyboard Viewer. Now you’ll know if all your keys work, even the ones you never use. The Keyboard Viewer adjusts to the keyboard you use, so as long as it’s recognized by macOS you should get an accurate representation of your keyboard. For example, here is the Keyboard Viewer for an Apple Extended Keyboard:
- When you’re done testing, go back to System Preferences > Keyboard and uncheck the checkbox next to “Show keyboard and emoji viewers in menu bar.”
If there is an issue with your mouse or trackpad, you will find out during normal use, so I won’t suggest any tests for those. The same goes for the hinges of your laptop screen.
Step 4 : Carry Performances and Versioning Test
yes > /dev/null &
If you open Activity Monitor and look at the CPU tab, you’ll see a single process “yes” running at 100%. To kill the process, go back to the Terminal window.
For a 4-core CPU that has 8-cores like the Core i5 Haswell Extreme UL, the total with the virtual cores included, the command becomes:
yes > /dev/null & yes > /dev/null & yes > /dev/null & yes > /dev/null & yes > /dev/null & yes > /dev/null & yes > /dev/null & yes > /dev/null &
sw_vers -productVersion system_profiler SPSoftwareDataType
MAJOR_MAC_VERSION=$(sw_vers -productVersion | awk -F '.' '{print $1 "." $2}')sw_vers -productVersion | cut -d ‘.’ -f 1,2
product_version=$(sw_vers -productVersion)os_vers=( ${product_version//./ } )os_vers_major="${os_vers[0]}"os_vers_minor="${os_vers[1]}"os_vers_patch="${os_vers[2]}"os_vers_build=$(sw_vers -buildVersion)# Sample semver outputecho "${os_vers_major}.${os_vers_minor}.${os_vers_patch}+${os_vers_build}"# 10.12.6+16G29Step 5 : Check what is really under the hood
2. Check PCI devices : ioreg -l | grep PCI
3. Extended Info : sysctl machdep
sysctl -n machdep.cpu.brand_string
5. Check GPU : System Information/System Profiler -> Graphics and Displays
system_profiler SPDisplaysDataType
system_profiler SPDisplaysDataType |grep Resolution
system_profiler SPDisplaysDataType
defaults read /Library/Preferences/com.apple.windowserver.plist
system_profiler SPHardwareDataType | grep Identifier
system_profiler SPHardwareDataType | grep Processorsysctl -n machdep.cpu.brand_stringsysctl -a | grep cpuopen http://www.google.com/?q=$(sysctl -n machdep.cpu.brand_string | awk '{FS=" " ; print $2 "+" $3 "+" $4}')+site:ark.intel.comGet CPU Flags : sysctl -a | grep \.features\: | fmt -w 48
clang-3.5 -v -xc /dev/null -O3 -march=native -o- -E 2>&1 | grep -o 'target-cpu \w*'gcc -v -xc /dev/null -O3 -march=native -o- -E 2>&1 | grep -o 'arch=\w*'gcc -xc /dev/null -O3 -fverbose-asm -march=native -o- -S | grep -o 'arch=\w*'arch=core2
Step 6 : Check the audio DSP
system_profiler SPAudioDataType -xml
system_profiler -listDataTypes | grep AudioSPAudioDataType
Step 7 : Check Temperature
smc -fsmc -k TC0D -r | sed 's/.*bytes \(.*\))/\1/' |sed 's/\([0-9a-fA-F]*\)/0x\1/g' | perl -ne 'chomp; ($low,$high) = split(/ /); print (((hex($low)*256)+hex($high))/4/64); print "C\n";'
Mojave Fan Cooler : sudo powermetrics | grep Fan
Step 8 : Check Disk Space
df -H | awk '/\/dev\/disk1s1/ {printf("%s\n%s\n", $2,$4)}'diskutil info /dev/disk1s1 | awk ' /Volume Total Space/ { total = $4" "$5 } /Volume Free Space/ { avail = $4" "$5 } END { printf("%s\n%s\n", total, avail) }In case of bad results here and there, you better be careful.
1: Check actual age of the machine
The age of the machine is not when the seller bought it. It is whatever Apple say it is. Macbooks are built in generations, usually twice per year. Even though there is no new announcement or changes of price, you and your friend who bought the exact same Macbook only 10 months apart can have quite different machines.
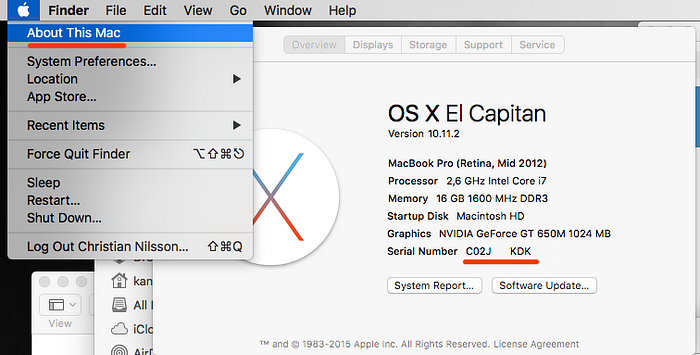
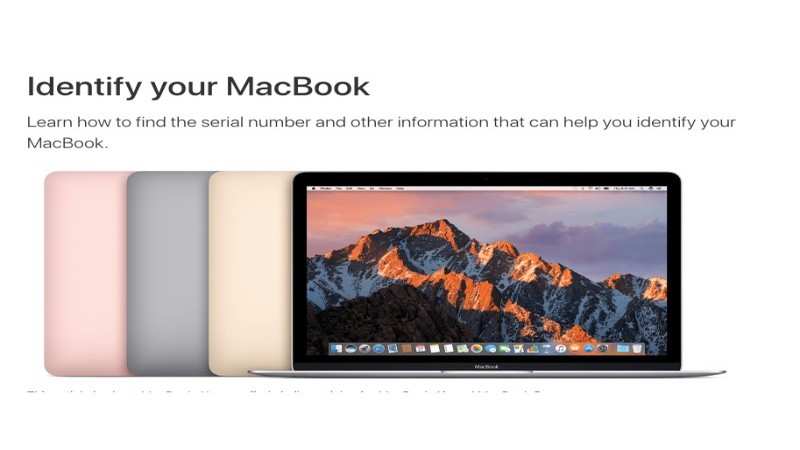
Open the lid of the Macbook, press the Apple in top-left corner and click “About this Mac”. From there a new window shows up which in newer machines show the Serial Number, in older machines you have to double-click on the version number. (https://support.apple.com/en-us/HT201581).
You can also turn the machine up-side-down as the serial number is printed on the bottom.
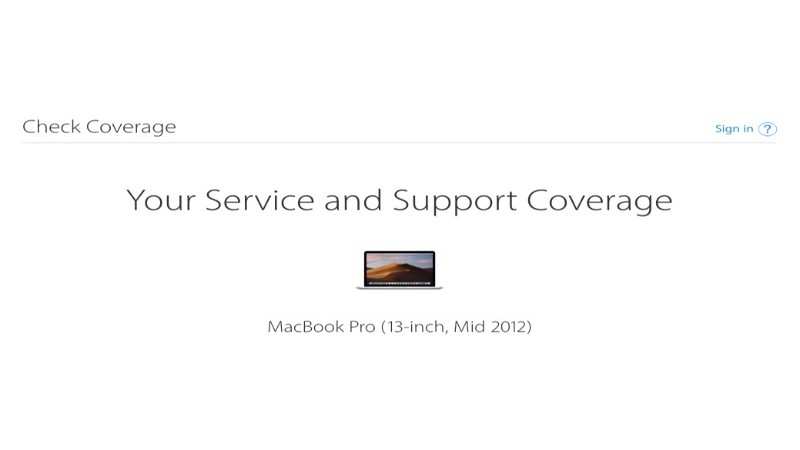
Copy or write this number down. Then visit Apples Warranty Checker online by going to this URL: https://checkcoverage.apple.com. It will tell you the model and in parenthesis which revision the Macbook is. For example “MacBook Pro (Retina, Mid 2012)”.
This page also tells you current warranty coverage situation and gives you the actual name to search for when you want to find out specifics about this particular model and revision.
2: Require proof of purchase
This goes without saying but if you have bought something as pricey as a new computer you tend to know where the receipt is. If bought online there is a digital copy stored on your account. When the seller “have lost it” you know something is up.
3: Check how much is left of battery
Now this is a important one. No battery lasts forever and as a matter of fact laptop batteries in general is not very long-lasting. Specially not considering the latest trend of not making them replaceable without serious breach of warranty. It is not impossible, you can still get the battery replaced by authorized Apple stores for a cost of around $200 (excluding taxes) but this is an extra cost to factor in.
A Lithium-Ion battery which is what Apple uses counts load cycles. The battery can take about 1000 load cycles with progressively worse performance. You can check health and how many load cycles the battery has by holding option-key down while clicking the Apple logo in top left corner and select System Information. In the new window choose “Power” and look for Cycle Count. You want this to be a value less than 500. Over 500 load cycles and you will be experiencing a battery that quickly drains and before not too long will require constant power cable.
Apple claim that below 1000 cycles is good but my experience is different. You can find official information about maximum load cycles here (https://support.apple.com/en-us/HT201585).
4: Confirm all keys are functional
Open the lid and find anywhere you can type, like the password box or so but even better a box where you can see the letters printed. Then progressively press each key on the keyboard and make sure something comes up on the screen at the same time you press the key. Also make sure it has a solid “bump” as you press the key down since dirt under the keys can be very expensive to get out and shows extreme wear from previous owner.
The Apple keyboard and touchpad are exceptional and they should never have any quirky feeling to them. If in doubt pass up on the buy. A bad keyboard will drive you mad over time. Replacing these is expensive and buying extra keyboard defeats the purpose of a laptop.
Make sure you test Space and arrow keys as these are more exposed and more common problem keys than the rest of them for some reason. Ensure the Space key works evenly across the whole key, not just center.
5: Run Apples built-in hardware test “AHT”
This is by far the most important thing. Built in to every Macbook there is a stand-alone hardware testing application that is very advanced, yet simple to run. It doesn't care what the shady seller is saying, nor does it try to pretend being better than what it is. It will take a long (anywhere between 15 mintues to upper extremes of an hour), hard look at itself and tell you exactly how it is feeling and if anything is bad or broken.
It doesn't just report what is broken, but also gives you health indicators on what the wear and tear components of the computer such as the disk drive (yes, even SSD wear out) and battery.
To start the test software follow these steps:
- Shut down your computer. Then, press the power button to turn it back on.
- Press and hold the D key before the gray startup screen appears.
- It takes a minute or so for AHT to start up and inspect your hardware configuration. When finished loading select language and then click the “Test”-button.
The extended test is more thorough and a bit overkill for just checking the computer but if you want to overkill the check then do click it. Prepare a cup of coffee though as it takes an hour to complete. I recommend the basic test. Read more at Apple website: https://support.apple.com/en-us/HT201257.
Running the test can take a while but it is insignificant amount of time given the amount of dough you are handing over the compared to the time you will regret the purchase if you buy a broken machine.
Bonus: Check for dead pixels
This is the most common thing people mention when you ask for advice but honestly not very important. The idea is that all thin monitors well wear out and this happens pixel by pixel. The higher quality of screen, the longer it will last but there are lemons everywhere. A dead pixel is not always a black dot on the screen which is what you might think. Instead it can also be a shining bright pixel which is how a pixel “dies”. It is not always easy to spot and most screens have somewhere between zer0 and ten of them randomly placed on the screen somewhere.
Try to find a dark background or object on the screen you can move around and then search for a white pixel on the screen. Do the opposite for black pixles. If you see more than 10 of these I would avoid the computer, less than that though is reasonable if not in a terrible place (read: middle of screen). There are blogs talking about how to fix some problems with dead pixels but really just accept that this is inevitable and not a huge deal.
- Check the body for scratches, dents, and other physical damage
- Check the rubber feet and screws that connect the hardware.
- Check the screen for damage, cracks, and scratches.
- Try the brightness keys to ensure they work to make the screen fully bright or dim.
- Ensure the display hinges aren't loose and the rubber gasket isn't worn out.
- Check the whole keyboard to ensure each key works as intended.
- Check the trackpad, ports, and headphone jacks as well.
6. Check the MacBook's Battery
The battery is the first thing you should check when it comes to the MacBook's internal components. You can check a MacBook's battery health from System Settings (or System Preferences on older macOS versions). When the battery health drops below 80%, you might notice significant degradation in battery performance.
Another important factor to consider is the MacBook's battery cycle count, which is the number of times a battery is fully charged and depleted. You complete one charge cycle when you deplete the battery of a fully charged MacBook.
A previously owned MacBook might have a cycle count upwards of 500, and although it isn't great, it's well below the 1,000 cycles Apple rates it for. All in all, the lower the battery cycle count of the used MacBook you're getting, the better.
7. Run Disk Utility to Check the Hard Drive
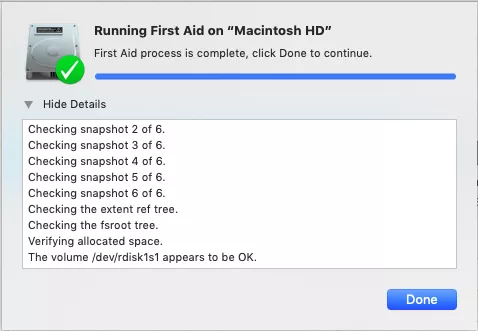
Older MacBooks are more prone to hard drive failure. Using Disk Utility, you can check the MacBook's hard drive health when meeting the seller in person.
Go to the Applications folder from Finder. Then, go to the Utilities folder, open Disk Utility, and click on First Aid at the top of the window. This inspection usually takes some time to complete.
You will be presented with any system concerns in a separate window. If there are any messages displayed in red, it indicates an issue with the hardware, memory, or logic board.
Even with a working processor, you might end up having to replace hardware such as the SSD. You can use these as bargaining chips if you are open to investing in repairs.
Step 1: Check for damages
Start diagnostics by carefully examining the body of the used Mac for any physical damages, such as visible scratches. Next, check all the screws. Any loose screws can be a sign that the Mac has been serviced by a non-authorized repair service. Also, make sure the screen and the case aren’t bent.
Finally, check the display hinges (the joints that hold the display and case together). These hinges should be powerful enough to support the lid and prevent it from casually falling.
If you find any damages when buying a used Mac, you could use it to bargain.
Step 2: Check how old that Mac is
Does the current Mac owner claim the Mac is in like-new condition? That may be true, but that doesn’t mean it’s actually new. You can check the actual age of the Mac by going to About This Mac section of the Apple menu in the upper left corner of the screen.
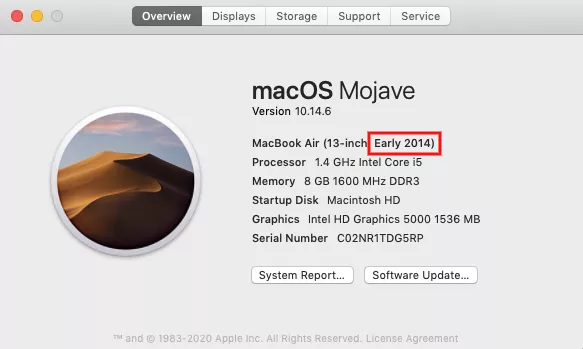
If macOS is not installed on the used Mac you’re examining, you can check its age with its serial number. Turn the Mac over and you’ll find the serial number next to the regulatory markings. Use these resources to identify the Mac model and its age, as well as its warranty and support at the Apple’s coverage check webpage.
Step 3: Boot this Mac
Time to give this Mac a whirl. Make sure the machine you want to buy starts and macOS loads all the way to the desktop picture. If macOS is not installed on this machine, use the bootable drive you brought with you (the one with macOS on board). Hold down the Option key once you hear the startup chime and select the external startup drive.
If the Mac doesn’t boot, it’s not really a deal-breaker. You can check out our tips on what to dо if a Mac doesn't turn on. However, it’s up to you to decide whether you’re ready to overcome such obstacles. And if you are, it might be another reason for a discount on the second-hand Mac.
Step 4: Disable firmware password
Mac users set up various passwords for their devices, but one of them can be a real headache for the new Mac owner. Bad news if the seller set up a firmware password on their device — you won’t be able to start your Mac from the USB drive. When booting a Mac and hearing a startup chime, hold down the Option key. If you’re prompted to type in the firmware password, ask the Mac owner to turn it off.
Here’s how to disable firmware password:
- Turn off the Mac
- Turn it on again and hold down Command (⌘) + R keys immediately afterwards
- Release the keys when you see a lock icon and a password field
- Ask the Mac owner to enter the firmware password
- Click Utilities and select Firmware Password Utility or Startup Security Utility
- Click Turn Off Firmware Password
- Enter the firmware password when requested
- Quit the utility and restart the Mac
Step 5: Check the display condition
To spot defective pixels on the display, go to a dead pixels checker that fills your screen with pure colors. Alternatively, open pictures with a mono-colour background (red, green, blue, white, or black) on the used Mac. If any pixels are damaged, you’ll notice small spots on the display.
It’s ok if there’s a dead pixel or two. However, if there are groups of broken pixels, then you probably shouldn’t buy this used MacBook.
Looking ahead, if you need any advice or have any specific questions regarding the device you’ve chosen, you can always install MacKeeper and message/call our tech expert. Our team would love to help you choose the best device for you, and they will also explain how to use MacKeeper effectively to prolong your Mac’s life.
Step 6: Run a keyboard test
Use the macOS built-in Text Edit app to make sure the keyboard is not malfunctioning. Open it and type every keyboard character. Works fine? Now try the Caps Lock button and functional keys. Works perfectly? Great!

Alternatively, you may use Keyboard Viewer. Go to the language menu at the top menu bar, and select Show Keyboard Viewer. Now every key you hit is displayed in the new keyboard-like window.
Step 7: Check the optical drive
If the Mac you’re about to buy has the optical drive, insert a DVD or a CD disk to check if it reads information.
Step 8: Check all ports
It’s easy to do. Just connect your external drive to the USB port. Do the same with the headphones. Works? Amazing!
Step 9: Run webcam diagnostics
Launch the Facetime app or the Apple’s Photo Booth app to test the iSight camera. Can you see your face in the app window? That means your webcam works perfectly.
If you encounter a pop-up message saying “There is no connected camera”, change your app’s default camera to the iSight camera. If this problem persists, it could be a sign of camera issues.
Step 10: Check hard drive
Disk Utility is a handy tool to help you examine the Mac’s hard drive health.
- Go to Applications in Finder
- Choose Utilities
- Select Disk Utility
- Click on First Aid in the menu above
- Click Run
The checkup will take a while and once you’re done, you’ll see a window with a list of messages regarding the status of your hard drive. If you notice any messages in red, it means that something is wrong with the disk.
A MacBook with a failing hard drive can be a big headache, but it’s not the end of the world. You can always fix or replace it. If this is the case, then make sure to get a discount from the seller.
Step 11: Check the battery
MacBooks are known for their outstanding battery performance, so you want to make sure the Mac you buy won’t drain after just an hour or so of use.
To check your Mac’s battery health:
- Click on the Apple Logo
- Hold down the Option key
- Select System Information from the drop-down menu
- Open the Power section in the left sidebar menu
- Pay attention to the Health Information section
Cycle count and Condition will help you diagnose the Mac’s battery health. Most Mac batteries tend to last between 300 and 1000 charge cycles. Here you can find more information on battery cycle count for different Macs. Make sure the battery cycle count and health are within the limit. As a general rule, the less battery cycle count the better.
Step 12: Apple Hardware Test
The final step we recommend is an Apple Hardware Test (or Apple Diagnostics on newer Macs). It detects issues with the logic board, memory, and other hardware components.
- Disconnect all external devices and turn off the Mac
- Turn it back on and hold the D key once you hear the startup chime
- Select the language you need and press the arrow button to run the test
For more information, check out this article on Apple Diagnostics.
Got 5 minutes?Watch our YouTube tutorialto see the steps above!
FAQ
How to test out a used MacBook before you buy it?
To test out a used MacBook before you buy, run Apple Diagnostics. It’s a built-in Apple tool that can help you detect issues with RAM, battery, sensors, graphics, CPU, and other hardware components. Here’s how to run Apple Diagnostics to test out a used MacBook before committing to a purchase:
- Shut down your Mac and disconnect all peripherals
- Press and hold the power button until the startup window appears
- Press Command (⌘) + D
- Wait for the test to complete and review the results
How to check whether a MacBook is original or not?
To check whether MacBook is original or not, go to the Check Coverage page, which is an Apple service allowing you to verify your warranty status. Once there, enter Mac’s serial number into the search field, solve a CAPTCHA, and click Continue. Among the results, you will find the validation of the purchase date, telephone tech support, and service coverage among others.
To check whether the MacBook is original you need its serial number. It can be found in the About this Mac section of the Apple menu. Alternatively, look up the serial number on Mac’s bottom case.
How to check whether a second-hand or refurbished Mac is stolen or not?
To check whether a second-hand or refurbished Mac is stolen or not, ask the seller to provide the original box and receipt. If the reseller cannot provide you with the receipt, check used Mac’s Find My settings. If the settings are disabled, it doesn’t necessarily mean the Mac has been stolen, but it’s a reason to raise your guard.
Ask the seller to tell you the approximate expiration date of Apple’s Limited Warranty and check whether it matches the information on the Check Coverage page.
- Go to the Apple menu and select About this Mac
- In a window that opens, copy a serial number
- Go to theCheck Coverage page and paste the serial number into the search field
- Compare the results to the one provided by the seller
- If there’s a considerable discrepancy between the two dates, stay away from the purchase
Check how old that Mac is Check 1: Check how old that Mac is Is a Mac like-new? Check the age of the Mac by going to the About This Mac section of the Apple menu in the upper left corner of the screen. A little tip: if macOS is not installed, you can check its age with its serial number. Turn the Mac over and you’ll find it next to the regulatory markings. This number will help you identify the Mac model and its age, as well as its warranty and support when you head to Apple’s coverage check webpage. Check 2: Boot this Mac Boot this Mac Make sure the machine you want to buy starts and macOS loads all the way to the desktop picture. If macOS is not installed on this machine, use the bootable drive you brought with you (the one with macOS on board). Hold down the Option key once you hear the startup chime and select the external startup drive. Check the display condition Check 3: Check the display condition To spot defective pixels on the display, go to a dead pixels checker that fills your screen with pure colors. Alternatively, open pictures with a mono-color background (red, green, blue, white, or black). If any pixels are damaged, you’ll notice small spots on the display. It’s ok if there’s a dead pixel or two. However, if there are groups of broken pixels, then you shouldn’t buy this MacBook. Run a keyboard test Check 4: Run a keyboard test Use the macOS built-in Text Edit app to make sure the keyboard is not malfunctioning. Open it and type every keyboard character. Then try the Caps Lock button and functional keys. You can also use Keyboard Viewer. Go to the language menu at the top menu bar, and select Show Keyboard Viewer. Now every key you hit is displayed in the new keyboard-like window. Check all ports Check 5: Check all ports This one’s easy. Just connect your external drive to the USB port. Do the same with the headphones. Run webcam diagnostics Check 6: Run webcam diagnostics Launch the Facetime app or Apple’s Photo Booth app to test the iSight camera. If you can see your face, smile back, it means the webcam works perfectly. Note: If you encounter a pop-up message saying “There is no connected camera”, change your app’s default camera to the iSight camera. If this problem persists, it could be a sign of camera issues. Check Hard Drive Check 7: Check Hard Drive Disk Utility is a handy tool to help you examine Mac’s hard drive health. Go to Finder - Go - Utilities Select Disk Utility Click on First Aid in the menu above Click Run The checkup will take a while and once you’re done, you’ll see a window with a list of messages regarding the status of your hard drive. If you notice any messages in red, it means that something is wrong with the disk. Check a battery Check 8: Check a battery To check your Mac’s battery health: Click on the Apple Logo Hold down the Option key Select System Information from the drop-down menu Open the Power section in the left sidebar menu Pay attention to the Health Information section Cycle count and Condition will help you diagnose Mac’s battery health. Most Mac batteries tend to last between 300 and 1000 charge cycles. The less battery cycle counts the better. Run an Apple Hardware Test Check 9: Run an Apple Hardware Test Apple Hardware Test (or Apple Diagnostics on newer Macs) detects issues with the logic board, memory, and other hardware components. To start Apple Hardware Test: Disconnect all external devices and turn off the Mac Turn it back on and hold the D key once you hear the startup chime Select the language you need and press the arrow button to run the test.
Battery It could seem like you're getting a bargain in a used Mac until you find out that less than a year later you need a new battery. It's very fairly easy to check to see the condition of the battery. All you have to do is go to the Apple menu, About This Mac, and then System Report. Then look for Power and look then for two things. Condition, which should say Normal and Cycle Count. But you want to check Apple's website and it shows you the expected cycle counts for the battery. You can see how far along the battery is. So you have to factor that in. If it's a $200 battery and it's halfway through its life you have to think, well it should be worth $100 less than if it had a new battery. You also want to check the Model number and Serial number. The Model number, if you search for it online, you'll find information about that model and what year it really came out. A lot of time listings online, or in classifies, give the wrong year. So it may be, for instance, a 2015 MacBook but the seller says it's 2017. I've heard that you should check the serial number that's on the case with the serial number that comes up in About This Mac to make sure they match. I don't know how they would not match but I guess if they don't match then that's a big red flag right there. You can also use that serial number to check to see if that machine is still under warranty or something. But chances are that if you are buying a used Mac it's not. So is doesn't matter. Now hopefully you're seeing this Mac in person so you can test out some things. One of the first things you want to do is run a hardware test. Instructions for doing so can be found at Apple's website. The second URL is for 2013 and newer Macs so it's probably the one you want. Run the hardware diagnostic and see if anything comes up. Hard Drive Then you want to check the hard drive. This is pretty easy to do. You want to run Disk Utility , select the hard drive, get info on it, and then look for the S.M.A.R.T status. It should say Verified. Now you want to run some of your own tests. The first thing you want to do is look at the screen and look for any dead pixels. It's hard to tell if you're looking at a color image like the desktop background so maybe bring up Safari and a blank or mostly white browser window and look around to see if there are any dead pixels. Then you want to check the keyboard. Make sure every key works. Nothing seems to stick. Nothing seems to give double key presses. Use the sentence, the quick brown fox jumps over the lazy dog, which includes all 26 characters of the keyboard and then remember to check the number keys and everything else in there. Be pretty thorough. Also test out the trackpad as much as you can. Try moving the cursor around. Try clicking. All of that just to make sure that trackpad seems to be fine. You want to test out the Camera by either launching PhotoBooth or FaceTime to make sure that the camera works. Test out the speakers by playing music or something at a pretty loud volume to see how they sound. Also checkout the headphone jack. This is a little more difficult to do but you want to checkout the ports. So if you've got a bunch of USB ports, for instance, you want to make sure each one works. So maybe bring along a flash drive or a USB mouse or something that you could use to test each port one by one. Firmware Password Also checkout wifi and bluetooth. Okay, so now here's a really important one. You want to make sure there's no firmware password set. A lot of people buy a used Mac, they go to reset it or do something important with it, and they find out it has been locked with a firmware password and there's no way to get in touch with the seller again so the Mac, kind of, becomes useless. To do this all you need to do is restart the Mac in Recovery Mode. So restart it holding Command R down. It'll go into Recovery Mode. At that point if a firmware password is set it's going to prompt you for it. If you can boot up into Recovery Mode fine then no firmware password has been set. Also if the seller still has their user account setup there you want to make sure they are not logged into iCloud. So go into System Preferences and iCloud and make sure they are not logged in. Because if they are logged into iCloud they can have the ability to lock the Mac after they sell it. User Accounts Here's another thing though. It's possible that you can be looking at only one user account on that machine. So you want to go to System Preferences, Users and Groups and see if there are any other users. Then have the seller log into each of those accounts and make sure that iCloud isn't turned on for any of those as well. Ideally the seller should be selling you a Mac that has been completely wiped and has none of their information or accounts on there. Where to Buy So there are a lot to be concerned about. Now where are the best places to buy a used Mac. Well, probably the best place is Apple itself. Apple has a section on its site on refurbished Macs. So these are kind of like used Macs. They probably are the most expensive used Macs but you do get the full Apple warranty and support with them. Now there are some websites out there that sell used Macs. I've never bought used Macs from any of these but these are places that have been around for years so if I had to buy a used Mac I probably would go to them first. So checkout Smalldog Electronics, checkout OWC, and checkout MacofAllTrades. Another place to buy a used Mac is your local used Mac store. If you think you don't have one in your city then you're probably wrong because there are used Mac stores hidden around all over the place. So ask around. Do some searches. You'll probably find out there's a shop that's been around for years selling used Macs not too far from you. If the place has been around for a long time and has a good reputation it's certainly a better place to buy a used Mac than from some random person posting online. Now probably the most popular place to buy a used Mac is on eBay. So from another individual or somebody that resells lots of things. If you're going to buy from eBay first take the time to read up on all the different scams and things you should look out for when buying anything expensive on eBay. Make sure you're really well educated before you even go in. Look out for all the red flags especially if the seller tries to change the method of payment or something like that. You should only pay on eBay through the official eBay payment system. Look out for deals that are too good to be true. You can read about all sorts of people getting scammed by trying to buy expensive items like computers on eBay. Craig's List is another place to go and buy. Of course that's only for buying local so you should be able to meet the person and see the Mac in person and test it out. Follow all the safety procedures. Make sure you meet in a public place, etc. Now all those things I told you to look out before if you're buying a used Mac in person, any one of those should be a sign that you should walk away. Don't be afraid to walk away. Too often we get attached to wanting a specific item, even when we find a little this or that is wrong, we go for it anyway. Chances are you're interested in a Mac because the price is just good enough and any tiny little thing like a port not working or a dead pixel, or an older battery should be enough for you to just walk away and keep looking. Reset Now once you get your used Mac the first thing you should do before you do anything else with it is do a complete reset. Even if the seller has already done so. You should boot into Recovery Mode and completely wipe the drive and reinstall the operating system from the internet so you starting completely from scratch. You should absolutely do this every time. I'd say the only exception to that rule is if you're buying a refurbished Mac directly from Apple.
You should pay much attention about the age that it is not actually the time that the seller bought it. You should be careful about what apple mention about it. As a matter of fact, MacBook are built in different generations, usually twice per year. If you and your friend buy two MacBook in a same year about in 10 months apart, both of you will experience two quite different systems.
So to discover the exact age of the MacBook,
- Open the lid of the MacBook,
- Press the Apple in top-left corner and click “About this Mac”,
- New window shows up which in newer machines show the Serial Number, in older machines you have to double-click on the version number.
Another easy way to check the age, is turning the machine up-side-down and see the serial number and write it down in a piece of paper, then visit apples Warranty Checker online. https://checkcoverage.apple.com. This site will show you the model and in parenthesis which revision the MacBook is. like “MacBook Pro (Retina, Mid 2012)”. Totally it will tell you whatever you should know to check about the MacBook.
It’s clear that when you have bought a MacBook as the same price of a new one you should check the receipt and where it is exactly. When you buy something online digital copy should be available.
The most important about this machine is the battery, you should know that no battery being alive forever. Specially laptop batteries don’t have a long time battery life, as a matter of fact you can change the battery by authorized Apple stores and pay around $200, but this is a reality and an extra money that you should be aware of it. The battery can take almost 1000 load cycle with worse performance, so you should check health and load cycles. To do this you can hold option-key down while clicking the Apple logo in top left corner and select System Information. In the new window choose “Power” and look for Cycle Count. In this issue, you can rely on a value less than 500. more than that in no time you will need constantly power cable.
Open the lid and type wherever you can. For example, password box or press each key and make sure that they work perfectly. Make sure that the keys are clean because it’s too difficult and expensive to get out the dirt. Actually the keyboard is very important to be okay with it, because a bad keyboard will make you tired over the time and it’s important to know that replacing the keyboards are really expensive and it’s better to pass up on the buy.
This the most important technical checking over the hardware testing application, but it’s easy to do and check. Keep it in your mind that you shouldn’t pay any attention what the seller tries to say about it. To start the checking software, you should follow these steps:
- Shut down your computer. Then, press the power button to turn it back on.
- Press and hold the D key before the gray startup screen appears.
- It takes a minute or so for AHT to start up and inspect your hardware configuration. When finished loading select language and then click the “Test”-button.
As a matter of fact, it’s not so much important issue to check out. Because recognizing the dead pixels are not so much easy that it seems. You should know that a dead pixel is not always a black one on the screen, but I can help you that if you find around ten pixels avoid the computer and less than that its actually normal and it’s not a big deal to think about it.
To check whether the MacBook is original or not, visit Apple’s 'Check Coverage' website
Apple has a dedicated website to check the authenticity of its products. Visit the official https://checkcoverage.apple.com page. Enter the serial number and check the validity of the purchase date along with other details.

If the MacBook doesn’t switch-on, then look for the serial number in the box and verify it on these website
If for whatever reasons, your MacBook doesn’t start then simply take note of the serial number on the box. Every the serial number partner is different for MacBook, MacBook Pro and MacBook Air. To validate the same, visit https://support.apple.com/en-in/HT201608 for MacBook, or visit https://support.apple.com/en-jo/HT201300 for the MacBook Pro. To validate the model of a MacBook Air then visit https://support.apple.com/en-gb/HT201862.

Always ensure, the serial number on the box and the one shown on screen are same
Check whether the serial numbers on the box and under “About this Mac” option is same or not

To know whether the second-hand or refurbished MacBook is stolen or not, always ask for the serial number first
Before you start negotiating on the price of an old MacBook ask for the serial number first. If the seller doesn’t provide the serial number, cancel the deal right away. Note that buying a stolen MacBook can land you in serious trouble.
Also Read: TCS, Infosys, Wipro and other IT companies: Who has rolled out and who has delayed salary hikes
Don’t buy any locked Macbook even if the seller tells you that he/she will unlock it after full payment
If you are buying an old MacBook from someone, ensure that it’s unlocked and fresh from the start. Never buy any locked device as it could be a stolen one and the owner might have remotely locked it.
To check the actual age of the MacBook model along with the warranty details visit this website.
Visit https://checkcoverage.apple.com page, enter the serial number of the MacBook model and know the registered details of the product.

If you are buying a second-hand Macbook, check for visible physical damages
It goes without saying that you should check the physical condition of the old MacBook that you are going to buy.
To know the actual age of the old MacBook model that you are buying do this
Visit https://support.apple.com/en-in/HT201608 for MacBook, or visit https://support.apple.com/en-jo/HT201300 for the MacBook Pro. To validate the model of a MacBook Air then visit https://support.apple.com/en-gb/HT201862. Check the respective model number to know the actual age.
If you are buying an Old MacBook, simply start it to ensure that there are no firmware passwords
Ensure that MacBook boots up to the desktop first. Then restart it. When the Mac OS is booting (when you hear the startup chime music) hold Alt/Option key. If you are told to insert password then there is a firmware password and you should tell the owner to remove it.

Check the condition of the battery of the old MacBook model
Simply open system information (if you don’t know how then simply search for the term ‘system information’ by clicking on the magnifying glass search button on the top right side). On the left, browse down to power and click on it. Note the battery serial number and capacity to check the authenticity of the battery. To know the life of battery, note the ‘Cycle Count’ under ‘Health information’ of the battery.
If you are buying an old MacBook, check the optical drive
Insert a DVD to check whether the optical drive is working or not. In new MacBook models there is no optical drive.

Open Disk Utility to check the health of the hard drive
Just search “Disk Utility” app on your MacBook and run a first aid scan to know the condition of the hard drive. Also, this is where you get to see the exact storage of the MacBook.

Run Apple Hardware Test (AHT) by visiting this website
To know the exact condition of the MacBook hardware, visit this website https://support.apple.com/en-in/HT202731 if the MacBook model is prior June 2013, then visit this website for Apple Hardware Test (AHT) https://support.apple.com/en-us/HT201257
Check the condition of the MacBook charger of old models
The charging cable of any MacBook is quite sensitive to wear and tear. Check whether the cable is original or not and whether it charges properly or not.
Check webcam of the old MacBook
Before you buy any old MacBook, check whether the camera is working properly or not.
Check whether all connectivity ports are working or not by using them
Physical abuse of ports are pretty common in old MacBook models. Check them before you buy or negotiate the price.

Check the trackpad condition by varying tracking speed
Go to System Preferences and click on Trackpad. Check the response of the trackpad by varying the tracking speed.
Check the performance of the keyboard and whether all keys are fine or not
Simply open the Text Edit app and start typing each keys to know whether they are working or not.
Check the display of the MacBook with this simple test
After checking for any visible damages, download four images of four colours— Red, Blue, Yellow and Green. Open these images individually on full screen and check for any dead pixels.
Serial number
The first thing you should do is ask for the serial number. It must be visible on the laptop and will allow you to verify that the laptop has not been reported and is legal. In addition, if it is really stolen it is very possible that the current owner either does not have the number or does not know how to get it, so you already have a good filter. Then you can also ask for the original invoice which will be another key point to check its legitimacy.
Main features
Once this is achieved, another aspect to analyze is the features of the laptop that we are about to buy. It is very possible that the seller has already offered them to you, but to avoid problems you can do a new check by going to My Computer> Properties. With other tools like DXDIAG you can go much deeper, but this first measure will be enough to check that everything fits.
Battery health
Lastly, you can also see the battery status. It is something that we all ask and that is always a source of conflict with the seller. Sadly, Windows does not have a system like Mac cycles (full battery loads), but there is a trick to know all the information about the power. You should look for the program ‘Command Prompt’-> type ‘powercfg/batteryreport’-> press ‘enter’-> go to ‘C: Users name’ and find the generated HTML file that will show you all the details. We leave you a video that details the entire process.
What to check in MacBook laptop

Serial number
As we mentioned before, it is key that when talking to the seller, he offers you data that shows that the laptop is completely legal. In this case you can ask if it has the box or things like its charger. It is more in the box the serial number usually appears, although it can also be obtained in your Apple space if, obviously, you are the owner of the device or you have registered it as yours.
Main features
We return to the same as before. We must check in detail that everything corresponds to what they told us both in the announcement and on the official Apple page said about model. To see the characteristics, in this case you must go to the upper left corner-> apple icon-> About this Mac. There you will have the details.
Battery health
This Apple has it much better structured than Microsoft, and in a glance at what they call battery cycles you can know the trot that the battery carries. Go back to ‘About this Mac’ and click on ‘System Report’. There, look for the ‘Power’ section and locate ‘Number of cycles’. Think that the recommended maximum is 1000 cycles for a battery so do the math.
Apple Hardware Test
Finally, Apple has a very interesting tool for a computer review. It is a test that checks that everything works correctly and warns you of possible failures. To use it, you just have to follow the steps indicated on the web that we link to you here. https://support.apple.com/ru-ru/HT202731
Check Serial Number
Asking the serial number of a used MacBook is the first thing you have to do as it can give you very important information about the computer. You can check it by clicking the Apple logo on the upper-left of the MacBook and choose About This Mac. You can also check it on the bottom of the Mac. What to do after you get the serial number?
- First, make sure the serial number on your Mac is the same one as you find in its box.
- Go to https://checkcoverage.apple.com/ and enter the serial number.
- Here, you get the information about the actual age of the machine, the product’s date of purchase, the warranty status, etc.
If you buy the MacBook online and the seller refuses to give you the serial number, cancel it right away because it might be a stolen MacBook.
Check Physical Damages
Check the body of MacBook if there is any physical damage like a dent, scratch, etc. Also, make sure there are not any loose screw and ask if the Mac has ever been serviced by the unauthorized repair shop. Next, test all the ports, optical drive, WiFi and the webcam. If you find any physical damage, you can ask the seller to reduce the price.
Check Battery Condition
Battery replacement for Apple notebook can cost you around $100 to 200$. That’s why checking the battery condition is very important. To check it, click Apple logo, press the Option key, and select System Information. On the left sidebar of the pop-up window, find Power and click on it. Here, you will find the battery health status and the cycle count. It should be written “normal” and make sure the Cycle Count is under 300 or 500 depended on the MacBook model. Each model has a different cycle count. For example, MacBook Pro 13-inch early 2012 has a maximum 1000 cycle count, while MacBook Pro 15-inch late 2008 has only 500 cycle count. You can find more information about the cycle here: https://support.apple.com/en-us/HT201585
Check The Charger
Checking the charger is also important. Make sure it can plug and charge the Mac properly, otherwise you have to spend extra money on buying the new one.
Disable Firmware Password
Turn on the Mac by pressing the power button. Once you hear the startup chime, hold the Option key. If you are asked to type a password, that means the owner hasn’t disabled the Firmware password yet. Tell her or him to disable it.
Check Hard Drive Health
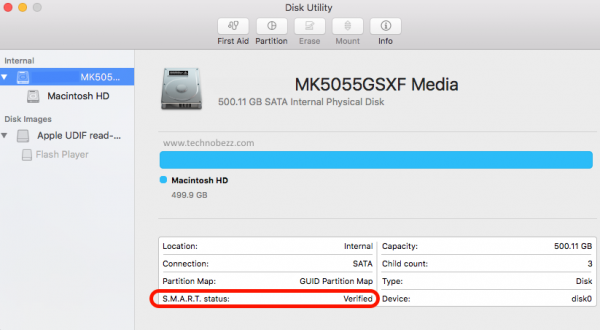
Open Finder > Applications > Utilities > Disk Utility and click Apple SSD … the first list you will find under Internal. Check S.M.A.R.T (Self-Monitoring Analysis Technology) status on the right sidebar and make sure the status is verified. Then, on the upper menu bar, click First Aid to check the Hard Drive health.
Run Apple Hardware Test
Apple Hardware Test (AHT) can help you to troubleshoot if there are any issues with the hardware component, like the logic board, memory, etc. This is a useful step, but it requires about 15 minutes to one hour. You can see the steps to run AHT, here.
Test All Keys Functionality
Find a place or any text edit app where you can type something to test all the keys function. Type all keys one by one, then try using the caps lock key. Make sure all keys work well and that you feel comfortable when typing something. Testing the trackpad is also necessary. Check if it also works perfectly.
Check Dead Pixel
Download five mono-color background to check the display condition. These colors are red, blue, green, and yellow. After you open each color, check if there is any white spot appear anywhere on display.
Check Bill and the Warranty
First of all, you have to check the warranty of the laptop while buying the laptop. That is, when that laptop was bought by its first user. Apart from this, the serial number written in the bill of the product and the serial number of the laptop have to match. This shows whether the product is correct or not.
After that, you have to check the warranty of that laptop. However, the warranty of the refurbished laptop would have expired. But if the warranty of that laptop is over, then it has to be checked whether it can be extended or not.
Second-hand laptops available online have a warranty of 6 months to 12 months. Like in Amazon. But the second-hand laptop that is available in the offline market, some have a warranty and some do not.
Check the Battery Life
After checking the bill and warranty of the refurbished laptop, the battery installed in it has to be checked. In this, you have to check how much the laptop has been used. In this, you have to check the battery cycle.
Battery cycle means how many times the laptop has been charged from 0% to 100%. This information is seen in different ways on every laptop.
On a Windows laptop, you have to download a software called Battery Care, with this software you can get complete battery reports. Getting battery information on a Mac is easy. In this, by going to system properties and clicking on the power option, the battery cycle is shown.
My advice is that when you are going to buy a second-hand laptop or a refurbished laptop, buy one whose battery cycle should be between 400 to 500. Don’t buy a laptop whose battery cycles above 500. Otherwise, you may have to replace the battery soon.
Test all the ports & overheating
The third important point is that all the ports of the laptop should be checked thoroughly. Some ports don’t work in some laptops, be it due to a driver or hardware fault.
By charging any refurbished laptop, charging is visible but the charge does not increase. Some USB ports do not work due to missing drivers. After checking and verify all these things, you should buy a used laptop or refurbished laptop.
After checking all the ports, it has to be checked whether the laptop is overheating or not. To check this, it is known after running a video or any other software for some time.
Check System specification
While buying a refurbished laptop or a used laptop, you have to keep in mind whether the laptop is fulfilling your requirement or not. That’s why it is known by running that laptop for 1 or 2 hours.
However, Amazon has a return period of 7 days. At this time period, the laptop can be checked properly. But when you go to buy from the offline shop, they will not give you so much of time. So, you have to convince them to check the laptop for 1 or 2 hours in front of him. Then you will know whether the system is fully configured or not.
In the system specification, you have to see whether the specification which is mentioned for the laptop is actually in the laptop or not. for that you have to check the processor, RAM, display, keyboard, touchpad, storage etc. of the laptop thoroughly.
Talking about the processor, which processor, which generation processor is installed. If we talk about RAM then which RAM is installed i.e., DDR3 or DDR4 and how much GB is it to be checked?
Inspect for physical damage
Refurbished laptops or used laptops will always have some scratches. But you have to check that it has not caused any physical damage. For this, you have to take a good look at that laptop.
Apart from this, after wiping that laptop with a clean cloth, it will be known whether there is physical damage to the laptop or not.
Test Software
After, testing everything, you have to go towards the software. Which software will you use in this, all of them have to be installed and run on the laptop. From this, it will be known whether the software is supported on that laptop or not.
You have to check whether the operating system installed on that laptop is performing well or not. Whether the system is running slow, also has to be checked. Whether any kind of virus is present in that laptop or not, it will also have to be tested.