(The Most Comprehensive) Guide to Overclock hacks
- Find an activated portal (with a diamond shape in the center)
- Approach within 20 meters, press the Overclock button
- Point the camera at the portal
- Identify the depicted glyphs and enter them
- Enjoy the abundant loot in the drop
Table of Contents:
- Glossary
- What is OC in general?
- Why is it needed?
- How to activate a portal?
- How to find activated portals via map?
- How to start an overclock hack?
- Calibration
- Setting up tesseract
- Overclock hack process
- Results
- Interesting facts
- Known issues
- Technical requirements
- Known glyph combinations (L6-L8)
- How to contact the author?
- Greetings
Glossary
AR - Augmented Reality. For example, Pokémon running around your sofa.
OC - Overclock Hack
Activation - adding OC capability to a portal through Wayfarer App or Lightship
Calibration - the initial process in OC. Successful calibration significantly increases the drops from the portal.
Multiplier - a number that affects the hacking result (drop, points in various medals, etc.). Depends on the calibration result (x1 - x4). In simple terms, multiplies everything obtained from the portal.
Tesseract: here - a figure in which glyphs are drawn during OC. A special projection of a tesseract in three-dimensional space, looking like two nested cubes.
What is OC in general?
OC is a new portal hacking method where glyphs appear in AR space instead of on a flat board. The key advantage is faster portal farming and burning. This technique works only on specially activated portals marked by a rhombus in the center.
The hacking process unfolds as follows:
- Get within 20 meters of the portal or closer and tap a designated button in the menu.
- Aim the camera at the portal and wait for calibration.
- Press the Continue button.
- Safely position the tesseract.
- Input the displayed glyphs from within the tesseract onto the familiar glyph input panel.
Why is it needed if it's so complicated?
Despite its increased complexity, this hack, when executed with the right skill, offers substantial gaming advantages. Its key highlight is that each calibrated OC is equivalent to 4 glyph hacks simultaneously, enabling significantly faster farming compared to the standard method. For instance, to deplete a farm of four L8s (VRMH, VRMH, VRHS), you only need to perform 24 OC instead of 88 glyph hacks, all within a similar timeframe and cooldowns between hacks. In practice, this means you can burn such a farm in just 10 minutes instead of the usual half-hour (literally in one fracker!).
The catch is that executing this hack correctly on high-level portals is practically impossible without a thorough understanding of glyph combinations and some hands-on experience. Expect the initial hundred or so attempts to result in failure, leading to potential frustration and multiple "wtf?!"
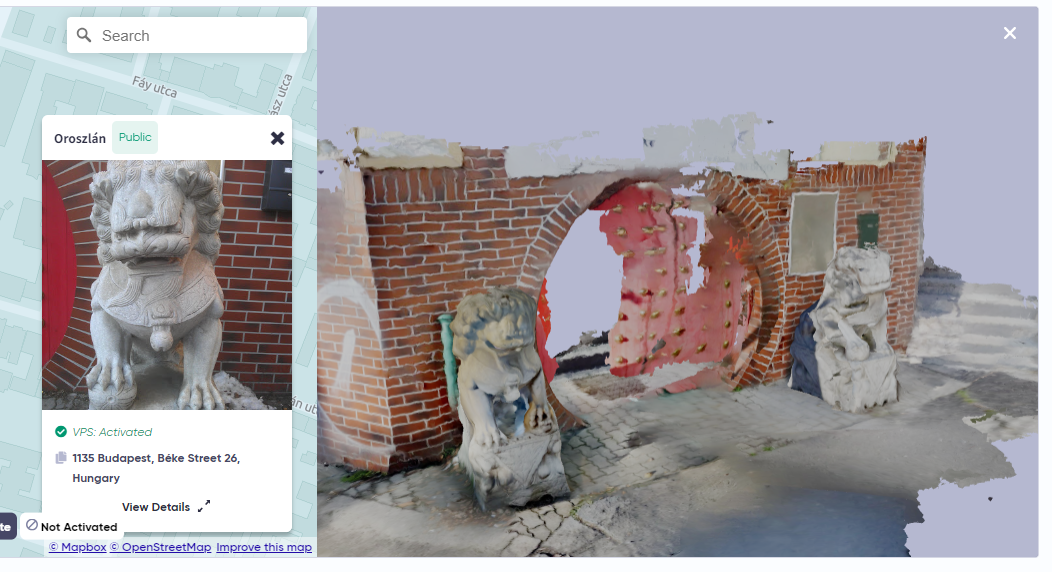
How to activate a portal (make it OC-enabled)?
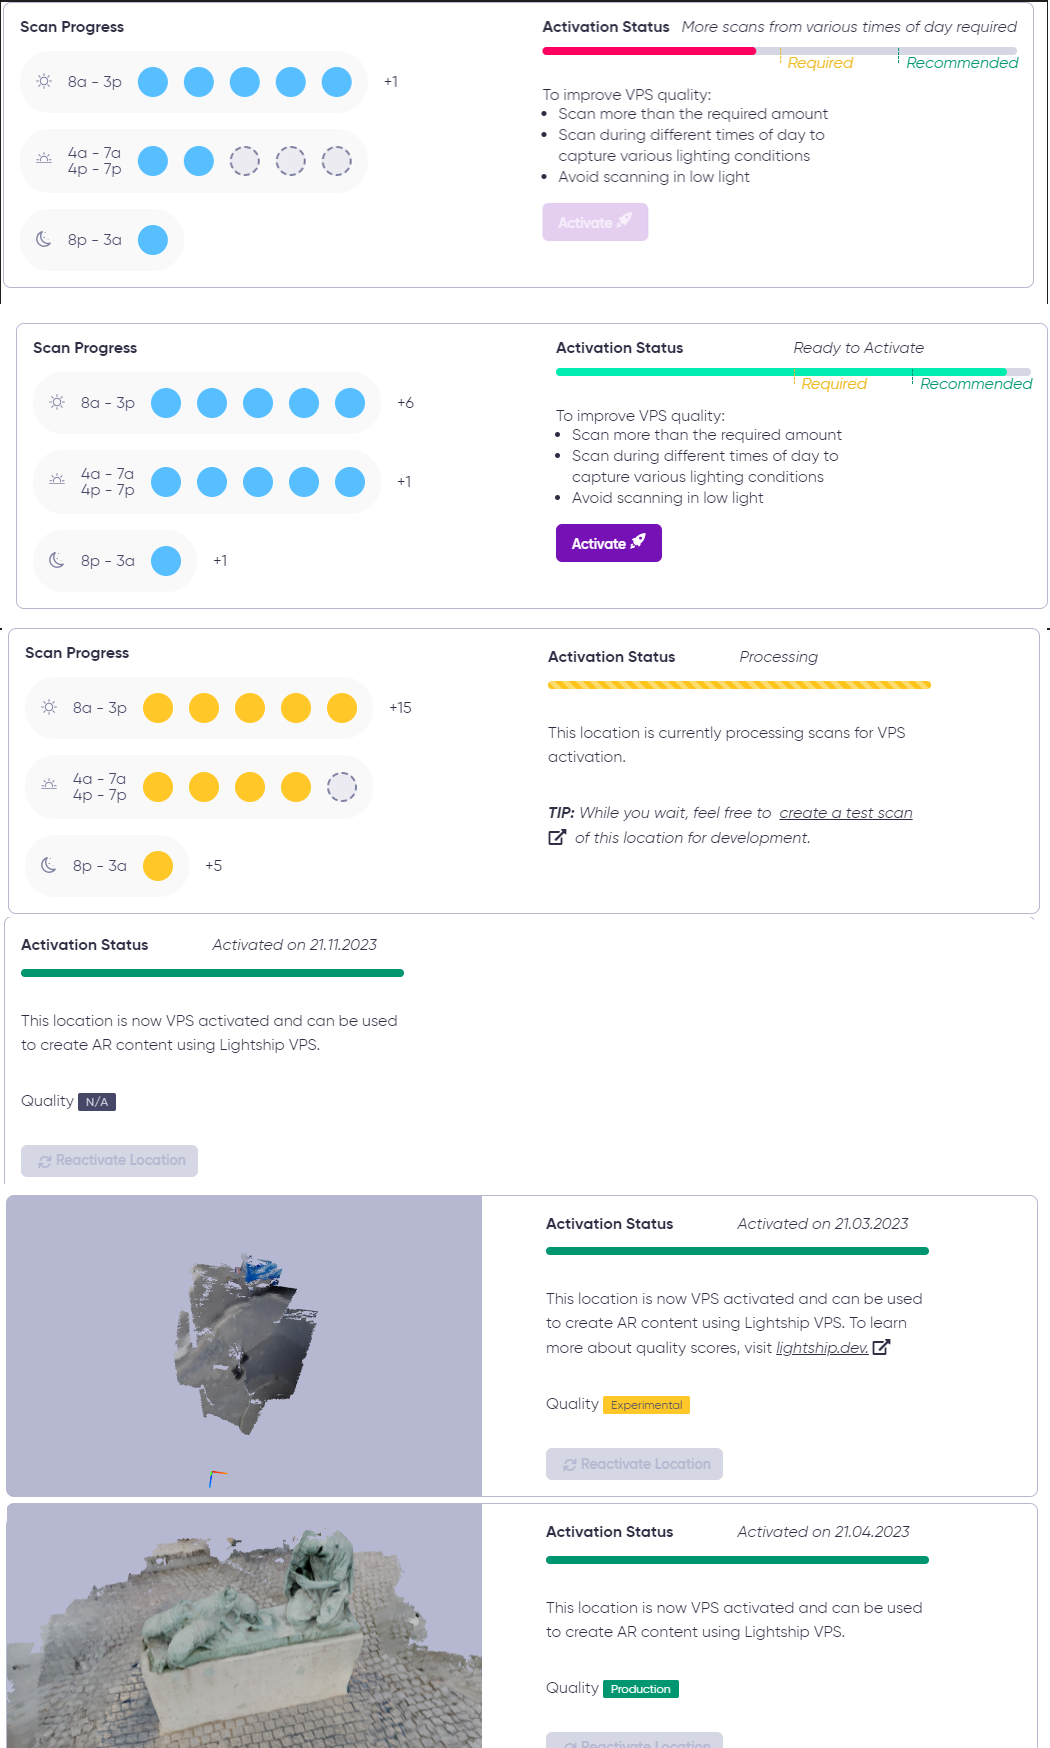
- Capture 10 or more high-quality scans of the portal using any applicable application such as Ingress, Pokemon GO, or the Wayfarer App. Allow a minimum of 5 hours to elapse between the first and last scan (as per developer recommendations, unverified in practice).
- Visit the website https://lightship.dev/account/geospatial-browser/ or find the portal in the Wayfarer app.
- Pinpoint the desired portal on the map.
- Ensure that the scans are registered (this may take a few days, but often occurs within a couple of hours).
- Click the Activate button.
- If using the Wayfarer app for activation, await an email confirming the successful activation.
- If the portal obtains the status VPS: Activated Experimental, conduct 5 or more additional scans and proceed to step 4.
- If the portal acquires the status VPS: Activated without the Experimental badge, wait a few days for the synchronization of activated portals between Lightship and Ingress databases.
Q: Any recommendations on how to capture optimal scans for successful activation? A: Yep, there are a lot of them!
- Clean the phone lens before scans.
- Scan with good lighting, avoiding late twilight and nighttime.
- Take scans when the subject is not in dynamic shadow (for example, under tree leaves).
- If scanning a large object, try to scan the same area or, at least, ensure a significant overlap among scans.
- In my practice, scanning time does not significantly affect the quality, so minimal timing is enough.
- Take scans from the location where you plan to stay while overclocking later.
- Avoid changing phone rotation and refrain from using unusual angles.
- Scan from a distance of 3-6 meters.
- Aim for at least 100 frames in each scan. If you achieve around 50 frames in 20 seconds, this scan is highly unlikely to be scored, even if preliminary marked as good. App restart could increase the framerate.
- If your frames look blurry, move the phone slower.
Q: What to do if the portal doesn't want to activate? A: Try capturing more scans; currently, it's the only available option.
Q: Can a portal change its activation quality over time and lose overclocking capability on its own? A: Yes, some portals have experienced a decline in Production quality over time, leading to a loss of overclocking capability until reactivation.
Q: How long does activation take? A: Activation typically takes several hours.
Q: How long to wait for overclocking capability to appear after activation? A: An excellent question. It can range from a few hours to a week. The speed of synchronization remains unclear.
Q: The portal disappeared from the Lightship map after activation! What happened? What to do? It won't disappear from Ingress? A: Occasionally, after activation, portals receive the status Quality N/A. In such cases, they won't be visible under filters on the map, making it challenging to display them straightforwardly. You can access them by substituting the GUID of any other portal into the link of the missing portal. Although it won't vanish from Ingress, overclocking won't be available. Be patient; after some time, the portal should reappear on the map [the author has waited for over a week for a couple of portals].
Q: Wayfarer app requires only 5 scans, not 10, why should I do 10? A: Presently, despite the app requesting just 5 scans, you need to perform 10 scans for portal activation. This discrepancy may be a bug.
Q: There is a requirement to do scans at various times of the day; is it important for activation? A: Currently, the activation process only requires 10+ quality scans, and nothing more. Theoretically, scanning at different times of the day could improve calibration quality.
Q: Are there any limitations on the number of portals I may activate? A: It seems there is a limit of approximately 20 activations per day on lightship.dev. After reaching this limit, you may encounter various errors like "Unable to request VPS Activation" and "Rate limit exceeded." No known limits exist for the Wayfarer app.
Q: Is it possible that portals are being activated on their own? A: Yes, some portals were initially activated by Niantic, and it's possible that they are activating some portals manually without agent requests.
More details about the hack
IMPORTANT: Exercise extreme caution and patience when conducting OC in non-touristic locations with people nearby. They may feel uncomfortable being filmed, even if unintentional. No hack is worth dealing with angry parents after overclocking a playground.
How to find activated portals via map?
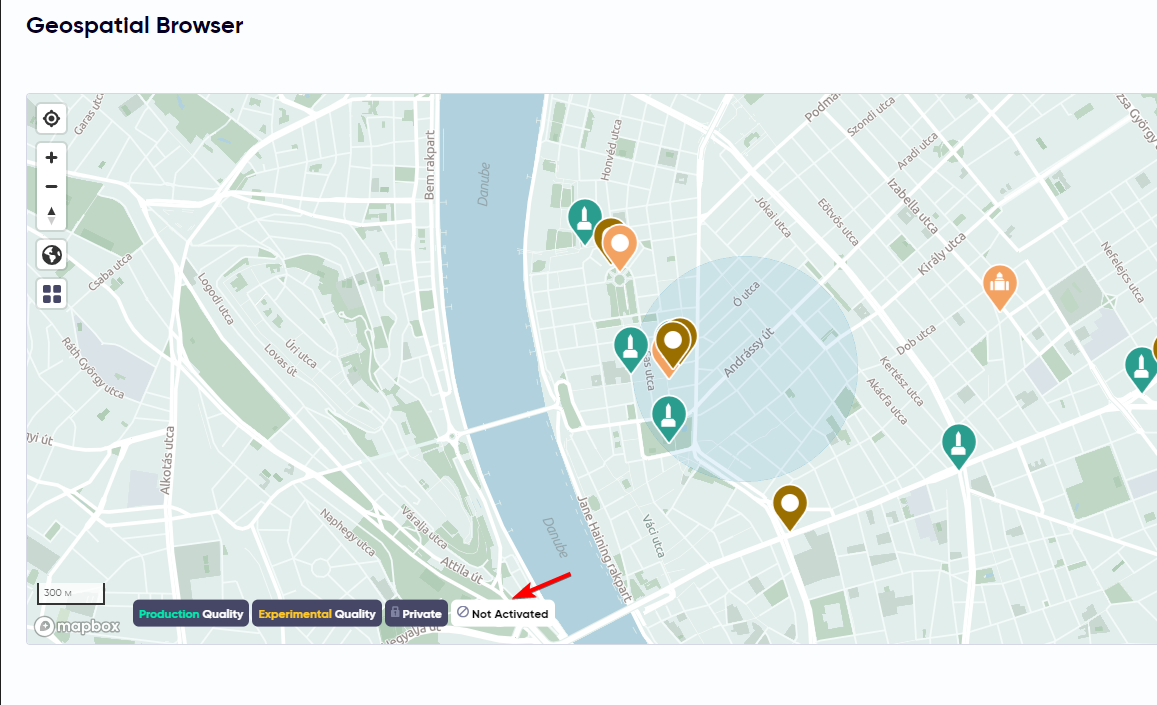
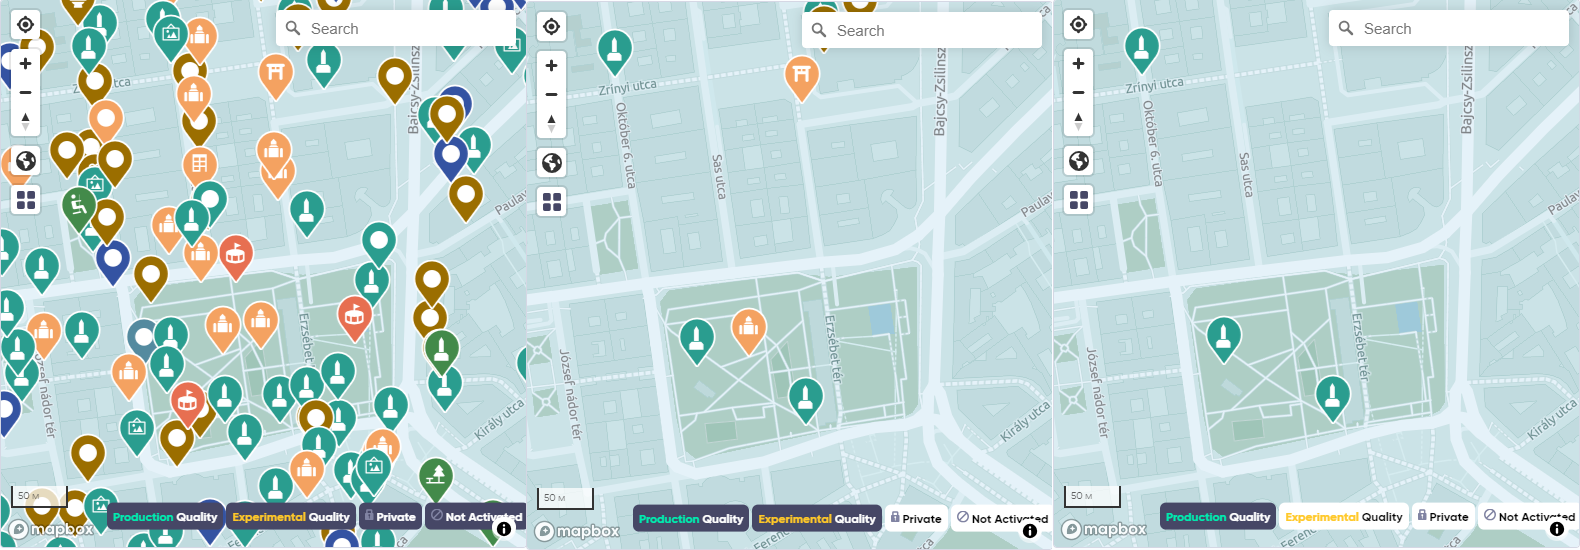
Currently, it is not possible to see activated portals via the intel map. However, you can use the Lightship website and the Geospartial Browser to search for activated Wayspots.
Open lightship.dev and go to the Geospartial Browser and deactivate the layer for "Experimental Quality" as these Wayspots won't become activated Overclock portals. Search around the area and take note of the markers that appear. Tapping on a marker will show the Wayspot details as well as the coordinates and the 3D mesh created by the scans. If these Wayspots are also Portals in Ingress they should be activated for Overclock.
It is also possible to use Wayfarer app to find activated portals, but there is currently no filter for "Production quality" only.
Q: My waypost is classified as "Good/Production", but it's not overclockable in Ingress. What's wrong? A:If a Wayspot was just recently activated and classified as "Good", the corresponding Portal might not be activated for Overclock yet. Ingress syncs to the Lightship database once per day including Overclock statuses, so you might have to wait a few days before the portal can be Overclocked.
How to start a hack?
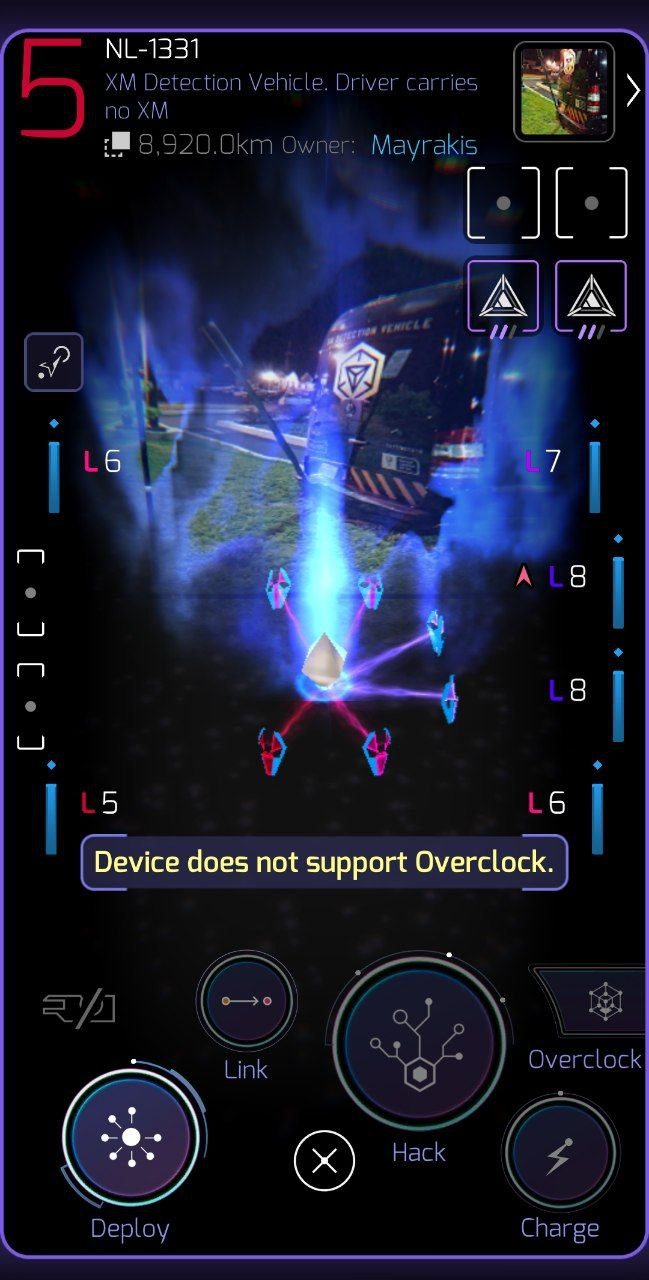
Firstly, confirm the availability of OC for the portal. You can identify this by the portal's appearance: portals eligible for overclocking display a bright rhombus icon in the center, and the OC button in the portal menu is not crossed out.
Next, approach the center of the portal within 20 meters or closer and press the Overclock button in the portal menu (if done correctly, its background will turn yellow).

Following that, a menu for entering pre-glyphs will appear. Currently, only two options are functional: "More" to obtain additional keys and "Less" to refrain from hacking keys.
Q: What will happen if other pre-glyphs are entered?
A: Inputting Glyphs Complex and Simple will trigger an Unknown command warning, while other pre-glyphs (although not all tested) appear to have no effect.
Calibration
After some time following the pre-glyph input, the calibration process will start: the phone's camera will activate, and the application will initiate recording, with the video stream being transmitted to the game servers.
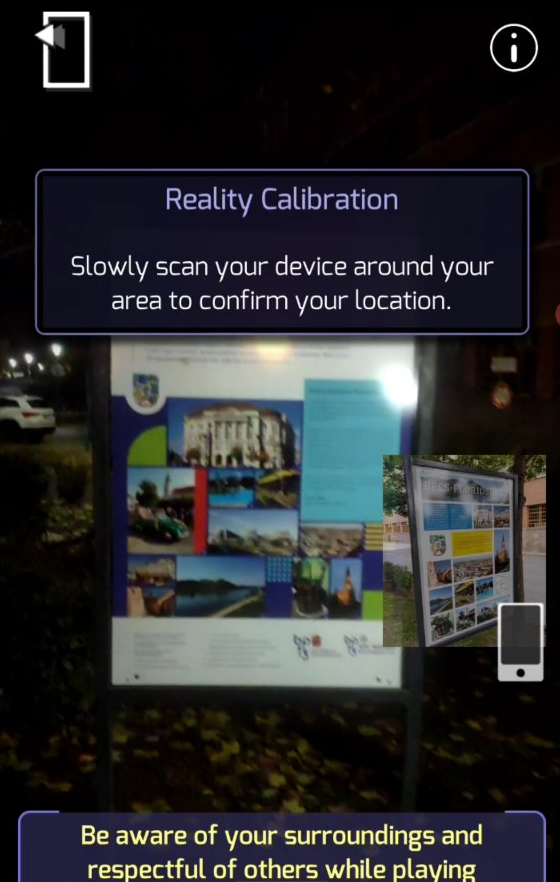
The scanner actively suggests moving the phone back and forth, but under low-light conditions, it's advisable to make minimal movements to capture a clearer picture.
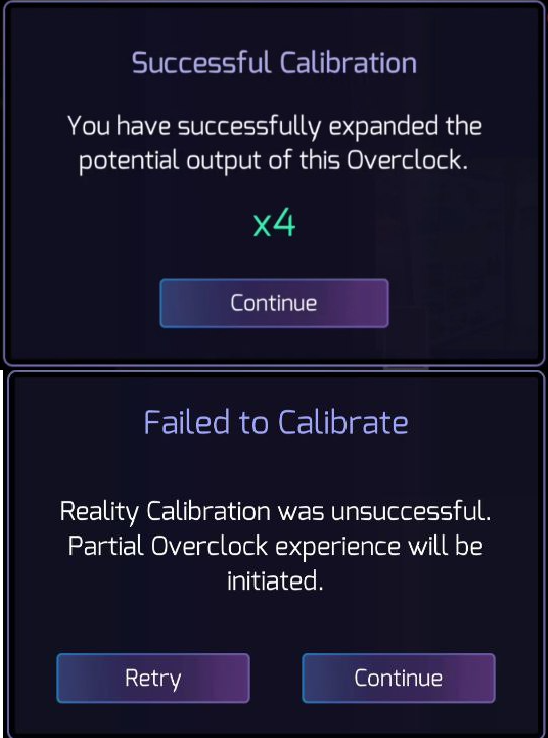
Upon successful calibration, a window revealing the hack multiplier (x1 - x4) will appear, and clicking "Continue" will open the Deployment window. In the event of a failure, you'll have the option to either retry the calibration or initiate an uncalibrated OC. Additionally, you will be prompted to scan the portal to enhance the quality after the hack finished.
To understand what exact area needs to be scanned for calibration on a particular portal, refer to the compiled 3D model of that portal at https://lightship.dev/.
Q: How long does calibration take? How much data is transmitted? A: Calibration typically lasts up to 10 seconds, with a well-scanned portal reducing this time to 1-2 seconds. Throughout this duration, the video stream is transmitted to the servers at a rate of 500-700 KB/s.
Q: What happens if you press the exit button during calibration? A: Pressing the exit button during calibration results in a regular portal hack.
Q: What multiplier will the hack have?
A: If calibration fails, the multiplier will be x1; if successful, it can go up to x4, depending on the number of hacks remaining before burning out the portal. For instance, hacking a portal without mods, waiting for the cooldown, and then performing OC will yield a x3 multiplier. Burning a portal with 2 VRMHs will result in 5 OCs with a x4 multiplier and one with x2.
If you desire more practice, intentionally failing is an option: a portal with VRMH will provide for 16 hacks compared to 4 with successful calibration.
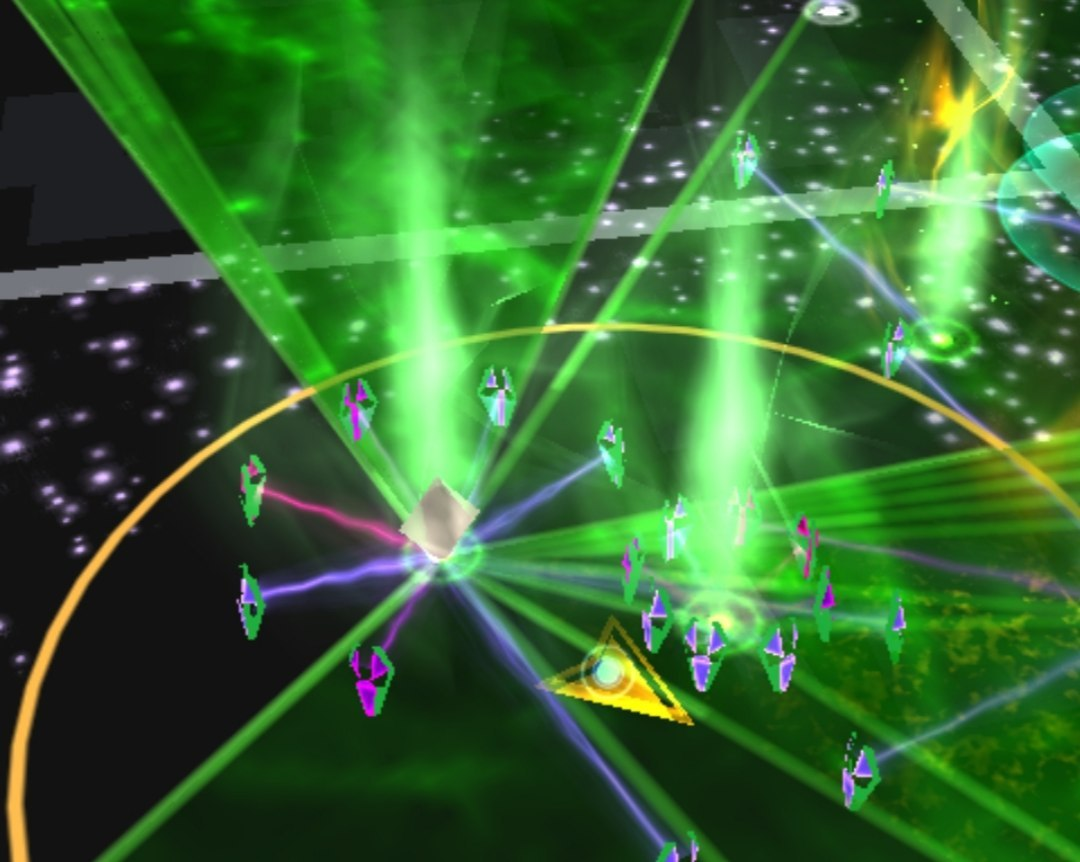
Setting up the Tesseract
On the Deployment screen, the outlines of the tesseract will appear, and you must position it in AR space by pressing the Deploy button.
The hack multiplier will also be visible, with its color indicating the success of the calibration: green for successful and purple for unsuccessful.
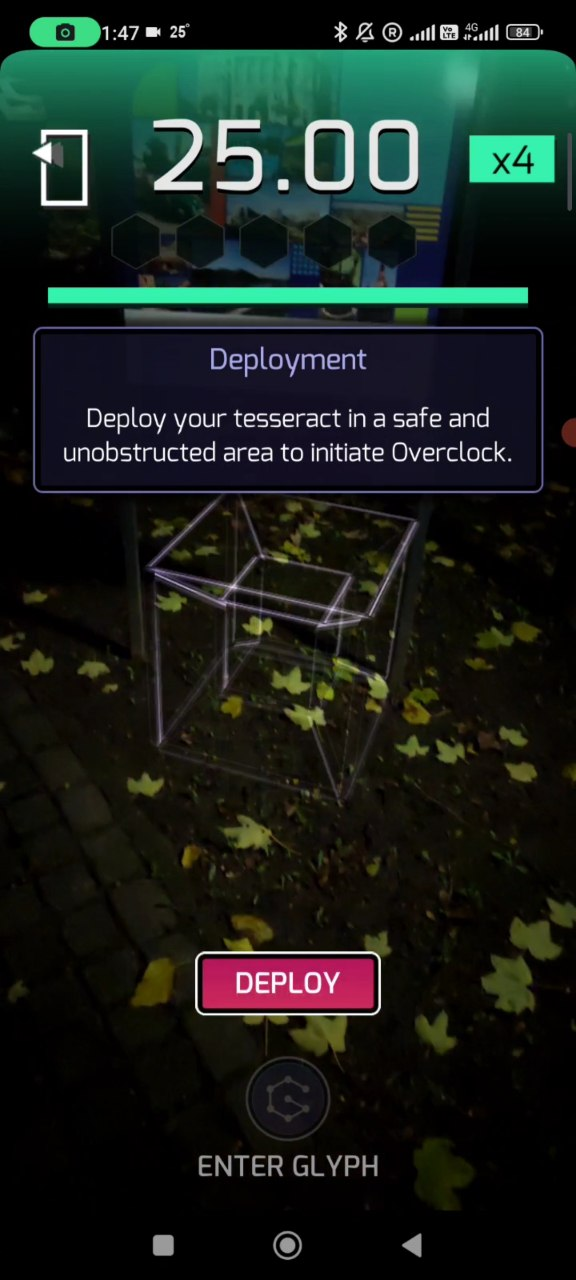
Q: Are there any preferences for when it's best to place the tesseract during the rotation of the outline? A: No, it will be set in a specific state regardless. The only consideration is to avoid turning away from the portal after completing the scan. Turning more than 90 degrees before placing the tesseract may result in mirrored glyphs being displayed (as if looking at the tesseract from the back).
Q: Are any data sent to Niantic servers? Is there any data usage? A: No, data is only transmitted during calibration; all other actions are performed on the device.
Overclock hack process
All glyphs will be displayed inside the tesseract, positioned somewhere in AR space. In the early stages of familiarizing yourself with OC, you'll likely find yourself in a moment of "uh, what is this?". You'll either have to make an guess or physically walk around the location where the tesseract is placed to align the arrangement of the lines to a glyph. For a more in-depth understanding of the process, refer to the video at the beginning of the article.
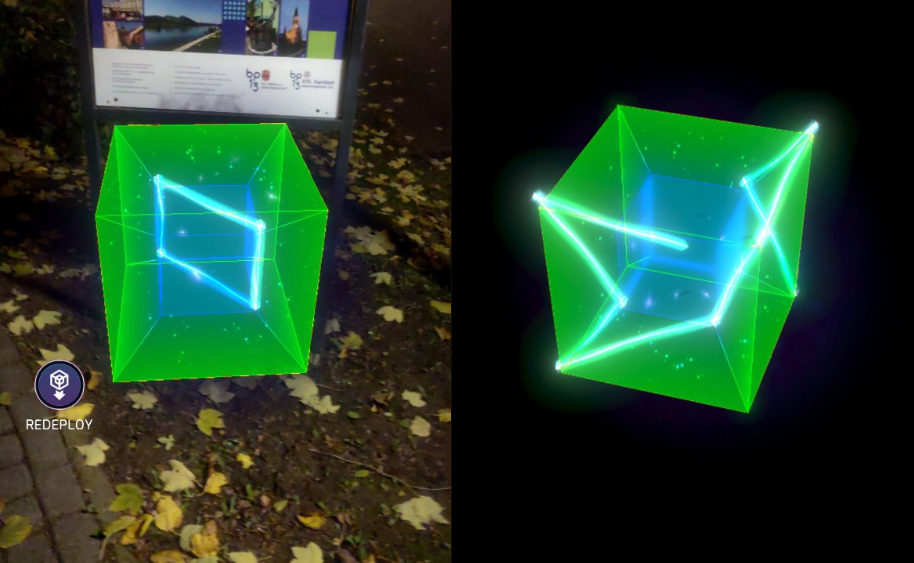
Depending on the portal level, the combination will consist of 1-5 glyphs, showing a standard glyph hack sequenses. Glyphs will appear sequentially, each following the entry of the previous one. If you recognize the displayed glyph, press the "Enter Glyph" button to access the familiar glyph input menu. Upon entry, you'll have roughly a second to press "Redo" and retract the currently drawn glyph; otherwise, it will be considered entered. The "Submit" button will promptly finalize the glyph input.
Q: How much time is given for the hack?
A: The duration depends on the portal level:
Levels 1-5: 30 seconds,
Levels 6-7: 27 seconds,
Level 8: 25 seconds.
Is it too short? When the feature was initially introduced, L8 only had 17 seconds :)
Q: How quickly can you finish an L8 hack in practice? A: If you're fortunate with the combination (many of them are obvious from the first glyph), you can complete it in 7-8 seconds; otherwise, it might take 12-13 seconds. It's a matter of practice.
Q: How long to wait for the display of glyphs? The tesseract unfolds for an eternity each time! A: The first glyph appears one second after the start of the hack; before that, the tesseract animation is displayed. Each subsequent glyph appears one second after pressing the Submit button.
Q: Can you cancel the previously entered glyph? A: No, it is impossible to cancel the input of the previous glyph, only the current one.
Q: I understood the whole combination after the first glyph! Do I need to wait for them to be drawn? A: If you understand the combination, there's no need to wait for the drawing of the glyph; you can enter it immediately - it all depends on the agility of your fingers :)
Q: What does the bar and highlight at the top mean? How does it work? A: The bar is an alternative timer indicating the remaining time, decreasing during the hack. It will be green if more than half of the allotted time remains, yellow if 25-50%, and red if less than 25%.
Q: What happens if I press the exit button during the OC? A: Exiting OC during the hack will count as 1-4 glyph hacks, taking the entered glyphs into account.
Q: What if I close the scanner? A: You can start the hack again.
Results
After entering all the glyphs, the familiar glyph hack results window will appear, featuring an additional Overclock output section containing the OC multiplier (x1-x4) [below referred to as the output bonus].
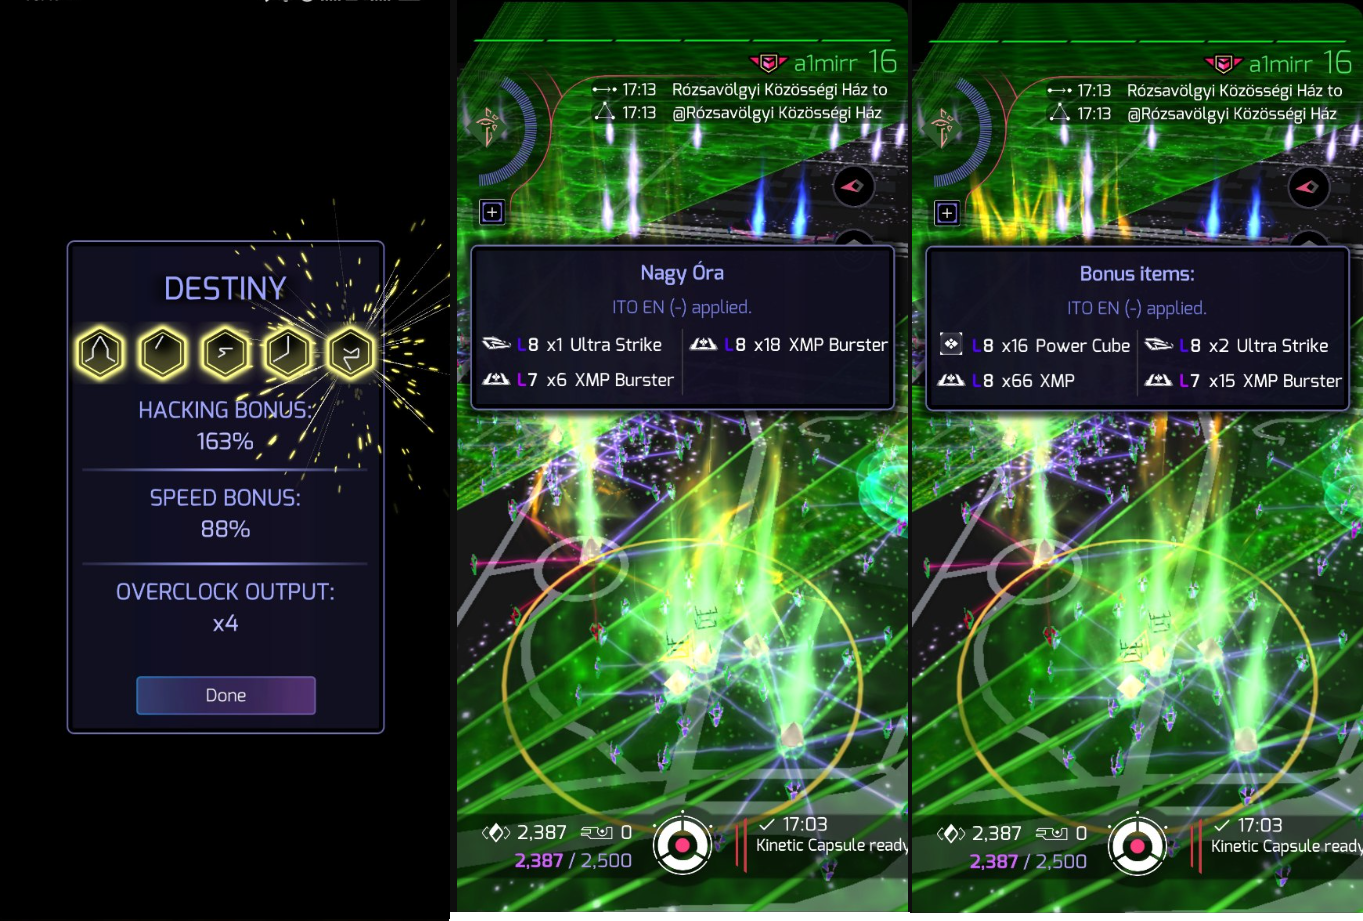
Following the OC, assuming an L8 portal with all glyphs entered correctly and a multiplier of x4:
- Four glyph hacks with a speed bonus equal to the OC speed bonus will be executed.
- The corresponding amount of AP for the glyph hack, multiplied by 4, will be added.
- A 4x bonus AP for hacking of one's own/other faction will be added.
- The hacker will receive 4 points.
- The translator will receive 15*4 = 60 points.
- The overclocker will receive 15+5 = 20 points.
- The total dropped loot will be displayed (sometimes quite impressive!).
- The portal's available hack count will decrease by 4.
- The cooldown timer will start as after a regular hack.
Q: How much XM is spent on the hack? A: XM consumption will be equivalent to the consumption for 1 hack (in case of L8 portal, 400 XM).
Q: Can OC be done with insufficient XM? A: Yes, it can be done, but the hack will show an error AFTER displaying the final screen, and you will have to hack again.
Q: How does the multiplier work? A: The multiplier applies to all hacks.
Q: How does the Epoch bonus work? A: If it's the first hack of the day, the Epoch bonus will apply only to one of the four hacks.
Q: Do More and Less glyphs apply to all hacks? A: Yes, control glyphs apply to all hacks.
Q: How many keys will drop if control glyphs are not entered? A: If More or Less glyphs are not entered, and there is no key in the inventory, 0-1 key will drop. If the key is already in the inventory, then 0 keys will drop.
Q: How to understand how many glyph points will be given? A: Multiply the number of glyph points for a regular glyph hack of a portal by the output bonus. For example, for L6 (4 glyphs) hack with all glyphs inputed correctly and a x3 bonus, it will give 8*3 = 24 points.
Q: And for hacks? A: The same as the number written in the output bonus.
Q: How are points calculated for Overclocker? A: The Overclocker receives as many points as are given for a glyph hack of the same level, regardless of the output bonus, plus 5 points for successful calibration regardless of the correctness of glyph input. Examples:
- L7, calibration x3, successful glyphing => 8+5 = 13 points
- L7, uncalibrated, successful glyphing => 8+0 = 8 points
- L7, calibration x3, unsuccessful glyphing => 0+5 = 5 points
Q: And how is AP calculated? A: Like AP for a glyph hack with the same speed bonus, multiplied by the output bonus. The bonus for hacking a portal of your or the opposing faction is also multiplied by the output bonus.
Interesting Facts
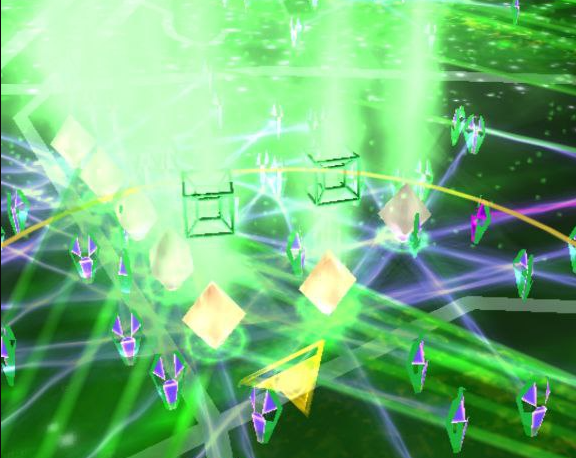
The projection of the tesseract into our space consists of two cubes: one nested within the other. If you hacking green portal, the outer cube will be green, and the inner one will be blue. For the blue one, it's the opposite. Both cubes will be red for Machina portal, and gray for neural portal.
Rotate the tessera: https://tsherif.github.io/tesseract-explorer/. Turn on axis rotation and imagine the madness it would be to read glyphs from a rotating tessera in four-dimensional space :)
Known Issues
- On some phones, glyph lines are barely visible.
- Sometimes (very rare) the application crashes during OC.
- If the application lags during the first deploy, the tessera may project quite strangely, and it will be much more difficult to decipher the glyphs. Redeploy won't help in this case.
- Sometimes the tessera may start "running away," for which the Redeploy button is made.
Technical Requirements
Does anyone know them? If yes, write to @a1mirr, and I'll update the article.
Known glyph sequences
Bolded are the glyphs to wait for to understand the combination (except for the first). Pay attention to L8 combinations starting with Strong - after Strong, you can enter three more glyphs, and only on the fifth does ambiguity arise.
You may find known sequences screenshots here
L8 (22):
- Avoid Chaos Avoid Shapers Lie
- Create Pure Future Human Civilization
- Destroy Lie Inside Gain Soul
- Help Human Civilization Pursue Destiny
- Inside Mind Inside Soul Harmony
- Mind Body Soul Pure Human
- Mind Technology Capture Human Soul
- Portal Potential Help Human Future
- Present Chaos Create Future Civilization
- Protect Destiny Protect Human Civilization
- Protect Human Civilization Shapers Portal
- Protect Human Civilization Shapers Lie
- Protect Human Civilization XM Message
- See Truth See Future Begin
- Shapers Portal Message Destroy Civilization
- Shapers See Complex Path Destiny
- Simple Truth Shapers Destroy Civilization
- Strong Together War Together Chaos
- Strong Together War Together Destiny
- Weak Human Destiny Destroy Civilization
- XM Create Complex Human Destiny
- XM Path Future Destiny Harmony
L6-L7 (18):
- All Chaos Inside Body
- Avoid XM Message Lie
- Change Future Capture Destiny
- Complex Shapers Civilization Strong
- Destroy Complex Shapers Lie
- Destroy Destiny Human Lie
- End Journey Discover Destiny
- Help Shapers Create Future
- Human Soul Strong Pure
- Portal Change Civilization End
- Portal Potential Change Future
- See Truth See Future
- Shapers Message End Civilization
- Simple Message Complex Idea
- Strong Idea Pursue Truth
- Strong Portal Strong Field
- Strong Together Avoid War
- Truth Idea Discover XM
- Weak Portal Weak Field
How to contact the author?
Send suggestions and feedback to Telegram @a1mirr
Greetings
@EchoZer0, @quirischa for proofreading and advices
@InvestigateXM, @sp4cecourgette, @Shooters42 for additional information