Installing and Using OpenZFS on Debian 10 "Buster" Linux
I am running Debian 10 "Buster" Linux in Virtual Box 6.0 Manager on my Win10 Pro Main PC using the debian10-1.0-amd64-netinst.iso file which I downloaded from the Debian Linux download page. This distro was originally installed as a VM using the ext4 filesystem for the primary partition represented as /dev/sda1 in the system. I wanted to experiment with using ZFS (ZetaByte File System) which was originally developed by Sun Microsystems and published under the CDDL license in 2005 as part of the OpenSolaris operating system. I further wanted to investigate this filesystem over others that are traditionally used in Linux, such as ext3/ext4/btrfs because ZFS is known for two specific reasons: (1) It stores large files in compressed format, and, (2) it decouples the filesystem from the hardware or the platform on which it is running. In my specific case, I'm running Debian 10 in a Virtual Machine rather than on bare metal and I'm running Linux, not Windows, MacOS, or BSD.
The implementation of ZFS that I am undertaking, however, isn't ZFS but, instead, is OpenZFS. I chose OpenZFS because unlike ZFS which is a proprietary filesystem developed under Oracle, the latter is opensource and community-supported and licensed under its own opensource licensing. OpenZFS has been ported from FreeBSD to Linux in support of the ZoL (ZFS on Linux) installation on Linux distros like Debian, Arch, Fedora, Gentoo, OpenSuse, RHEL and CentOS, and Ubuntu.
My OpenZFS on Debian 10 "Buster" Linux project was performed by following the steps below:
Step 1: Configure Debian 10 "Buster" Linux by setting it up in Oracle Virtual Box 6.0 Manager running in Windows 10 Pro and installing the operating system using the default ext4 filesystem. Apply all system updates prior to moving to Step 2, then shutdown the system.
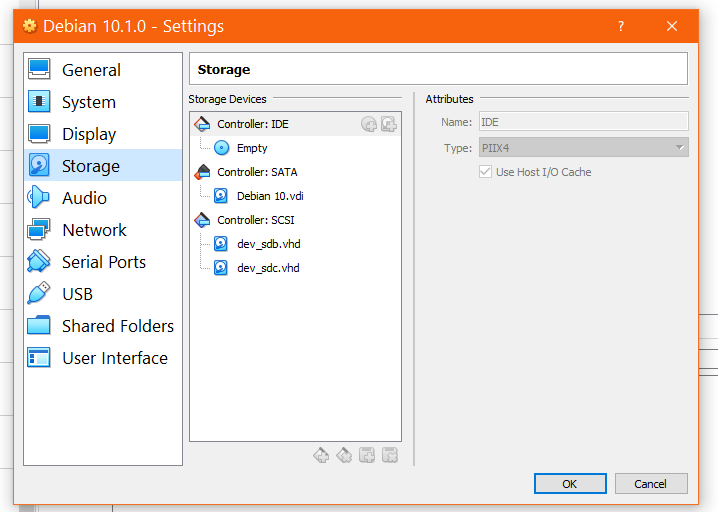
Step 2: Add two VHD SCSI disks in the system designated as /dev/sdb and /dev/sdc, then restart the VM. See the diagram below which shows how I added the SCSI Controller in the Storage module, then added the two VHD SCSI Virtual Hard Drives on the SCSI Controller in the system:
Step 3: For Debian Buster Linux, the ZFS packages are included in the contrib repository. In my case, I used the backports repository which typically contain updated releases of these ZFS packages. I added the backports repository in Debian 10 Buster using the following commands in the Linux Terminal:
# vi /etc/apt/sources.list.d/buster-backports.list
deb http://deb.debian.org/debian buster-backports main contrib
deb-src http://deb.debian.org/debian buster-backports main contrib
# vi /etc/apt/preferences.d/90_zfs
Package: libnvpair1linux libuutil1linux libzfs2linux libzpool2linux spl-dkms zfs-dkms zfs-test zfsutils-linux zfsutils-linux-dev zfs-zed
Pin: release n=buster-backports
Pin-Priority: 990
Step 4: Run a system update to refresh the repositories using
# apt update
and then install the kernel headers and associated dependencies using
# apt install --yes dpkg-dev linux-headers-$(uname -r) linux-image-amd64
And, finally, install the ZFS packages by running
# apt-get install zfs-dkms zfsutils-linux
Step 5: My Debian 10 Buster Linux system was unable to find the zpool command when I started to execute the commands in the Linux Terminal to setup the two SCSI drives as a ZFS mirror pool. So, I had to add the path to the zfs commands so BASH would recognize them. I ran the command:
# whereis zpool
which returned the location to the command as
/usr/sbin/zpool
Therefore, to allow my Linux system to find this command as well as other zfs commands by default, I modified the ~/.bashrc file and added the following line at the bottom of that file before saving it, then restarting the Terminal:
# adding the path to the zpool command in Linux export PATH=$PATH:/usr/sbin/
This makes the $PATH change persistent in the system. To prove this, I ran the command:
echo $PATH
in the Terminal and the following was returned:
/usr/local/bin:/usr/bin:/bin:/usr/local/games:/usr/games:/usr/sbin/
indicating that the $PATH has been extended to include the location for the zfs commands in the system making these commands recognizable by BASH by default.
Next, I created a ZFS Pool using the two SCSI drives /dev/sdb and /dev/sdc I created earlier into a ZFS mirror-0, using the command:
# zpool create zfspool mirror /dev/sdb /dev/sdc
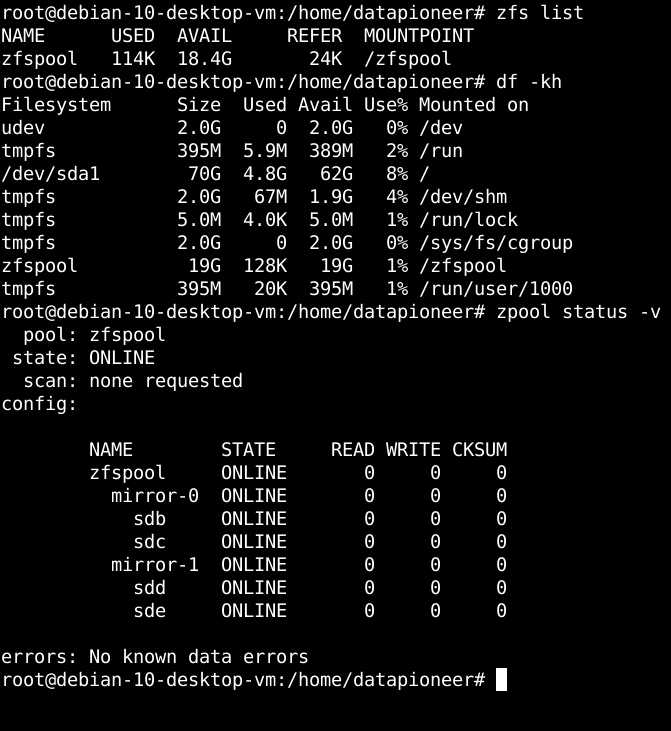
and checked the status of the ZFS pool I just created using the following zpool status command with -v switch, and then running the zfs list command to indicate the amount of pool space currently available and where it is mounted. I followed this up by running the df -kh command to have Linux show me the filesystem breakdown in the system by human-readable blocksize. See these commands listed out below:

Note above that the zfspool is showing up as ONLINE state and both sdb and sdc along with the associated mirror-0 are ONLINE as well. No errors were detected in these drives. The zfs list command shows that 88.5k of data was written to the mirror for administrative tracking purposes leaving 9.3G out of 20G of total drive space (10GB X 2) as available for the zfspool mirrored drive. Also, note that the mount of the zfspool at /zfspool as shown in the diagram above is persistent. It means that by implementing the OpenZFS filesystem using ZoL I am no longer required to update the /etc/fstab file in Linux each time I create a ZFS pool. Thus, the zfspool which was created is not managed by Linux at all. Instead, ZFS manages the pool of two drives, in this example, and automatically mounts the pool as mirror-0 (listing out the drives separately).
Step 6: Now, I want to expand my current zfspool of drives from its current 10G size to 20G by adding a new mirror of two drives designated as /dev/sdd and /dev/sde. To accomplish this, I need to stop the VirtualBox 6.0 Manager VM of Debian 10 Buster, then add two SCSI drives as VHD virtual drives which show up as /dev/sdd and /dev/sde in the Linux system. The process to add these two additional drives in VirtualBox 6.0 Manager is shown below:

Note, we now have two additional drives under the SCSI Controller: /dev/sdd and /dev/sde. Each of these drives were set to a size of 10G.
Next, I use the command:
# zpool add zfspool mirror /dev/sdd /dev/sde
which adds the two SCSI drives to the existing zfspool as mirrored drives. If I then list out the zpool, run the Linux command that displays the existing mount of zfspool and its size, and obtain a current status of the zpool, you can see that I have effectively expanded the existing zfspool I originally created to a size of 20G (doubling the drive space).
Now that I've created mirror-0 by combining /dev/sdb and /dev/sdc as well as mirror-1 by combining /dev/sdd and /dev/sde, I can no longer add more drives to either mirror. However, I can add additional drives by creating additional mirrors.
In ZFS, Pools are the equivalent of Disk Volumes in RAID and other disk-combining systems. Moreover, in ZFS, Datasets are the equivalent of data shares in those other systems. Thus, in the next step, I create my first dataset in ZFS underneath the zfspool mounted at /zfspool.
Step 7: To create a ZFS dataset called data under zfspool, I run the following command, then list out the status of the pool:

This creates zfspool/data mounted at /zfspool/data automatically and 24k of administrative data was written to the pool to keep track of it. Now, if I wanted to add another ZFS Dataset called apps and add another ZFS Dataset called datapioneer underneath the data ZFS Dataset, I can do this in the Terminal as follows:

Step 8: To gain access to the /zfspool/data/datapioneer dataset and permissions to write to it, I can perform the following commands in the Linux Terminal:

Listing the storage looking at directories only, you can see that I now own the /zfspool/data/datapioneer directory and the group owner of this directory is also datapioneer with rwx, r-x, and r-x permissions. This is possible in the Linux Terminal since ZFS has a Posix layer in its ZoL implementation in Linux.