Investigating RAIDZ in Debian 10 "Buster" Linux
Now that we have looked at implementing OpenZFS on Linux in Debian 10 Linux and created zfs pool mirrors using OpenZFS as well as created and accessed ZFS datasets on the system, let's turn our attention to implementing RAID in OpenZFS. How does implementing RAID in OpenZFS compare to traditional RAID solutions? Is there a one-to-one correlation between RAIDZ and traditional RAID? Are there advantages to running RAIDZ rather than the traditional RAID solutions?
RAIDZ in OpenZFS is roughly equivalent to RAID-5 in the traditional RAID world which requires at least 4 drives with one drive serving as a parity drive. RAIDZ (RAID-5) can survive the loss of one drive and still function in the RAID. RAIDZ2 is roughly equivalent to RAID-6 which requires a total of 6 drives with two drives serving as parity drives. RAIDZ2 (RAID-6) can survive the loss of two drives and still function within the RAID-array. RAIDZ3 has no equivalent in traditional RAID.
The first thing that we need to do is to destroy the current zpool arrangement that we established when I showed you how to implement OpenZFS on Debian 10 "Buster" Linux and set up ZFS pools or mirrors in the original article shown in paragraph 1 above. The process of destroying the ZFS pools is irreversible, so if there is any data that is important to you or you want to go back to this OpenZFS configuration, then you should perform a backup by taking a snapshot of the system. We are using VirtualBox 6.0 Manager to create this OpenZFS environment in Debian 10 Linux, so it is very simple to create a snapshot. If you don't know how to create a snapshot of your VM (similar to creating a Restore Point in Windows), then consult this resource on how to accomplish this prior to moving forward.
Before destroying the current ZFS pool configuration, I suggest shutting down the VM and adding some additional SCSI drives. In the example below, I have added three more virtual SCSI drives to the VM. These are /dev/sdf, /dev/sdg, and /dev/sdh for a total of seven SCSI drives in the system.

Now, restart the VM and return to the Terminal in Debian 10. To destroy the current OpenZFS configuration we established in Linux, obtain elevated privileges in the system by becoming root, then run the following command as shown in the diagram below:
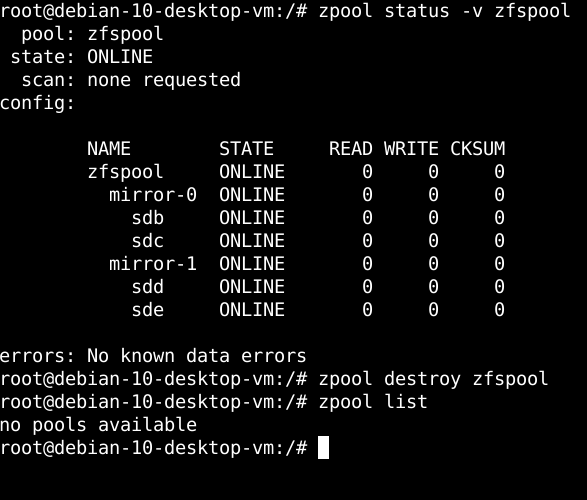
The zpool destroy zfspool command is akin to running rm -Rf <directory name> in Linux as this command will recursively remove all ZFS pools and datasets that currently reside on the system. Rerunning the zpool list command afterward confirms that we no longer have any OpenZFS pools or datasets present in the Linux system. It is worth mentioning here that this command not only removes all OpenZFS pools and datasets, but it also removes any snapshots that may have been taken in ZFS as well as any exports you may have performed and the zfs mountpoints that were created. Therefore, backups are critical at this point as reversing this process is impossible.
So, what is RAIDZ? Essentially, RAIDZ is the implementation of RAID in OpenZFS which is roughly equivalent to RAID-5 using traditional software/hardware RAID in Linux. One primary distinction between RAIDZ and RAID-5 that I would like to mention at this point is that unlike traditional RAID-5, RAIDZ does not read block-by-block when it rebuilds a drive that may be lost in the RAID or that is manually replaced in the RAID prior to failure. Rather, RAIDZ only looks at the data that resides on the SCSI drive(s) that are rebuilt and writes back to the replaced drive(s) only the data not a block-by-block restoration of the drive(s) itself. When OpenZFS restores a RAID drive, it reports that the drive has been "resilvered". We'll see this when I show you how to implement RAIDZ going forward in this article.
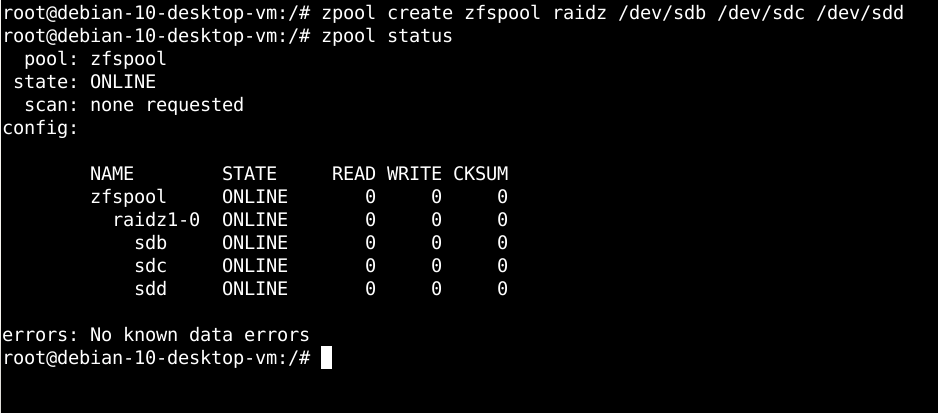
To create a RAIDZ or RAIDZ1 in Linux, I need to run the following command as root, then I can check the status of the newly-created RAIDZ running the subsequent command we've run previously. This process will take a few seconds longer to run since the RAIDZ takes a little more work. Here we are creating an equivalent to a traditional RAID-5 using this one OpenZFS command and attaching three SCSI drives in the process. This RAIDZ will allow us to survive the loss of one drive without losing the RAID:
Now, if I want to add an additional RAIDZ pool under zfspool I can rerun the previous command replacing the "create" option with "add" and changing /dev/sdb, /dev/sdc, and /dev/sdd with /dev/sde, /dev/sdf, and /dev/sdg, respectively. See the diagram below:
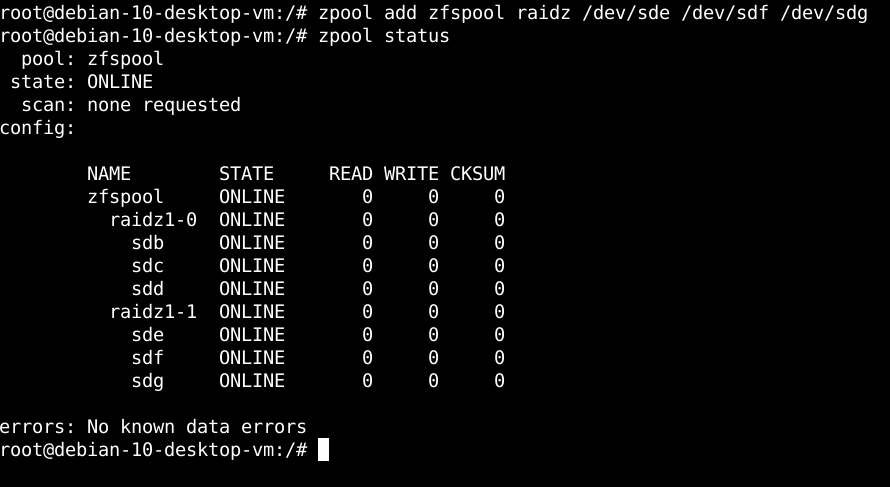
Running a status of the zpool configuration now shows that we have created two RAIDZ mirrors: raidz1-0 and raidz1-1 in the system. The first RAIDZ comprises drives sdb through sdd and the second RAIDZ comprises drives sde through sdg. All of these RAID mirrors are ONLINE and no known errors have been detected in the drives.
If you recall from the previous article on implementing OpenZFS in Linux, we set all the SCSI drives to a 10G capacity. Let's investigate how much drive capacity we have usable among the six 10G-capacity SCSI drives that we have implemented in this scheme:

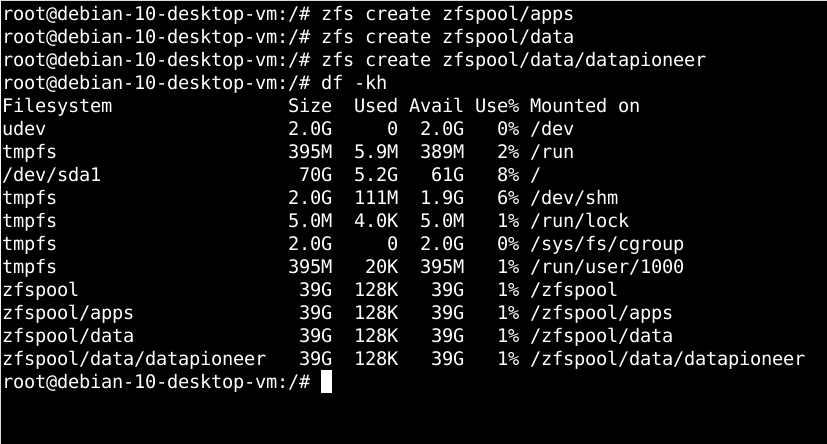
From the diagram above, we see that OpenZFS is reporting a total of 38.1G of usable drive space out of a total of 60G. This is roughly 2/3rds of the available drive capacity among the six SCSI drives. We are losing 1/3rd of the capacity or roughly two SCSI drives to parity. In this RAIDZ configuration, we can survive the loss of a single drive and survive a system-wide data loss. We need to recreate the datasets /zfspool/apps, /zfspool/data, and /zfspool/data/datapioneer that we had previously. This is accomplished in the Terminal like so:
We also need to reacquire the datapioneer dataset we just created which will require us to change ownership of /zfspool/data/datapioneer to datapioneer and group ownership to datapioneer as well as changing the permissions to 755 on this dataset (mounted directory for the zfspool in Linux). See the diagram below:

Running ls -ld against the dataset confirms this has been accomplished. I have written a Bash script which writes data to the zpool we created and made accessible, namely, /zfspool/data/datapioneer. The bash script looks like the following:
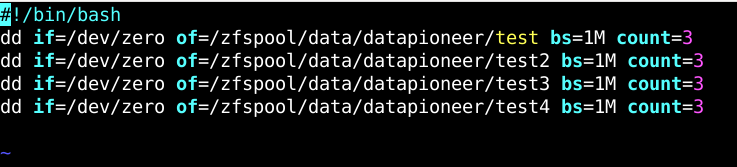
I called this bash script, data.sh., added the executable bit to the file, then ran the script which added 3M X 4 (over 4 tests) of data to the zfspool dataset. To confirm this, we can run the df -kh command in the Terminal. This reveals:
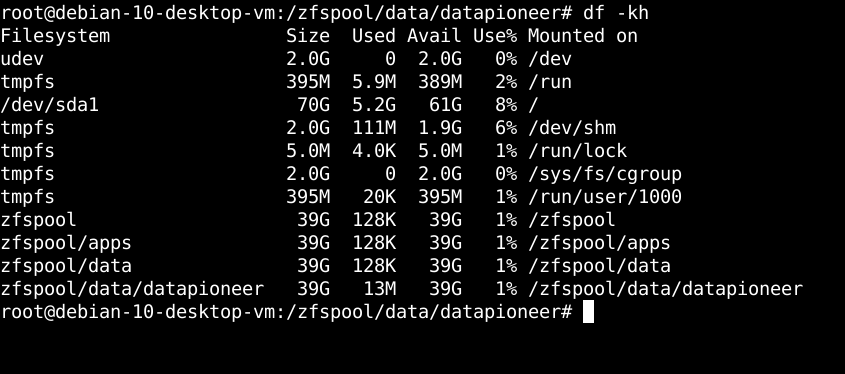
which demonstrates successful writing of ~12M (13M shown) of data to the dataset. Similarly, we can look at this in the GUI by bringing up the File Manager and taking a Properties sheet on the combined files test through test4 that were created in running the bash script:

So, now, let's look at some real world examples of how RAIDZ works. If we return to take a look at the status of the current RAIDZ, we see the following output:

Let's assume that we, as sysadmin, see a bunch of CKSUMs starting to show up on drive /dev/sdc indicating a potential failure in that drive. We can take one of our spare drives, /dev/sdh, and replace /dev/sdc with this spare. To accomplish this on-the-fly using OpenZFS, we run the following command in the Terminal:
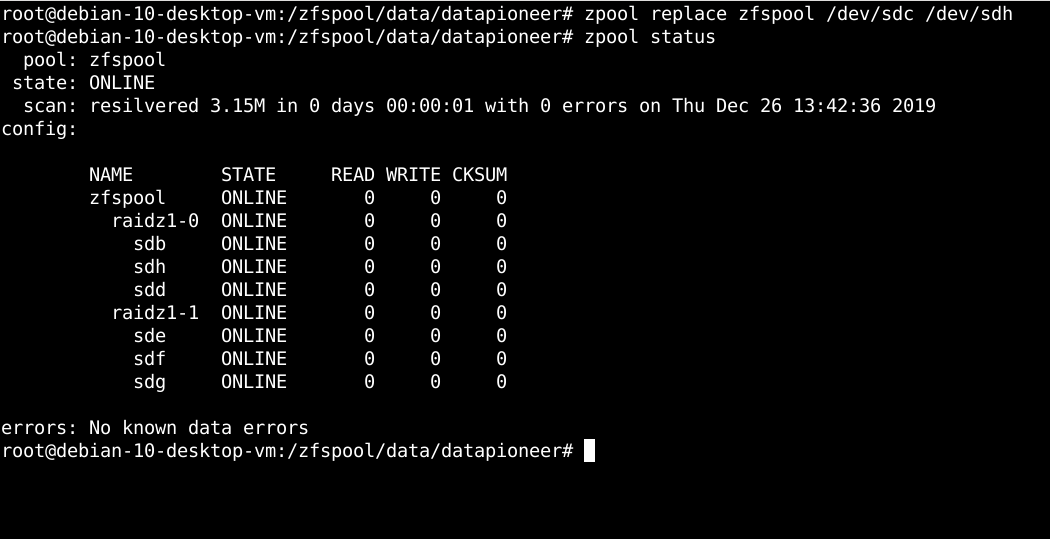
In the command that we ran in the Terminal, we referenced /dev/sdc as the drive to be replaced and /dev/sdh as the drive replacing it. Note, under zfspool / raidz1-0 drive sdc has been replaced by the spare drive, sdh, which is showing up as ONLINE, and the comment following "scan:" indicated the zfspool has been "resilvered" which as I mentioned earlier is the equivalent to a RAID rebuilding of the replaced drive. Note, also, that this process took only 1 second to rebuild since unlike traditional RAID-5, RAIDZ looks only at the 12M of data that it needs to rewrite to the spare drive rather than rebuilding the entire 10G drive block-by-block.
So, now let's look at another real world scenario in which a SCSI drive in the RAIDZ zfspool actually fails. I have replaced /dev/sdh with /dev/sdc once again and then simulated a drive failure in drive /dev/sdc using the following command in the Terminal and outputting the status following the running of the command:
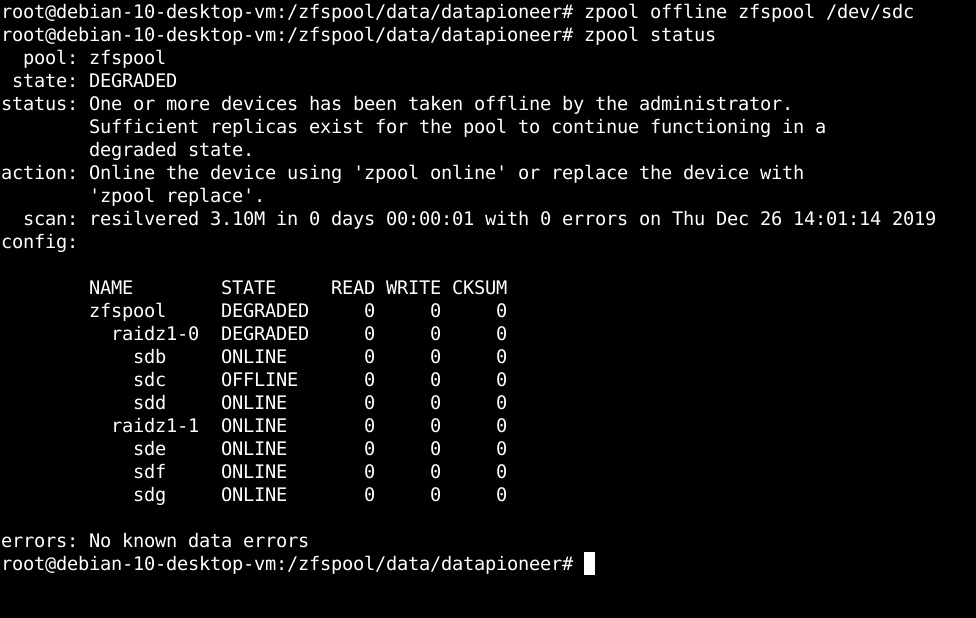
Taking /dev/sdc OFFLINE results in a degraded zfspool which is shown in the "state" of the pool as well as an OFFLINE status for sdc under raidz1-0 with a STATE of "degraded". The "status" reported shows one or more devices has been taken offline by the administrator (simulating the failure) and that "sufficient replicas exist for the pool to continue functioning in a degraded state." The recommended "action" is to "Online the device using 'zpool online' or replace the device with 'zpool replace'."
In this example, we're going to ONLINE the drive /dev/sdc, by running the appropriate command shown below, then rerunning a status to show the current state of the zpool in a non-DEGRADED state:
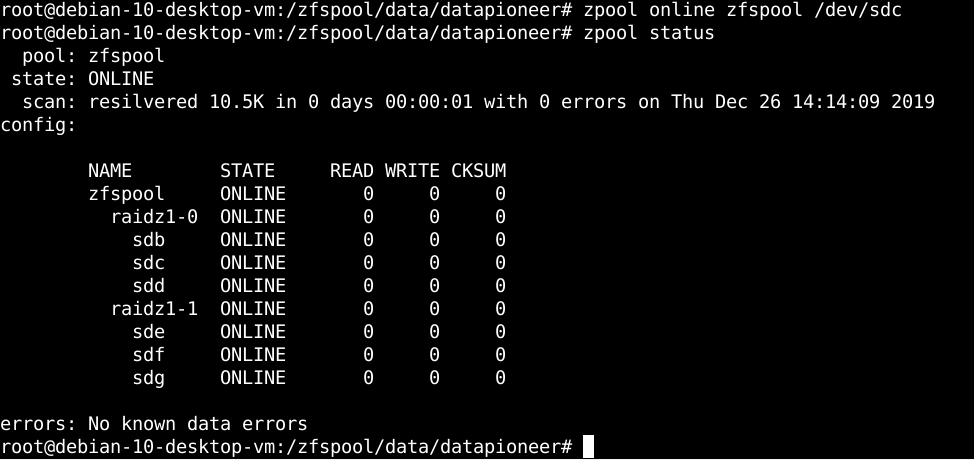
The drive, /dev/sdc, has been resilvered and the entire zfspool has been returned to an ONLINE status from DEGRADED status reported earlier.
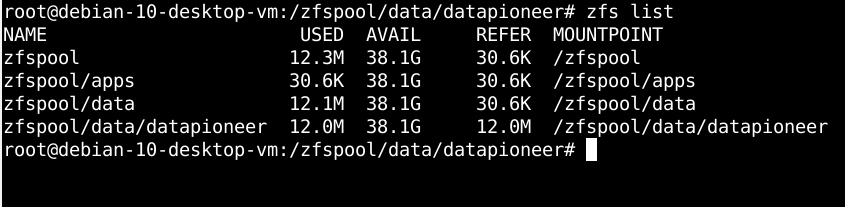
Now, notice that when we run zfs list again in the Terminal, I, as datapioneer, have access to 38.1G of usable drive space across the six SCSI drives and, could theoretically fill that entire space on my own.
But, in OpenZFS, there is a way to limit the amount of this usable space that a single user can consume. This is referred to as establishing a QUOTA on the pool. If I want to limit my quota of usable drive space to 100M rather than the entire 38.1G, I can run the following command in the Terminal:
# zfs set quota=100m zfspool/data/datapioneer
Then, we can confirm this by running the following command and looking at the output in the Terminal:

The quota assigned to datapioneer is listed as 100M, not the full pool of 38.1G. So, if I start creating files that begin to fill up the pool beyond 100M, future actions to create files will be disallowed until action is taken to reduce the amount of used space across the six drives below the quota assigned to me. Granted, 100M of allowed space in today's world seems totally preposterous, but you get the point.
Another good example here would be to run a zfs command that would allow the administrator to reserve 100M of usable space for apps on the pool. Unlike quotas, this is considered a reservation of space that is to be used by apps only so that no one else can use it. To perform this action in OpenZFS against the pool, we can run the following command in the Terminal:
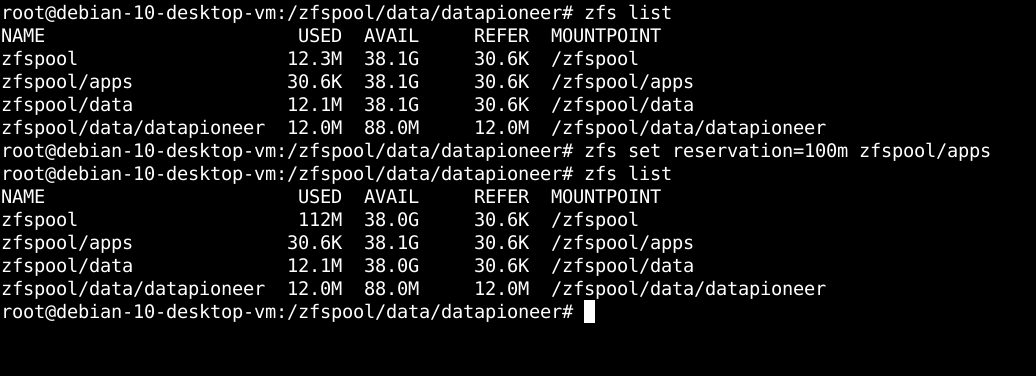
So, by looking at the before-and-after listing of zfs we see that initially there was 38.1G available space in zfspool. After running the reservation using the command shown to reserve 100M of space for apps, the amount of available space in zfspool has been effectively reduced to 38.0G so that others cannot use the difference of 0.1G or 100M.
And, finally, the last thing that I would like to show as an example of a real world scenario using OpenZFS is to simulate a process in OpenZFS that is similar to the process that can be performed in Linux but which is much more difficult to perform in the latter case. What I'm referring to here is this. If you start noticing a drive might be failing or data might begin becoming corrupt on the drive, in Linux you would have to take the drive OFFLINE by umounting the drive (and this could be in a Linux RAID scenario), then run fsck against the drive, getting a status, then returning the drive ONLINE by mounting it if you find there are no errors or if errors have been corrected. One of the beauties of OpenZFS is that a sysadmin can check a drive or the pool of drives in RAIDZ, for example, without having to OFFLINE a particular drive. This process is referred to as a SCRUB in OpenZFS and it can be performed at anytime while the ZFS pool is functioning or on a schedule using Cron. To perform this action manually, you can run the following command in the Terminal:
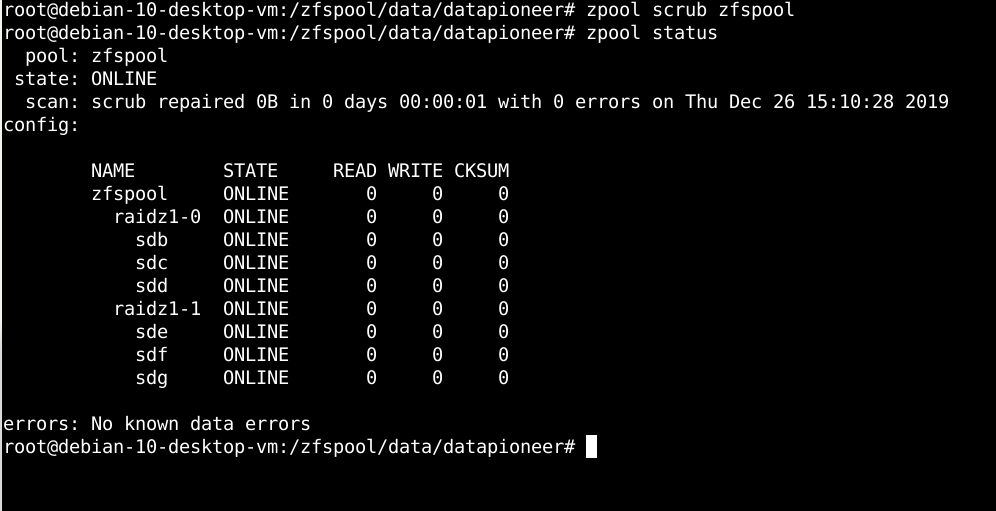
Running the command as shown above performed the scrub scan against the zfspool and it reports that 0B of data was repaired in 1 second. If lots of data were repaired instead, this would be an indication of corruption occurring in the pool and the sysadmin would be alerted to a potentially failing drive that needed action taken to replace.
In a future article, I will look at the implementation of RAIDZ2 and RAIDZ3 and its implications.
Logs, Mirrors, Cache, & Snapshots in OpenZFS in Linux - Part 4