Triple-Fence Defense Strategy For Hardening an SSH Server
Recently, I setup a Raspberry Pi, Model 3B+ in my home (See my previous article entitled: How to Setup Your Own Domain Website on a Raspberry Pi) and one of the first servers that was installed and configured on the Pi was my SSH Daemon server. This server allows me to remote into the Pi to perform administrative tasks as well as install other applications that I have running on the Pi, such as Apache Web Server, vsFTP, PiVPN, Pi-Hole, Node-Red, TinyTiny RSS, and more.
Since the Raspberry Pi that I own is running on RaspbianOS--a variant of Debian 9 Linux called Debian Stretch--I can use the aptitude package manager to install my apps/packages fairly easily. The SSH server running on the Raspberry Pi is really OpenSSH which is the modern open source version of SSH--or, Secure Shell--using the ssh protocol version 2 and listening on port 22. When remote administering the Pi using SSH, I can use either another Linux distro such as Arch Linux or a Windows 10 PC. To run SSH from the Terminal in Arch Linux, use the command:
ssh pi@192.168.1.90
where pi is the standard account user associated with the Pi and 192.168.1.90 is the IPv4 address statically assigned to this device. I do have IPv6 running on the Pi, but for purposes of SSH, I don't use it. Another means I use to create a remote session into the Raspberry Pi is an application running in Windows 10 Pro on my main PC called MobaXTerm. This application allows me to setup a persistent SSH connection to the IPv4 address shown above using the user, pi, to make the connection. As you will see later in this article, this user is the only user allowed to make such an SSH connection to my Pi device. Not even root can log into the Raspberry Pi. Attempting to do so will get you blocked. More on this later in this article.
When making an SSH session connection to a device out on your Local Area Network (LAN), the SSH server installed on the remote device listens on port 22 for requests to connect. In my particular case, I left port 22 as the listening port since changing the port to something else doesn't really offer any significant security enhancements. Techies will tell you that you should change the listening port away from port 22 to another port not already in use in the 1 - 1024 port range, but if a hacker wants to access your remote SSH server, s/he can easily use a port sniffer device or application to determine which port your SSH server is listening on and this defeats any attempt on your part to thwart brute force attacks that they can make on your remote SSH server.
The SSH session connection between you and your remote SSH server encrypts all the data that flows between you and your server in what's referred to as an SSH tunnel. This is a very effective way of accessing your remote device (such as the Raspberry Pi, in my case) so that you can keep the system updated, install apps/packages, and perform other necessary administrative tasks on the device. However, since we aren't consoled into the device via hardwired connection, but rather are making this connection remotely over a wireless connection, if a hacker brute force attacks your SSH server and is able to breach it, then s/he can access the entire device as a standard user or even one with sudo privileges if they are able to remote into the server using the root account. This would give the hacker total access to the device and possibly complete unfettered access to your entire network. This creates a serious security hole in the LAN that must be protected. Sure, one way of handling this is to ensure that you have a good firewall setup on the remote device--which I do--but firewalls represent only one layer of defense and can't be relied upon as the be all and end all method of protecting your assets.
So, how does one go about ensuring that hackers can't perform successful brute force attacks against the SSH server running on your remote device apart from installing and configuring a firewall? Well, in this article, I show you how you can do this in what I refer to as a triple-fence defense strategy:
Defense Layer # 1: Modify the controlling configuration file /etc/ssh/sshd_config to lock down certain aspects of the SSH server to enhance security.
Defense Layer # 2: Install and configure an application called fail2ban that monitors critical authentication logs and bans users who attempt to access your remote SSH server without authority to do so.
Defense Layer # 3: Install and configure an application called DenyHosts which logs entries in the /etc/hosts.deny file on your system that prevents users from even reaching your SSH server to make login attempts once their IPv4 addresses are registered.
I have created a series of videos that show you exactly how to go about implementing these three defense levels on your remote SSH server so I will not describe the process in detail in the article, but instead will let the videos speak for themselves. Invoking these three levels of defense on your remote device to thwart brute force attacks against your remote SSH server constitutes the triple-fence defensive strategy for protecting your LAN while allowing you to administer your remote devices that ultimately control your entire Local Area Network.
Defense Layer # 1: Modifying the /etc/ssh/sshd_config to enhance security
Defense Layer # 2: Installing and configuring fail2ban and fail2ban-client to monitor various critical logs on your system, including the /var/log/auth.log used by the SSH server
Defense Layer # 3: Installing and configuring DenyHosts on the remote device that logs banned IP addresses at /etc/hosts.deny and prevents further attempts on the part of banned users to log into your SSH server.
This process is fairly straightforward. Install DenyHosts using the command:
sudo apt-get install denyhosts
After installation, run the command:
sudo nano /etc/denyhosts.config
and make appropriate changes to this file. See the file below:
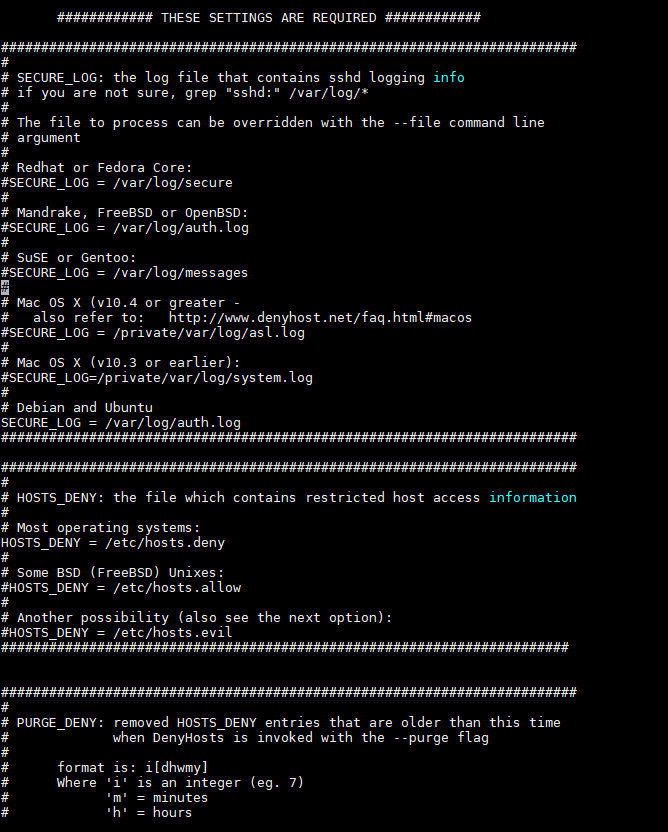
Modifications that I made in my /etc/denyhosts.conf file to further harden my SSH server were the following:
purge_deny = 5d (this uncommented command purges the /etc/hosts.deny file of its entries after 5 days)
purge_threshold = 2 (this uncommented command sets the maximum number of times a host will be purged to 2. On the third event where the same host is captured in the hosts.deny file, when 5 days have elapsed, all entries will be purged from this file with the exception of the host which exceeded the purge_threshold.
BLOCK_SERVICE = sshd (this uncommented command directs DenyHosts to only block the sshd service and no other in the /etc/hosts.deny file.
Deny_Threshold_Root = 1 (this uncommented command is required here even though it is also setup in the configuration of the /etc/ssh/sshd_config file in the initial layer of defense for disabling root's ability to login to the SSH server.
After completing these modifications, you will need to reload the DenyHosts package using the command:
systemctl restart denyhosts
If the denyhosts.service restarts properly, it will look like this when you run the command:
systemctl status denyhosts

This completes the three-layer strategy for hardening your remote SSH server.