June 18, 2021
(LFCS) 4. Networking - 12%

1. Essential Commands - 25%
2. Operation of Running Systems - 20%
3. User and Group Management - 10%
4. Networking - 12%
4.1 Configure networking and hostname resolution statically or dynamically
4.2 Configure network services to start automatically at boot
4.3 Implement packet filtering
4.4 Start, stop, and check the status of network services
4.5 Statically route IP traffic
4.6 Synchronize time using other network peers
5. Service Configuration - 20%
6. Storage Management - 13%
4.1 Configure networking and hostname resolution statically or dynamically
ip addr showShow IP addresses configurationip a sShort syntaxnmtuiNetwork Manager Text User Interface - Graphical interface to manage network connections configuration- Manual means that IP will be configured manually
- Automatic means that will be used DHCP protocol
- NOTE: IP must be inserted with syntax IP/NETMASK (e.t. 192.168.0.2/24)
- All network configuration will be stored in
/etc/sysconfig/network-scripts - If there is need to change IP configuration of an interface without using
nmtuiremember to shutdown interface, change IP, restart interface ip link set eth0 downShutdown interface eth0ip addr add 192.168.0.2/24 dev eth0Assign IP 192.168.0.2/24 to interface eth0ip link set eth0 upRestart interface eth0- The hostname can be changed editing
/etc/hostname hostnameshow current hostname- Alternative:
hostnamectl set-hostname your-new-hostnameset hostname equal to your-new-hostname - Reboot is required to see new hostname applied
- In
/etc/hostsis configured a name resolution that take precedence of DNS - It contains static DNS entry
- It is possible add hostname to row for 127.0.0.1 resolution, or insert a static IP configured on principal interface equal to hostname
- In
/etc/resolv.confthere are configured DNS servers entry - It is possible to insert more than one nameserver as backup (primary and secondary)
4.2 Configure network services to start automatically at boot
Network Manager
- Its purpose is to automatically detect, configure, and connect to a network whether wired or wireless such as VPN, DNS, static routes, addresses, etc which is why you'll see #Configured by NetworkManager in /etc/resolv.conf, for example. Although it will prefer wired connections, it will pick the best known wireless connection and whichever it deems to be the most reliable. It will also switch over to wired automatically if it's there. It's not necessary and many (including me) disable it as most would rather manage their own network settings and don't need it done for them.
systemctl stop NetworkManager.servicesystemctl disable NetworkManager.service
Network
systemctl status networkto check network configuration statussystemctl restart networkto reload network configuration
References:
4.3 Implement packet filtering
- The firewall is managed by Kernel
- The kernel firewall functionality is Netfilter
- Netfilter will process information that will enter and will exit from system
- For this it has two tables of rules called chains:
- INPUT that contains rules applied to packets that enter in the system
- OUTPUT that contains rules applied to packets that leave the system
- Another chain can be used if system is configured as router: FORWARD
- Finally there are other two chains: PREROUTING, POSTROUTING
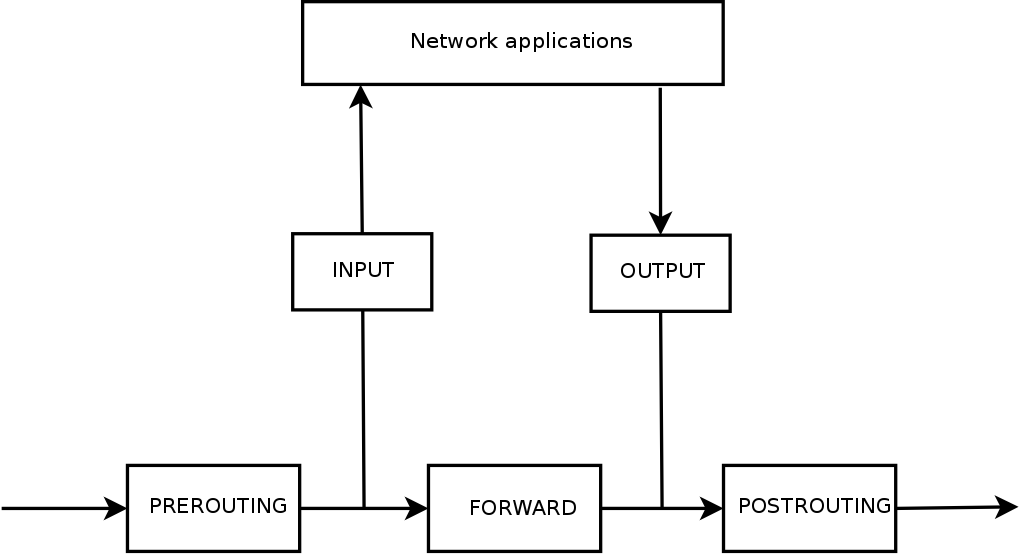
- Picture show the order with which the various chains are valued. The arrows indicate the route of the packages:
- Incoming packets are generated from the outside
- Outgoing packets are either generated by an application or are packets in transit
- The rules inside chains are evaluated in an orderly way.
- When a rule match the other rules are skipped
- If no rules match, default policy will be applied
- Default policy:
- ACCEPT: the packet will be accepted and it will continue its path through the chains
- DROP: the packet will be rejected
- The utility to manage firewall is
iptables iptableswill create rules for chains that will be processed in an orderly wayfirewalldis a service that use iptables to manage firewalls rulesfirewall-cmdis the command to manage firewalld
Firewalld
- firewalld is enabled by default in CentOS
- It works with zone, public is default zone
- The zone is applied to an interface
- The idea is that we can have safe zone, e.g. bound to an internal interface, and unsafe zone, e.g. bound to external interfaces internet facing
firewall-cmd --list-allshow current configuration- services -> service that are allowed to use interface
- ports -> ports that are allowed to use interface
firewall-cmd --get-servicesshows the list of default services- The services are configured in
/urs/lib/firewalld/services /urs/lib/firewalld/servicescontains xml file with service configurationfirewall-cmd --add-service serviceadd service to current configuration- NOTE: it isn't a permanent configuration
firewall-cmd --reloadreload firewalld configuration- NOTE: If a service was added with previous command now it is disappeared
firewall-cmd --add-service service --permanentadd service to configuration as permanent- NOTE: Now if firewalld configuration is reloaded service it is still present
firewall-cmd --add-port 4000-4005/tcpOpen TCP ports from 4000 to 4005firewall-cmd --permanent --direct --add-rule ipv4 filter OUTPUT 1 -p tcp -m tcp --dport 80 -j ACCEPT- Add a firewall rule using iptables syntax
- This add permanently a rule as first in OUTPUT chain to allow connections to TCP destination port 80
iptables
- The
firewallddaemon can be substitute withiptablesdaemon (the configuration that was in place until recently) systemctl stop firewalldiptables -L- More verbose output
iptables -L -v - Show configuration of iptables chains
- Note that policies is set equal to ACCEPT for every chain. This means that no package will be rejected. This is equal to have a shut downed firewall
systemctl disable firewalldyum -y install iptables-servicessystemctl enable iptables- With this configuration rules must be inserted
iptables -P INPUT DROP- Set default policy to DROP for INPUT chain
- iptables rules syntax:
iptables {-A|I} chain [-i/o interface][-s/d ipaddres] [-p tcp|upd|icmp [--dport|--sport nn…]] -j [LOG|ACCEPT|DROP|REJECTED]{-A|I} chain-Aappend as last rule-Iinsert. This require a number after chain that indicate rule position[-i/o interface]- E.g.
-i eth0- the package is received (input) on the interface eth0 [-s/d ipaddres]-sSource address. ipaddres can be an address or a subnet-dDestination address. ipaddres can be an address or a subnet- [-p tcp|upd|icmp [--dport|--sport nn…]]
-pprotocol--dportDestination port--sportSource port-j [LOG|ACCEPT|DROP|REJECTED]ACCEPTaccept packetDROPsilently rejectedREJECTEDreject the packet with an ICMP error packetLOGlog packet. Evaluation of rules isn't blocked.- E.g.
iptables -A INPUT -i lo -j ACCEPT- Accept all inbound loopback traffic
iptables -A OUTPUT -o lo -j ACCEPT- Accept all outbound loopback traffic
iptable -A INPUT -p tcp --dport 22 -j ACCEPT- Accept all inbound traffic for tcp port 22
iptable -A OUTPUT -m state --state ESTABLISHED,RELATED -j ACCEPT- This is a rule that is used to ACCEPT all traffic generated as a response of an inbound connection that was accepted. E.g. if incoming traffic for web server on port 80 was accepted, this rule permits to response traffic to exit from system without inserting specific rules in OUTPUT chain
- NOTE file
/etc/servicescontains a list of well know ports with services name
References:
4.4 Start, stop, and check the status of network services
- Network services are controlled as other daemon with
systemctlcommand systemctl status servicename- With
netstatis it possible list internet port opened by a process yum -y install net-toolsnetstat -tln- Show TCP port opened by processes
4.5 Statically route IP traffic
ip route show- Print route
- Alternative command
route -n ip route add 192.0.2.1 via 10.0.0.1 [dev interface]- Add route to 192.0.2.1 through 10.0.0.1. Optionally interface can be specified
- To make route persistent, create a route-ifname file for the interface through which the subnet is accessed, e.g eth0:
vi /etc/sysconfig/network-scripts/route-eth0- Add line
192.0.2.1 via 10.0.0.101 dev eth0 service network restartto reload fileip route add 192.0.2.0/24 via 10.0.0.1 [dev ifname]- Add a route to subnet 192.0.2.0/24
- To configure system as route forward must be enabled
echo 1 > /proc/sys/net/ipv4/ip_forward- To make configuration persistent
echo net.ipv4.ip_forward = 1 > /etc/sysctl.d/ipv4.conf
References:
4.6 Synchronize time using other network peers
- In time synchronization the concept of Stratum define the accuracy of server time.
- A server with Stratum 0 it is the most reliable
- A server synchronized with a Stratum 0 become Stratum 1
- Stratum 10 is reserved for local clock. This means that it is not utilizable
- The upper limit for Stratum is 15
- Stratum 16 is used to indicate that a device is unsynchronized
- Remember that time synchronization between servers is a slowly process
CHRONYD
- Default mechanism to synchronize time in CentOS
- Configuration file
/etc/chrony.conf serverparameters are servers that are used as source of synchronizationchronyc sourcescontact server and show them statuschronyc trackingshow current status of system clock- NOTE: if some of the commands below doesn't work please refer to this bug https://bugzilla.redhat.com/show_bug.cgi?id=1574418
- Simple solution:
setenforce 0 - Package
selinux-policy-3.13.1-229should resolve problem
NTP
- The old method of synchronization. To enable it Chronyd must be disabled
- Configuration file
/etc/ntp.conf serverparameters are servers that are used as source of synchronizationntpq -pcheck current status of synchronization