Tirador Step-by-Step Guide
Guide also available in Russian and Spanish
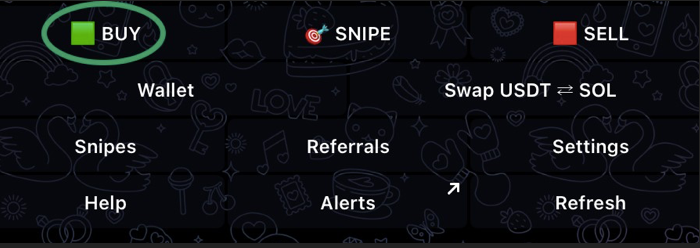
Main Menu
Once you tap START, the main menu will open. You can return to this menu anytime by using the /start command.

- BUY - Access the buy page to select token to buy
- SNIPE - Access the snipe page to select token to snipe
- SELL - Access the sell page to select token to sell
- Wallet - Manage your funds, swap USDT to SOL, reset your wallet, and more
- Swap USDT<>SOL - Swap USDT to SOL or vice versa on the swap page
- Snipes - Manage your active snipes on the snipes page
- Referrals - Explore the referral program, including detailed info about your earned referral bonus
- Settings - Customize Tirador to suit your needs on the settings page
- Help - Find answers to frequently asked questions and support contacts on the help page
- Alerts - Telegram channel with token alpha alerts
- Refresh - Button to refresh the current page and update your wallet balance
BUY
Before explaining the standard buy process, note that at any time, in any menu section, you can send the bot the token's address, and the buying process will begin. Everything is designed for your speed and convenience ;)
2. A menu opens with trending coins according to the service birdeye.so
You have two ways to buy a token:
- You can select a token from the list by tapping the corresponding button. Below the buttons, there is an arrow you can tap to scroll through the list of available tokens.

- You can send the bot the address of the token you want to buy. You can find the address in our info channels or other sources, such as platforms where they are created (Moonshot, pump.fun).
After selecting a token, a menu opens.

- BUY<> SELL - Go to the token sale menu if you own the token
- Refresh - Update information about the token
- Solscan / RickBurp / RugCheck - Links to services where you can get more information about the token (which services to show can be configured in the settings)
- BUY 0.5 / BUY 0.3 SOL - Quick buy for a specified amount of SOL (you can set these values in the settings)
- BUY X SOL - Specify the amount of SOL you want to use to buy this token
*To make your trades more profitable, we recommend making transactions of 0.05 SOL. The Solana network has a small but fixed fee. For a transaction of 10 SOL and 0.001 SOL, Solana will charge the same fee. However, with 0.001 SOL, this fee can consume a large portion of your profit, even if your P&L is 100%.
After setting the amount, double-check all the buy details. If everything is correct, tap CONFIRM.
*You can skip the confirmation step by disabling confirmations in the buy settings. This will make your trades even faster.
The buy is complete when you see the message: ✅ SUCCESSFUL TRADE
You can check the presence of the token and its current price by using the SELL button in the Main menu.
*If the buy was not successful, your SOL will not be deducted and will remain in your wallet balance.
Important addition: There are two significant buy settings:
- Anti MEV - A setting that protects against sandwich attacks. It is a paid feature, costing XX per transaction, and it may make transactions a bit slower, but it protects you from scammers and helps you preserve your profit.
- Txn priority - Transaction priority. By increasing the network fee, you can speed up transaction execution.
You can make all these settings in the Settings menu.
SNIPE
SNIPE, or How to Buy a Token in the First Seconds of Its Launch?

After tapping SNIPE in the main menu, you'll see a list of tokens available for sniping.
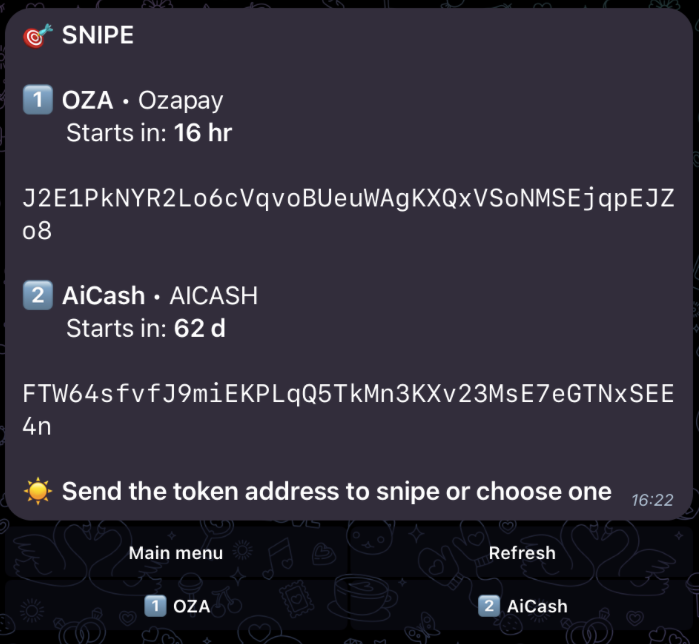
You have two ways to snipe a token:
1. Select a token from the list by tapping the corresponding button. Below the buttons, there is an arrow you can tap to scroll through the list of available tokens.
2. Send the bot the address of the token you want to buy. You can find and select a token and get its address in our info channels or other sources, such as platforms where they are created (Moonshot, pump.fun).
After selecting a token, a menu opens.

- Refresh - Update information about the token
- Solscan / RickBurp / RugCheck - Check services where you can get more information about the token
- BUY 0.5 / BUY 0.3 SOL - Make a quick buy for a specified amount of SOL (you can set these values in the settings)
- BUY X SOL - Specify your own amount of SOL you want to use to buy this token
*To make your trades more profitable, we recommend making transactions of 0.05 SOL. The Solana network has a small but fixed fee. For a transaction of 10 SOL and 0.001 SOL, Solana will charge the same fee. However, with 0.001 SOL, this fee can consume a large portion of your profit, even if your P&L is 100%.
The next step is to set the slippage.
Slippage - This is the price change you're willing to accept when buying. You can learn more about it here.

After setting the slippage, double-check all the sniping details.

And if everything is correct, tap CONFIRM.
The snipe is created! Congratulations! Now you will be among the first traders to receive this token in the first seconds of its launch.
SELL
Select SELL in the Main Menu.

In this menu, you'll see all the tokens you own, their current prices, and the current profit level for these tokens—P&L.
You can select a token to sell by tapping the button with the token's name.
After selecting, you'll see detailed information about the token and the upcoming transaction:

At the bottom, you can choose what percentage of your tokens you want to sell. By tapping the SELL X% button, you can set your own value.
In the next message, you'll see the final details of the transaction. Double-check them, and if everything is correct, tap the CONFIRM button.

*This confirmation step can also be disabled in the sale settings.
If you see the screen below, the transaction was successful—congratulations!

On this screen, you see the final values of the transaction and a nice image showing your profit, which you can proudly share on social media :)
This image and the text below include your referral link. When people who came through your link start trading, you'll earn up to 31% of the commissions they pay.
More details about the referral program conditions are provided below.
LIMIT ORDERS
Select a token for buy or send the address to the bot, and in the BUY menu, you will see the Limit order button.


If everything is OK, you’ll see this message:

By clicking on Orders, you'll find all your active orders.
Selling works the same way with the same settings. To set a Limit order for selling, go to the SELL menu and select a token.
REFERRAL PROGRAM
By tapping the Referrals button, you access the referral program menu.

The referral program is an opportunity to earn alongside those you invite to Tirador Bot. You can earn up to 31% of the commissions paid by traders who came through your link. The 31% is distributed among 3 levels:
1st Level - 25%: Referrals who joined through your link
2nd Level - 5%: Referrals who joined through the link of your 1st level referrals
3rd Level - 1%: Referrals who joined through the link of your 2nd level referrals
To receive these payments in full, you need to maintain a trading volume of 1 SOL over the past 7 days. (If you buy/sell 0.1 SOL ten times, your total volume is 1 SOL)
Lifetime bonus - The total amount of referral bonuses earned over time
Claimable bonus - The amount of referral bonuses available for withdrawal
Your referral link - This is your link; when people register through it, they become your referrals, and you earn a percentage of their commissions.

Settings
Tapping the Settings button opens the settings menu.

Buy settings - Settings related to buying tokens:
- Anti-MEV - Protection against sandwich attacks
- Auto buy - Automatic buy and its amount. With this option enabled, the bot will automatically buy the specified amount if you send the token address in the chat
- Buy buttons - Values on the buttons for quick buys in the BUY menu
- Slippage - Set the acceptable slippage value for buys
You can learn more about this here.
- External links - Configuration of service buttons where you can get more information about the token. You can add your favorite services for quick access
- Sell settings - Settings related to selling tokens. The purpose of these settings is the same as for buying, but here you configure the selling process
Slippage is the difference between the expected price of a trade and the actual price at which the trade is executed. This can occur due to high market volatility or insufficient liquidity, where large order volumes affect the asset's price.
Why set slippage before buying a token:
- High Volatility: Tokens often experience high volatility, leading to rapid price changes.
- Execution Guarantee: Setting an acceptable level of slippage ensures that your order is executed even if the price changes during the transaction.
- Avoiding Rejections: Without slippage settings, your order might be rejected if the price moves beyond the acceptable range.
Thus, setting slippage helps traders successfully execute orders in the rapidly changing token market.